Insert Jacquard Back and Make Further Settings
I. Assign Jacquard Back:
- 1
- Create a row selection via the control column.
- or –
Select the Jacquard motif by the Rectangle drawing tool. - 2
- Positioning the cursor in the pattern area.
- 3
- Call-up the Selection / Jacquard... context menu.
- The Create Jacquard [New Pattern] dialog box appears.
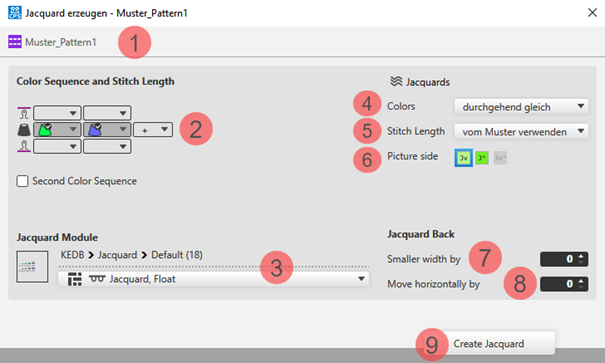
- 4
- Select in the dialog box under
 Jacquards -> Colors -> Minimum per row and column (yarn bridges).
 - 5
- Select the desired Jacquard Module for the back under Jacquard Module
- 6
- Make further settings if desired:
- Color Sequence
- Picture side
- Quantity of needles for Jacquard Back Smaller width by
- 7
- Apply the settings to the pattern with the Create Jacquard button.
- 8
- Close the dialog box by
 .
.
- The inserted Jacquard appears with the corresponding symbol within the pattern.
II. Settings for yarn carriers (color areas):
- The motive is created in the
 Design Pattern.
 - The
 Yarn Carriers document window is open.
- 1
- Open the Yarn Carriers tool window via
 Show Yarn Carriers. The Color Parameters table appears in the tool window.
 - 2
- Make the desired settings for yarn carriers (color areas):
- General Section
- Knitting-in Section
- Knitting-out Section
- Structure Section
III. Settings for Yarn Carriers and their Home Positions:
- The motive is created in the Design Pattern.
- The Yarn Carriers document window is open.
- 1
- Open the Yarn Carriers tool window via Show Yarn Carriers.
- 2
- Make the settings for the yarn carriers and their home positions:
- Allocate a yarn carrier from the pattern to a yarn carrier of the start.
- Change the home positions of yarn carriers.
- Yarn Carrier Type
- Knit-in before Start
IV. Changing the Default Settings for Intarsia Jacquard:
 : By default, a module for net pick-up for Intarsia Jacquard are assigned to each pattern in the Pattern Project.
Possibilities for changing the module allocation:
- In Configuration -> Jacquards tab -> Block Jacquard section : Changes will apply to all patterns of the Pattern Project .
- In the Home ribbon under
 Tool Windows, open the Jacquards tool window.: Individual changes regarding the desired Jacquard area
 - In the context menu on the design view -> select Open Jacquards....: Individual changes regarding the desired Jacquard area