Creating the shape as lined shape in the pattern project
Open the  Shapes tool window:
- 1
- In the Home ribbon under
 Tool Windows, select the Shapes tool window.
 - In the tool window, the existing shapes of the pattern project are displayed.
- 2
- Place the cursor in the tool window and open the context menu.
- 3
- Select Create New Shape of Size M... in the context menu.
- The New Lined Shape dialog box will appear.
- 4
- Select the desired input format.
- 5
- Confirm with the OK key.
- The new lined shape (basic shape) is graphically displayed in the Shapes tool window and in a new document window
 as rectangle.
 : The default attributes will be used for the shape edges of the lined shape.
 - 6
- For creating a lined shape based on the displayed rectangle click the Properties button in the ribbon under Line Table.
- or -
Use the graphic displayed in the document window. - 7
- Create the desired shape lines.
- or –
Import the existing shape into the pattern project. - 8
- Allocate the desired shape line attributes to the shape line.
: You may use the method you prefer as both views are always adjusted to each other.
|
Basic Shape: Front |
|
|
|
Shape Element Type: Neckline symmetric |
|
|
Create the Dart type of shape element for the left and right hand side.
- In the Line Table
- Position the cursor to the display pane of the line table.
Call-up the Add New Shape Element -> Dart -> Asymmetrically context menu.
 - In the document window
- Place the cursor within the basic shape.
Call-up the Add New Shape Element -> Dart -> Asymmetrically context menu.
:
The Dart shape element contains aligning  or
or  .
.
| Align to the right | Symbol is used in the shape element dart on the left side of the basic shape. |
| Align to the left | Symbol is used in the shape element dart on the right side of the basic shape. |
- 1
- Open the lines of the created shape element in Line Table in order to define presets of the line.
- or -
Open the line by double click on the desired shape line. - 2
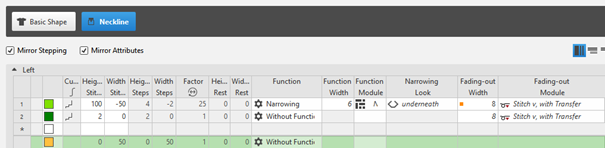
- Enter the values for the dart at the left:
- Step width for narrowing or widening: 1 needle
- Width of narrowing or widening: 1
- 3
- Allocate shape lines and attributes.
- Shape line for narrowing:
- e.g. Narrowing, separate transfer
- Shape line for widening
- Widening, Transferring outward, Standard
- Widening, Transfer outward, Closing Stitch
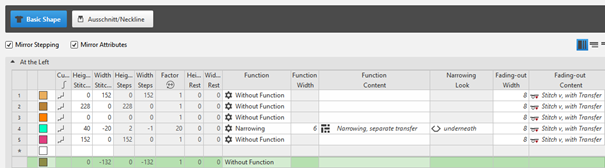
: The first created Dart shape element is linked to the left side of the basic shape leading to the line table At the Left.
Dart type of shape element for the left side of the basic shape |
|

- 4
- Call-up the Duplicate context menu of the shape element.
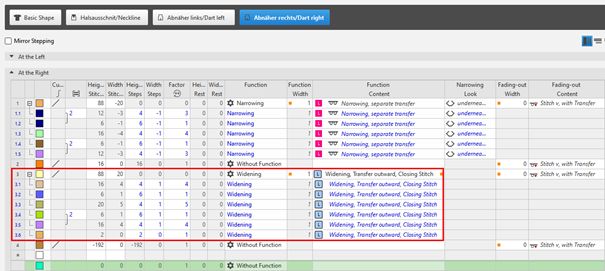
: The doublicated shape element is linked to the right side of the basic shape leading to the line table At the Right.
Dart type of shape element for the right side of the basic shape |
|
Link and position the Dart shape elements:
- A basic shape is created with the shape elements for the left and right Dart.
- 1
- Select the right Dart shape element
- The line with the anchor appears.
- 2
- Take the desired anchor at the cursor by LMB.
- 3
- Move the cursor to another shape line point with the LMB pressed.
- 4
- Release the left mouse button.
- The shape element is linked to this shape line point.
- 5
- Open the input window by double-click on the selected shape element.
- or -
Open the input window by double-click on the coordinate display. - 6
- Change the coordinates of Distance X: and / or Distance Y: if necessary.
- The shape element is correctly linked and is at the correct position.
- 7
- Continue with the second Dart shape element.