Assign the Jacquard Modules to the Jacquard Areas
I. Assign the Jacquard Module:
- 1
- Create a row selection via the control column.
- 2
- Positioning the cursor in the pattern area.
- 3
- Call-up the Seleção / Jacquard... context menu.
- The Gerar Jacquard [Nova amostra] dialog box appears.
|
| |||
|
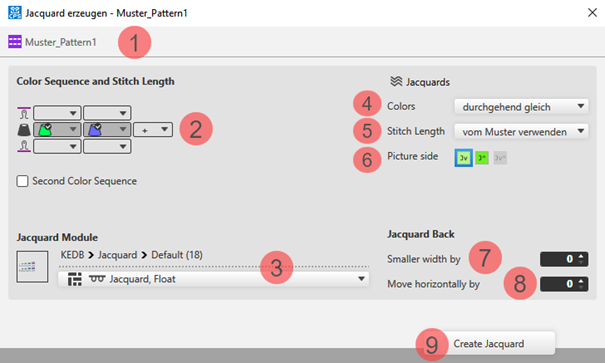
1 |
Display of the active document window | ||
|
2 |
Seqüência de cores e graduação | ||
|
|
Display or edit box for the stitch length per color / rear system
| ||
|
|
Display of the used colors in the selection in the color sequence from the left | ||
|
|
Display or edit box for the stitch length per color / front system
| ||
|
Segunda seqüência de cores | |||
|
|
|
Default Setting | |
|
|
Definition of the color sequence for the second pattern row is possible.
| ||
|
3 |
Módulo de Jacquard | ||
|
|
Displays the selected Jacquard module.
| ||
|
Display of the path of the selected directory in the Knit Explorer | |||
|
Selection list | |||
|
| |||
|
4 |
Cores |
Selection list for the knitting sequence of the colors
| |
|
5 |
Graduação |
Selection list for the stitch length
| |
|
6 |
Face da imagem |
Selecting the desired face of picture of Jacquard
| |
|
Avesso do Jacquard | |||
|
7 |
mais estreito em |
Specification in case of Jacquard with yarn bridges, by how many needles the back side is to be narrower then the face of picture | |
|
8 |
deslocar horizontalmente em |
Specification in needles for shifting the Jacquard horizontally | |
|
9 |
Gerar Jacquard |
The changes made in the dialog box will be applied to the pattern. | |


 for selecting the desired Jacquard module in the specified directory
- 4
- Make the desired presets in the Gerar Jacquard [Nova amostra] dialog box.
- 5
- Apply the presets to the pattern with the Gerar Jacquard button.
- 6
- Continue:
Create the next selection for a new Jacquard area.
- or -
Exit working in the dialog box by Fechar.
- The different Jacquards are displayed with different symbols in the pattern.
II. Changing the default settings for Block Jacquard:
 : A module for net pick-up and net ending are assigned by default to each pattern in the Projecto de amostra for Block Jacquard.
Possibilities for changing the module allocation:
- In Configuração -> Jacquard tab -> Block-Jacquard section: Changes will apply to all patterns of the Projecto de amostra .
- Select ribbon, Início ->
 Janela de ferramentas ->
  Jacquards tab.: Individual changes regarding the desired Jacquard area
 - Select the context menu -> Abrir Jacquards...
: Individual changes regarding the desired Jacquard area