How to Define Knitting Ranges with Different Knitting Modes
Knitting Areas
- An area with knitting mode can be assigned to every point (shape point or marking point), where it starts in the pattern.

- Areas can be defined as knitting range with:
- Color for stripes and sequence of stripes
- Needle action for simple structures
- Stitch Length
- Stitch Density
- The knitting range overwrites the basic pattern in this area.
- The complete shape width determines the width of the stripe.
- A value can be specified as height of the stripe.
This value can be either a fixed value, an independent or a dependent dimension.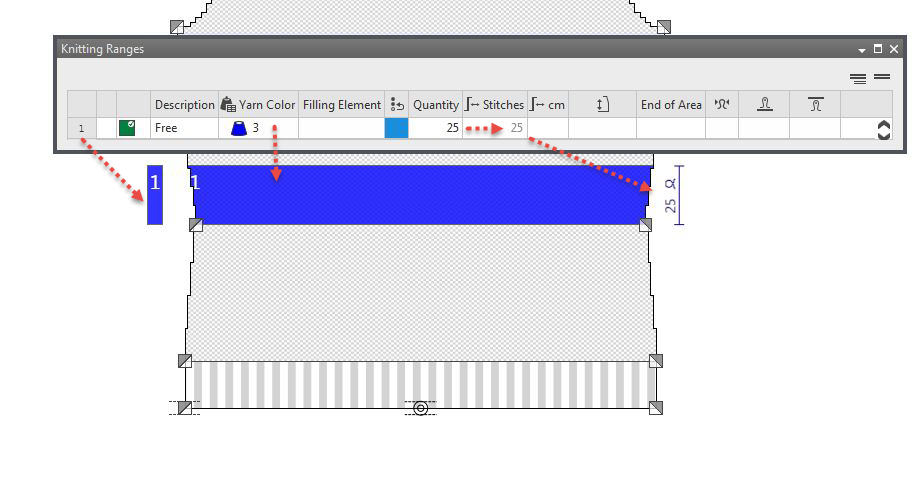
- A fixed value in relation to the height of the reference point can be specified as height position of the stripe.
- For colored stripes the area can be divided into a sequence of sub-stripes.
- The color areas can easily be filled with modules and pattern elements on the M1plus via find and replace.
How to do it:
- The dimensioned shape is open.
- 1
- In the Parameter ribbon select the
 symbol.
 - The Knitting Ranges tool window appears.
- 2
- In a free row, in the
 column select any desired identification color.
 - 3
- Enter an application note in the Description column.
- 4
- Select a yarn or plating color in the
 column.
- 5
- Select an element in the Filling Element
 column.
 - 6
- Activate the check box in the
 Round to Courses column if necessary.
With it you will get knitting ranges in an even-numbered height. - 7
- Enter the desired number of repeats of the filling element in the Quantity column.
- The calculated height of the area by cm appears in the
 Stitches column.
 - 8
- Enter the stitch density of the area in the
 column.
 - The calculated height of the area by cm appears in the cm column.
In case you entered the Inch unit, the calculated height of the area appears in inches. Note
Note
Different stitch densities within the fabric pieces may require Doubling!
Check the transitions to a different stitch density within the pattern. - 9
- Enter stitch length at the front in the
 column.
 - 10
- Enter stitch length at the back in the
 column.
Note
Alternatively select a measure or a formula in order to define the height of the knitting range in the  column.