Step by Step to 'Pattern-12A'
- The pattern project of pattern ‚Pattern-12‘ is open.
- 1
- Select ‚Muster_Pattern_12 in the tool window.
- 2
- Open the context menu with RMB and select Deseni çoğalt... .
- The Deseni kesim ile çoğalt -xxx dialog box appears.
- 3
- Rename the pattern.
- 4
- Activate Selection
 Kesimlerden kopyalar oluşturulsun mu?.
 - The pending shape of ‚Patten-12‘ will be duplicated as well.
- 5
- Rename the shape if necessary.
- 6
- Close the dialog box with the OK button.
- 7
- Select the
 Kesimler tab.
 - 8
- Select the duplicate of the shape.
- 9
- Open the shape by double-clicking.
- 10
- In the Çizgi tablosu tool window, position the cursor in the area beside the
 Ana Kesim button, open the context menu with RMB and call-up Yeni kesim elemanı ekle....
- or -
Position the cursor in the document window (graphic), open the context menu with the RMB and select Yeni kesim elemanı ekle.... - 11
- Select Asimetrik in the
 Tiktak selection menu.
 - 12
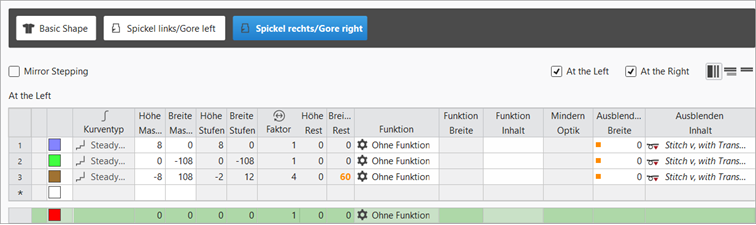
- Open the line table of the new shape element and enter the desired values.
- The newly created shape element is displayed in the graphic and in the line table as well.
|
Shape Element Type: Gore asymmetrical |
|
|
|
|
- 13
- Select Tiktak shape element.
- 14
- Open the context menu with RMB and select
 Dikey döndür.
 - 15
- Then open the context menu again -> select Yansıtarak çoğalt.
- New knitting element is saved and is displayed in the basic shape.
- 16
- To position a Tiktak shape element, open the input window by double click and enter the coordinates.
- or –
Place the shape element at the desired position with the LMB pressed. - 17
- Position both Tiktak shape elements below the collar.
 : When positioning, pay attention to the knitting technique (carriage direction)!
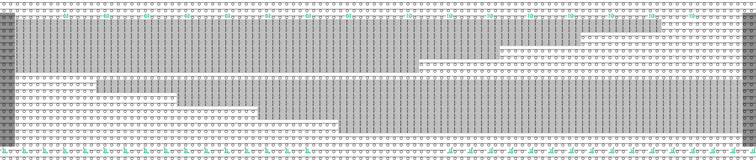
- 18
- Click the
 Başlat button under Önizleme in the Mekikler ribbon.
 - The document window is opened as view and the Mekikler ribbon appears.
- 19
- Open the dialog box via
 Mekikleri göster.
 - 20
- If necessary, make the desired settings for allocating yarn carriers.
- 21
- Start the
 Teknik
işlem:
Teknik
işlem: Show symbol view after technical processing.
 - 22
- Generate
 Sintral.
 - 23
- Start the
 Sintral Kontrolü.
 - 24
-
 Genişlet the knitting program.
- A program for the knitting machine will be created: CMS530.Pattern-12.zip.
- Load knitting program into the machine.
: The extracted file CMS530.Pattern-12A.zip can be loaded onto the machine with an USB stick or via Ethernet.