Options to draw stitch lengths in the design pattern
I. Apply stitch lengths from knitting element to the control columns when drawing:
- The control columns
 and
and  of the knitting element 1x1 half cardigan contain different stitch lengths.
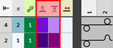
- 1
- Select a knitting element.
- The cursor attributes window with the currently available attributes appears.
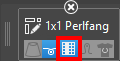
- 2
- Via the marked 应用控制列 button make the desired setting for drawing:
- Enabled
Stitch lengths from the knitting element are entered in the control columns. - Disabled
Stitch lengths from the knitting element are not entered in the control columns.
- 1
- Draw the knitting element in the design pattern.
- The stitch length is present in the control column and is therefor valid for the entire pattern row. No Power Tension Setting (NPJ) is created.
II. Apply stitch lengths from knitting elements exactly to the needles when drawing into the design pattern:
- In the knitting element 1x1 half cardigan there are entered different stitch lengths in the needle actions.
- 1
- Select the 1x1 half cardigan knitting element in the 编织资源管理器.
- 2
- Copy it to the 编织元素 tool window
 打开 tab with drag-and-drop.
 - 3
- Open the copied knitting element with double-click.
- 4
- In the status bar of the knitting element editor, switch from
 花型颜色 to
  线圈长度.
线圈长度. - 5
- In the area of the needle actions draw-in the desired stitch length.
- 6
- Accept the changes with the
 应用 button.
 - 7
- Close the Knitting Element editor.
- 8
- Select a knitting element.
- The cursor attributes window with the currently available attributes appears.
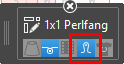
- 9
- Via the marked 应用线圈长度 button make the desired setting for drawing:
- Enabled
Stitch lengths from the knitting element will be applied to the design pattern. - Disabled
Stitch lengths from the knitting element will not be applied to the design pattern.
- 1
- Draw the knitting element in the design pattern.
- Now, different stitch lengths for PTS exist in one knitting row.
III. Draw stitch lengths from the table needle-exactly into the design pattern:
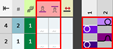
- In the design pattern there are drawn different structures by areas.
- In the control columns and there are entered different default values.
- 1
- In the status bar of the design pattern, switch from to .
- 2
- In the 起头 ribbon under 参数 or using the selection list under
 工具窗口
工具窗口  , open the Pattern Parameters
tool window and select the 线圈长度 (NP)
, open the Pattern Parameters
tool window and select the 线圈长度 (NP)  section.
 - The 线圈长度 (NP) tool window appears.
- 3
- Select the 默认 tab.
- 4
- Select the desired stitch lengths with the CTRL key in the
 and
and  columns additively.
 - The stitch length for the front and rear needle bed are at the cursor.
- 5
- Draw stitch lengths in the desired structure area needle-exactly into the design pattern.
- Now, different stitch lengths for PTS exist in one knitting row.
Result:
|
| |
1 | Grey = no colored entry of a stitch length In these areas, the default stitch length from the control columns
|
2 | Colored entry for further stitch lengths in one pattern row |

 : The default values must not be deleted from the control columns.