Insert Jacquard Back and Make Further Settings
I. Assign Jacquard Back:
- 1
- Create a row selection via the control column.
- or –
Select the Jacquard motif by the 矩形 drawing tool. - 2
- Positioning the cursor in the pattern area.
- 3
- Call-up the 选择 / 创建提花... context menu.
- The 创建提花 [新花型] dialog box appears.
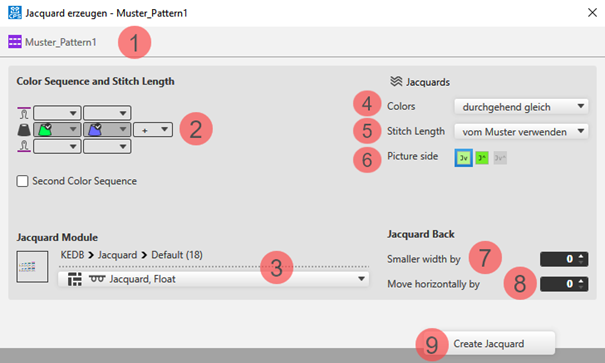
- 4
- Select in the dialog box under
 提花 -> 颜色 -> 每行和每列最少数量(跳纱).
 - 5
- Select the desired 提花模块 for the back under 提花模块
- 6
- Make further settings if desired:
- 颜色顺序
- 提花图
- Quantity of needles for 提花背面 减小宽度
- 7
- Apply the settings to the pattern with the 创建提花 button.
- 8
- Close the dialog box by
 .
.
- The inserted Jacquard appears with the corresponding symbol within the pattern.
II. Settings for yarn carriers (color areas):
- The motive is created in the
 设计花型.
设计花型. - The
 导纱器 document window is open.
- 1
- Open the 导纱器 tool window via
 显示导纱器. The 颜色参数 table appears in the tool window.
 - 2
- Make the desired settings for yarn carriers (color areas):
- 常规 Section
- 编织带入 Section
- 编织带出 Section
- 结构 Section
III. Settings for Yarn Carriers and their Home Positions:
- The motive is created in the 设计花型.
- The 导纱器 document window is open.
- 1
- Open the 导纱器 tool window via 显示导纱器.
- 2
- Make the settings for the yarn carriers and their home positions:
- Allocate a yarn carrier from the pattern to a yarn carrier of the start.
- Change the home positions of yarn carriers.
- 导纱器类型
- 起头前编织带入
IV. Changing the Default Settings for Intarsia Jacquard:
 : By default, a module for net pick-up for Intarsia Jacquard are assigned to each pattern in the 花型项目.
Possibilities for changing the module allocation:
- In 配置 -> 提花 tab -> 拼块提花 section : Changes will apply to all patterns of the 花型项目 .
- In the 起头 ribbon under
 工具窗口, open the 提花 tool window.: Individual changes regarding the desired Jacquard area
 - In the context menu on the design view -> select 打开提花....: Individual changes regarding the desired Jacquard area