Create and position knitting areas on basic shape
Open the  编织区域颜色 tool window:
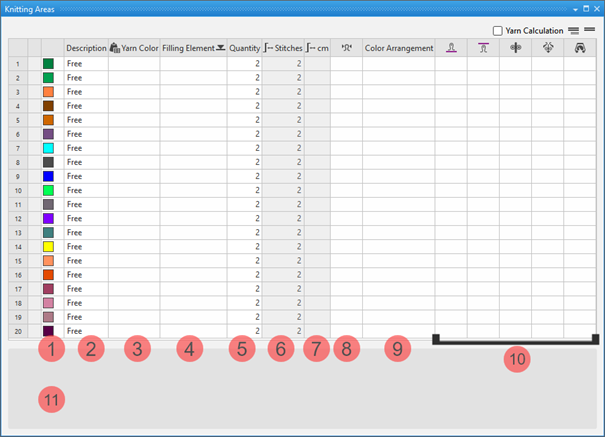
- A basic shape is created as lined shape.
- Lined shape appears in the
 xx document window.
- 1
- Click the 编织区域颜色 button under 参数 in the 模型编辑 ribbon.
- The 编织区域颜色 tool window appears.
|
| ||
|
1 |
Colors |
Display color of the knitting range in the lined shape |
|
2 |
说明 |
Definition of a knitting range |
|
3 |
|
Allocation of: |
|
4 |
填充元素 |
Selection of a knitting element / needle action / structure / pattern element to fill the knitting range |
|
5 |
数量 |
Height of the knitting range by stitch rows |
|
6 |
|
Display of the total height by stitches |
|
7 |
|
Display of the total height by cm
|
|
8 |
|
Assignment of a stitch density from the stitch density tool window |
|
9 |
颜色排列 |
Assignment of Color Arrangements |
|
10 |
|
Assignment of a stitch length for the front needle bed |
|
|
Assignation of a stitch length for the rear needle bed | |
|
|
Assignment of a take-down value | |
|
|
Assignment of a auxiliary take-down value | |
|
|
Assignment of a machine speed | |
|
11 |
List of the shapes (fabric pieces), where the selected knitting range is in use.
| |


 button.
Creating Knitting Ranges:
- Lined shape is created.
- Lined shape appears in the xx document window.
- The 编织区域颜色 tool window is open.
- 1
- Make the desired definitions in the desired, undefined (free) table row:
- Example 1:
- Knitting Range DJ
- By another yarn color, structure, stitch density and stitch lengths
- Example 2:
- Knitting range of color stripes
- For color stripes of two yarn colors
 : You have to create several sub-rows per main row corresponding to the knitting ranges with different specifications.
|
|
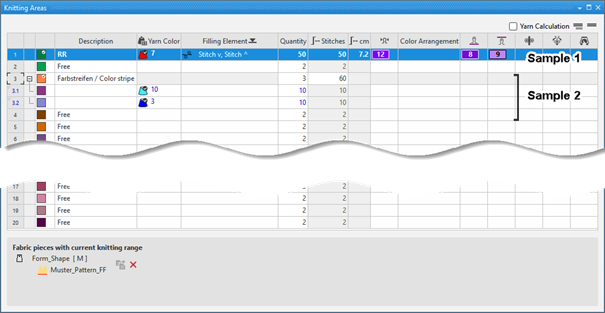
Creating sub-rows for an existing main row:
- 1
- Select the desired main row.
- 2
- Open the context menu with RMB and select 添加子行.
- 3
- Make the desired specifications in the sub-row.
- 4
- Create more sub-rows if necessary.
Enter the created knitting ranges into the shape and position it:
- Shape is created as lined shape.
- The knitting ranges are available in the 编织区域颜色 tool window.
- 1
- Open the lined shape in the xx document window.
- 2
- Select the desired shape line point by the LMB to which you want to assign the knitting range.
- 3
- Call up the 分配编织范围 context menu.
- List of the knitting ranges appears to select one.
Multiple selection is possible. - 4
- Select the desired knitting range.
- The knitting range appears in the assigned color at the the shape line point of the lined shape.
|
|
Enable the view of the knitting ranges in the |
|
|
Disable the view of the knitting ranges in the |

- 5
- Position the knitting range.
|
| ||
|
1 |
Selecting knitting ranges to replace the inserted knitting range. | |
|
2 |
Specify the 距离 in 线圈 in relation to the shape line point | |
|
3 |
向下插入编织范围 | |
|
|
Knitting range will be inserted above the shape line point | |
|
|
Knitting range will be inserted below the shape line point | |


