Create New Knitting Elements
Options for saving a knitting element:
- In the
 Knit Explorer
 : Knitting element available for all projects
 - In the
 Projet de dessin: Local knitting element related to the project
 - The knitting element can be saved.
-
Fichier -> Enregistrer sous
: The knitting element is saved in any directory on the PC as xx.smf file.
I. Create new knitting element:
- 1
- Click on the
 Nouvel élément de tricotage icon at the start of CREATE PLUS.
- or -
Click Nouvel élément de tricotage icon in the Knit Explorer.
- or -
Select Nouveau module... in the context menu of the Modules tab.
 - The Nouvel élément de tricotage dialog box will appear.
|
| ||
|
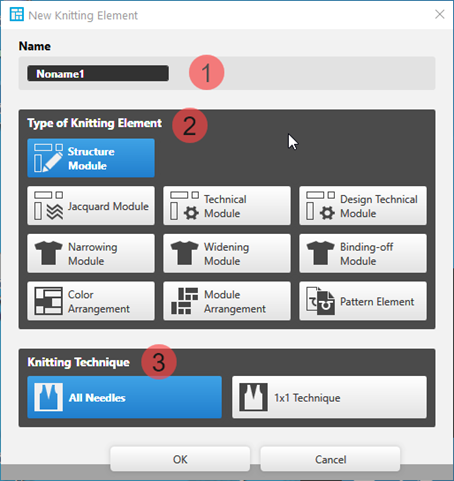
1 |
Nom |
Enter the name of the new knitting element. |
|
2 |
Type d'élément de tricotage |
Selection of the template for the new knitting element
|
|
3 |
Technique de tricotage |
Selection of the basic knitting mode for the new knitting element
|
- 2
- Make the desired settings.
- 3
- Close the dialog box with the OK button.
- The tool window appears with the corresponding template.
|
| ||||
|
1 |
Check: |
|
Automatique |
The created knitting element are not automatically checked regarding the correct structure. |
|
|
Automatique |
The created knitting element are automatically checked regarding the correct structure. | ||
|
|
Vérifier |
Checking of the created knitting element regarding the correct structure. | ||
|
Design Rows: |
|
Colonnes de commande |
Not applying the control column data from the technical rows to the design rows | |
|
|
Colonnes de commande |
Applying the control column data from the technical rows to the design rows | ||
|
| ||||
|
|
Sélection |
Get the design symbols for the technical rows in the selected area created. | ||
|
|
| |||
|
|
| |||
|
|
| |||
|
Presentation of symbols: |
| |||
|
|
|
Display of the drawing canvas for knitting with all needles. | ||
|
|
Display of the drawing canvas for knitting with all needles mirrored.
| |||
|
|
Display of the drawing canvas for knitting in 1x1 technique.
| |||
|
|
Display of the drawing canvas for knitting in 1x1 technique mirrored.
| |||
|
2 |
Display of the corresponding template with control columns and drawing canvas | |||
|
3 |
Commande |
Tab with all attributes for creating the different knitting element types | ||
|
Conception |
Tab with icons for changing / creating design rows | |||
|
Actions d'aiguilles / couleurs |
Tab with needle actions and the pattern colors | |||


- 4
- Select the Actions d'aiguilles / couleurs tab.
- 5
- Select the display of
 Technical Rows.
 - 6
- Draw the structure of the new knitting element with needle actions and the desired pattern color into the technical rows.
- The design rows are generated automatically.
- 7
- Define the control column data in the technical rows.
- 8
- If desired, apply the control column data to the design rows with the
 Colonnes de commande button activated.
 - 9
- Check the knitting element regarding the correct structure with the
 Vérifier button.
 - 10
- Save the knitting element.
II. Create a new, local knitting element:
- A project is created and opened.
- 1
- Select the
 Éléments de tricotage tab in the Éléments de tricotage tool window.
 - 2
- Call-up the Nouveau module... context menu of the tool window.
- The Nouvel élément de tricotage dialog box appears.
- 3
- Select the desired template.
- 4
- Select the knitting technique for the selected template.
- 5
- Confirm entries with OK.
- Tool window appears.
- 6
- Create and check the knitting element.
- 7
- Close the tool window with X.
- A new local knitting element is saved in the Éléments de tricotage tab.