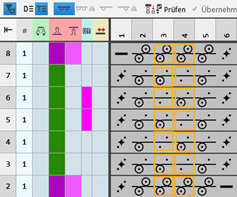
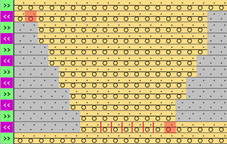
Example: Structure module with connecting points with repetition
Properties:
- A knitting-in and knitting-out row in the knitting element is defined by a connection point.
- A connecting point integrates the design row of the knitting element in to the design pattern.
- A knitting element may have one or more connecting points.
- Quantity of technical rows
- Even-numbered: Knitting-in and knitting-out on the same side
- Odd-numbered: Knitting-in and knitting-out on the opposite side
- Technical Rows
- Without entry of carriage direction
 : The structure module with connecting point can be mirrored.
 - With entry of carriage direction: The structure module with connecting point depends on the direction and cannot be mirrored therefore.
Create structure module with connecting points and repetition:
- 1
- Open the Nouvel élément de tricotage dialog box with
 Nouvel élément de tricotage.
- or -
In the Éléments de tricotage tool window / select the Nouveau module...
context menu.
Éléments de tricotage tool window / select the Nouveau module...
context menu. - 2
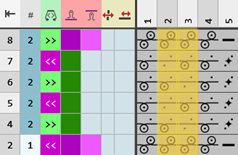
- Make the following settings:
- Technique de tricotage
- Toutes les aiguilles
- Type d'élément de tricotage :
- Module de structure
- Éléments de remplissage
- No yarn color / magazine color or yarn carrier color
- No Needle Action
- Dimension [mailles]
- Largeur : fix width
- Hauteur : even-numbered or odd-numbered
- 1
- Close the dialog box with OK.
- The Knitting Element Editor is opened.
- 2
- Select the Actions d'aiguilles / couleurs tab.
- 3
- In the drawing canvas, in the technical rows, draw the desired structure with the knitting needle action.
- The design rows are generated automatically and not displayed.
- 4
- If necessary, select a color for drawing.
-
Without color:
No allocation of a yarn carrier, i.e. color of the design pattern is used -
With color:
allocation of a yarn carrier, i.e. the used color is applied to the design pattern.: If desired, adapt this design row to the color of the structure module.
- 1
- Insert an empty column on the left and right side of the structure, if desired.
- The columns don't have any needle action.
- 2
- Overwrite these columns with
 Transparent.
 - 3
- Select the Commande tab.
- 4
- Select the
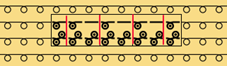
 icon and draw it into the technical rows of knitting in and out.
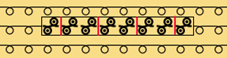
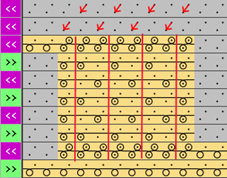
Icônes relatives à l'aiguille dans les rangées qui exécutent section -> Attribut du branchement: Not into the design rows! - 5
- If desired, allocate any desired color to the icon of the Couleurs de définition section.: No effect on the development, only for a better overview.
- 6
- Select the
 Répétition suivantesymbol.
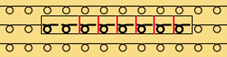
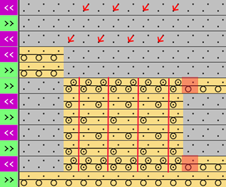
Icônes relatives à l'aiguille dans les rangées qui exécutent section → Répétitions - 7
- Define the repeating cycle related to columns by the selected icon.
- 8
- Enter the desired control column data in the technical rows:
- Stitch Length
- Fabric Take-down
- Cycle
- Carriage Direction
-
No entry of a carriage direction:
The knitting element is independent of the carriage stroke and can be entered on any desired pattern row of the Dessin de conception. -
Entry of a carriage direction:
The knitting element depends on the carriage stroke and can must be entered on the corresponding pattern row of the Dessin de conception.: All technical rows must have a preset carriage direction. - etc.
- 1
- If desired, apply the control column data from the technical rows to the design rows with the
 Colonnes de commande button activated.
 - 2
- Select technical rows for grouping.
- 3
- Group the selected rows with the CTRL + G keys.
- 4
- Check the knitting element with
 Vérifier regarding correct entries in the knitting element.
 - 5
- If necessary, in case of a knitting element already used in the design pattern, apply the changes to the basic pattern with the
 Accepter button.
 - 6
- Close the New Knitting Element tool window with
 .
. - The knitting element is saved.
- 7
- Select a knitting element.
- 8
- Position the cursor in the Dessin de conception.
- Make both of the following steps in order to insert the knitting element with repetition into the pattern.
Commencer à dessiner avec élément de répétition - Lancer l'adaptation de la taille - Étape 1 sur 2 :
Commencer l'adaptation de la taille de la répétition avec un clic dans la zone d'aiguilles. Ou avec <Ctrl> + <Alt> et un mouvement de la souris.
Quitter le dessin avec élément de répétition - Lancer l'adaptation de la taille - Étape 2 sur 2:
Quitter l'adaptation de la taille avec un nouveau clic.
Examples for knitting element with a connecting point and repetitions
|
Odd-numbered quantity of technical rows in height | |||
|
Example 1 |
| ||
|
|
| ||
|
Example 2 |
| ||
|
|
| ||
|
| |||
|
Even-numbered quantity of technical rows in height | |||
|
Example 1 |
| ||
|
|
| ||