Creating the shape as lined shape in the pattern project
Open the  Coupes tool window:
- 1
- In the Accueil ribbon under
 Fenêtre Outils, select the Coupes tool window.
 - In the tool window, the existing shapes of the pattern project are displayed.
- 2
- Place the cursor in the tool window and open the context menu with the RMB.
- 3
- Select Créer une nouvelle coupe dans la taille M... in the context menu.
- The Nouvelle coupe de ligne dialog box will appear.
- 4
- Select the desired input format.
- 5
- Confirm with the OK key.
- The new lined shape (basic shape) is graphically displayed in the Coupes tool window and in a new document window
 as rectangle.
 : Default attributes are used for the shape edges of the lined shape.
- 6
- For creating a lined shape based on the displayed rectangle click the Caractéristiques button in the ribbon under Yableau des lignes.
- or -
Use the graphic displayed in the document window. - 7
- Create the desired shape lines.
- 8
- Allocate the desired attributes to the shape lines.
: You may use the method you prefer as both views are always adjusted to each other.
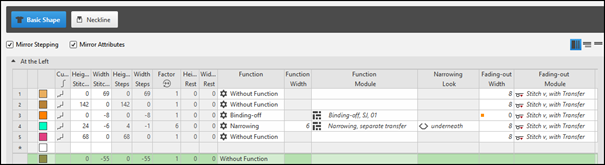
Basic Shape: Front - Binding-off at sleeve opening
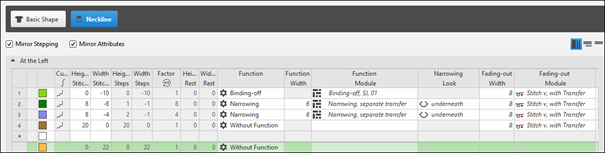
Shape Element: Neckline symmetric - Crew Neck
Adjusting the position of the Début, encolure en Vknitting element
- In the Line Table
- Select a line in the table.
Open the tool window with the Propriétés des lignes button and make the desired entries.
 - In the document window
- Position the cursor on a line of the displayed graphic and open the context menu.
Select Propriétés des lignes and make the desired entries in the tool window.
- 1
- Select the desired shape line.
- 2
- Open the tool window via Propriétés des lignes.
- 3
- Change the position of the Début, encolure en V knitting element in the Marquages section under X and Y.
- 4
- Make further changes if necessary.
- Place the knitting element at the left shape line (endpoint), as the binding-off shall be done from left to right.
|
| |
|
1 |
Positioning of the knitting element Début encolure en V, maille v-vwith
|
|
2 |
Positioning of the knitting element Début encolure en V, maille v-vwith
|
|
3 |
Positioning of the knitting element Début encolure en V, maille v-vwith
|

Adjusting the position of the Début, encolure en Vknitting element
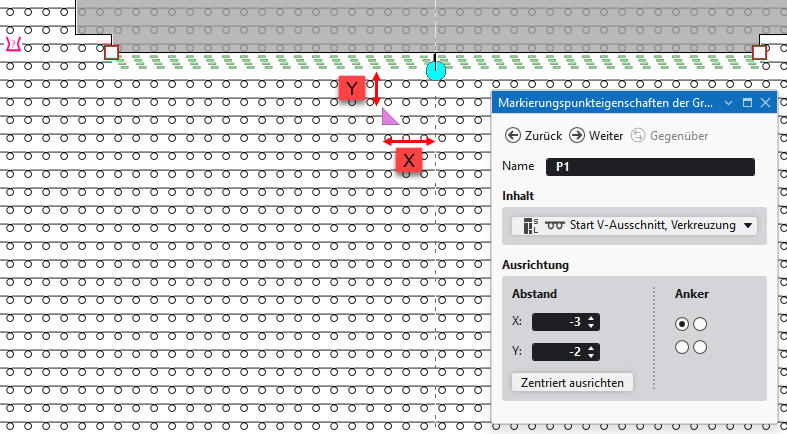
- 1
- Click on the marking point at the start of the neck.
In the Élaboration de la coupe menu bar -> Caractéristiques group open the Propriétes du point de marquage tool window.
- or -
Open the context menu on the marking point with RMB and click on Propriétes du point de marquage. - 2
- Change the position of the Début, encolure en V knitting element in the Alignement section under X and Y.
The values X and Y determine the distance from the marking point to the defined anchor in the knitting element.
X: A positive value offsets the knitting element to the right and a negative value to the left.
Y: A positive value offsets the knitting element upwards and a negative value downwards.
 Place the knitting element at the left shape line (endpoint), as the binding-off shall be done from left to right.