How to Assign a Knitting Range Above and Below the Distance
|
| Two times Knitting Range
|
 without distance
- The colored stripe area is entered in the Knitting Ranges table.
- The reference point is available in the fabric piece.
- 1
- Select
 in the Drawing Tools group.
 - 2
- Select the knitting range defined as main row.
- 3
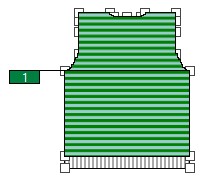
- Click the desired shape point in the fabric piece.
- The colored stripe area appears in the yarn view on the fabric piece above the reference point.
- The pop-up window appears.
- 4
- Keep the distance of 0 from the referenced shape point to the lower border of the colored stripe range in the
 cm edit box.
 - 5
- Click the desired shape point in the fabric piece again.
- 6
- The pop-up window appears.
- 7
- Keep the distance of 0 from the referenced shape point to the upper border of the colored stripe range in the cm edit box.
- 8
- Activate the
 Insérer la zone de tricotage vers le bas check box.
- The colored stripe range appears on the fabric piece below and above the reference point.