Save the image, copy it to the clipboard or create a project
- Via File ribbon:
- Save
- Save as
 : The target is saved in the STOLL Image Import type *.sii.
- Via Avvio ribbon:
 Negli appunti (CTRL + C)
: A pattern element is created based on the target and copied to the clipboard.
-
 Crea progetto per disegni
I. Save image / Save as:
- The image is edited and the desired result is displayed.
- 1
- Open the Salva importazione immagini con nome... dialog box.
File ribbon -> Salva -> Salva con nome - 2
- Enter the desired path for saving.
- 3
- Enter file name:
- The image is saved with the file name and in the (STOLL Image Import) format.
- 4
- Close the dialog box with X.
- The saved image can be opened again in the Importazione immagine dialog.
II. Copy the image to the clipboard and open it in a new pattern project:
- The image is edited and the desired result is displayed.
- 1
- Copy the image to the clipboard.
Avvio ribbon -> Esporta -> Negli appunti - The image is located in the clipboard.
- 2
- Create a new project in the Quick Access toolbar of the Image import with the
 button.
- or -
start the CPS with double click on the and create a new pattern project with button.
 - The Nuovo progetto per disegni dialog box appears.
- 3
- Make the desired settings.
- 4
- Enter the appropriate width and height for inserting the image under Dimensione.
- 5
- Close the dialog box with OK.
- The new pattern project appears.
- 6
- Select the Parti di disegno tab in the Elementi di lavoro tool window.
- 7
- Position the cursor in the tool window.
- 8
- Insert the image from the clipboard into the pattern project with Ctrl + V.
- 9
- Select a pattern element and draw it in the pattern.
III. Create a new pattern project from the edited image.
- The image is edited and the desired result is displayed.
- 1
- Create the new pattern project.
Avvio ribbon -> Esporta -> Crea progetto per disegni - The Nuovo progetto per disegni dialog box appears.
- 2
- Make the desired settings.
- 3
- Close the dialog box with OK.
- The new pattern project appears with the image.
IV. Changing the colors of an image in the pattern project:
- A pattern project is created.
- The image has the format tif, png, jpg or bmp.
- 1
- Select the Parti di disegno tab in the Elementi di lavoro tool window.
- 2
- Open the context menu of the tool window.
- 3
- Select
 Importa immagine....
 - 4
- Select the desired image in the Apri dialog box.: Image in the format tif, png, jpg or bmp
- 5
- Load the file with Open.
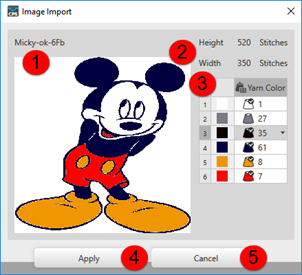
- The Importazione immagine dialog box appears.
| |
1 | File name and image preview |
2 | Height and width of the imported image |
3 | Table with the image colors in use In the |
4 | Applica The changed image is saved as pattern element. |
5 | Annulla Close the Importazione immagine dialog box without applying the change |

- 1
- Make the desired color change.
- 2
- Close the dialog box with Applica.
- The changed image is saved as pattern element and can be drawn into the pattern.