Insert Jacquard Back and Make Further Settings
I. Assign Jacquard Back:
- 1
- Create a row selection via the control column.
- or –
Select the Jacquard motif by the Retângulo drawing tool. - 2
- Positioning the cursor in the pattern area.
- 3
- Call-up the Seleção / Jacquard... context menu.
- The Gerar Jacquard [Nova amostra] dialog box appears.
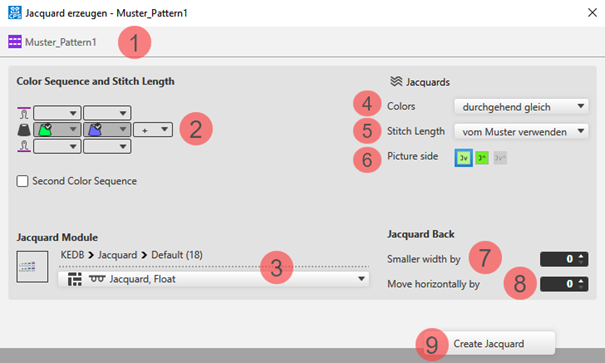
- 4
- Select in the dialog box under
 Jacquards -> Cores -> mínimo por fileira e coluna (pontes de fio).
 - 5
- Select the desired Módulo de Jacquard for the back under Módulo de Jacquard
- 6
- Make further settings if desired:
- Seqüência de cores
- Face da imagem
- Quantity of needles for Avesso do Jacquard mais estreito em
- 7
- Apply the settings to the pattern with the Gerar Jacquard button.
- 8
- Close the dialog box by
 .
.
- The inserted Jacquard appears with the corresponding symbol within the pattern.
II. Settings for yarn carriers (color areas):
- The motive is created in the
 Amostra de desenho.
 - The
 Guia-fios document window is open.
- 1
- Open the Guia-fios tool window via
 Exibir guia-fios. The Parâmetros de cor table appears in the tool window.
 - 2
- Make the desired settings for yarn carriers (color areas):
- Geral Section
- Entrar tecendo Section
- Sair tecendo Section
- Conexão Section
III. Settings for Yarn Carriers and their Home Positions:
- The motive is created in the Amostra de desenho.
- The Guia-fios document window is open.
- 1
- Open the Guia-fios tool window via Exibir guia-fios.
- 2
- Make the settings for the yarn carriers and their home positions:
- Allocate a yarn carrier from the pattern to a yarn carrier of the start.
- Change the home positions of yarn carriers.
- Tipo de guia-fios
- Knit-in before Start
IV. Changing the Default Settings for Intarsia Jacquard:
 : By default, a module for net pick-up for Intarsia Jacquard are assigned to each pattern in the Projecto de amostra.
Possibilities for changing the module allocation:
- In Configuração -> Jacquards tab -> Jacquard de bloco section : Changes will apply to all patterns of the Projecto de amostra .
- In the Início ribbon under
 Janela de ferramentas, open the Jacquards tool window.: Individual change regarding the desired Jacquard area
 - In the context menu on the design view -> select Abrir Jacquards...
.: Individual change regarding the desired Jacquard area