Export from Design Project
You can export different files by different ways from you design project.
Save the design view as image file
- A design project is open.
- The pattern has a design which you want to save as image file.
- 95
- Open the context menu of the design view with the RMB.
- 96
- Click the Exportar como ficheiro de imagem... menu item.
- 97
- Select the file format of the image, enter a name, select the path and save it.
- The complete design view is saved.
Save fabric view as image file
- A design project is open.
- 98
- Open the context menu of the fabric view with the RMB.
- 99
- Click the Exportar como ficheiro de imagem... menu item.
- The following dialog box appears with settings about saving:
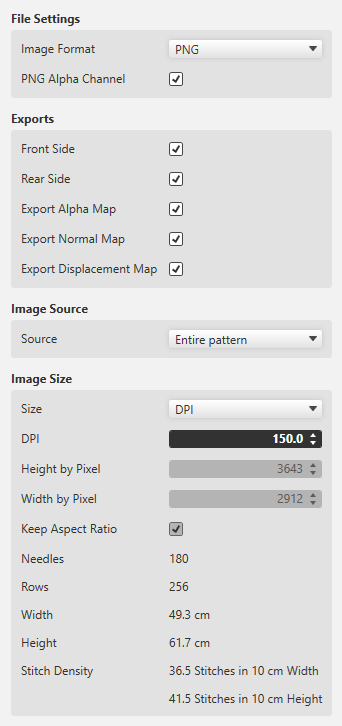
Formato de imagem
-
PNG with or without transparency
 Export the fabric view for further processing to a 3D apparel software always as PNG with enabled transparency (PNG canal alfa).
 -
JPG with specification of the quality
The fabric view as JPG is always exported with a black background.
Exportações (Variants)
So-called Maps are used for the 3D visualization and 3D simulation to assign two-dimensional images to the three-dimensional surfaces of the models.
The different types of Maps give a more detailed and realistic appearance to the computer generated 3D models.
- Lado dianteiro
- Lado posterior
- Alpha Map
- An alpha Map contains information about transparent areas of a texture.
In a 3D software it is required to define the transparent space. - Normal Map
- Also referred to as Bump Map.
- The Normal Map specifies the angle, with which virtual light is reflected over a digital surface.
- With it the appearance of the texture depth is simulated.
- The Normal Map is a necessary part of digital textures in a 3D software.
- Displacement Map
- Also referred to as Height Map.
- A Displacement Map can artificially generate an additional height of a digital texture.
- This way, a more realistic appearance of three-dimensional surface structure results within a 3D model.
Origem da imagem
- Amostra completa
- Select, if a complete fabric is to exported.
- Área selecionada
- Exports only the desired, selected section of a pattern.
This function is helpful in case cycles are to be used in a 3D apparel software. - Atual setor da imagem
- Exports only the area that currently appears in the document window of the fabric view.
- Manter a proporção
- The size ratio of the pattern is maintained.
Create a new pattern project from the design.
You can create a new pattern project within CREATE PLUS only.
This selection is not available in the CREATE DESIGN
.
- You are working with CREATE PLUS
- A design project is loaded and ready to export.
- 100
- Click
 Novo projecto de amostra in the Exportar group of the Início ribbon tab.
 - The Abre a caixa de diálogo 'Novo projecto de amostra a partir da amostra de desenho'. dialog box appears.
- 101
- Select machine in the Abre a caixa de diálogo 'Novo projecto de amostra a partir da amostra de desenho'. dialog box.
- 102
- Enter the pattern name.
- 103
- Switch the comb for the start on or off.
- 104
- Select the desired design from the Design Project.
- A new pattern project will be created.
Render a Fabric Piece
You can save your Design for 3D simulation.
- A design project is open.
- 105
- Click
 Renderizar peça de tecido in the Exportar group of the Início ribbon tab.
- The Exportar dialog box appears with settings about rendering.
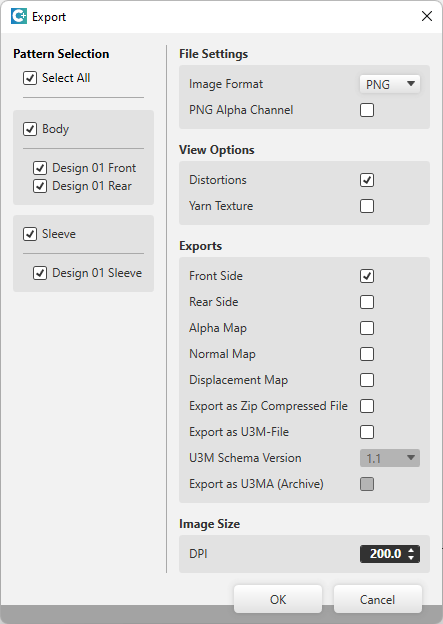
Seleção da amostra
- Select the desired patterns for export.
Ajustes de arquivo
Formato de imagem
-
PNG with or without transparency Export the fabric view for further processing to a 3D apparel software always as PNG with enabled transparency (PNG canal alfa).
-
JPG with specification of the quality
The fabric view as JPG is always exported with a black background.
Opção de representação
- Distorção
- Shows the stitch distortion in the generated image file.
- Textura do fio
- Shows the thread in the generated image file with yarn texture.
Exportações (Variants)
So-called Maps are used for the 3D visualization and 3D simulation to assign two-dimensional images to the three-dimensional surfaces of the models.
The different types of Maps give a more detailed and realistic appearance to the computer generated 3D models.
- Lado dianteiro
- Lado posterior
- Alpha Map
- An Alpha Map
contains information about transparent areas of a texture.
In a 3D software it is required to define the transparent space. - Normal Map
- Also referred to as Bump Map.
- The Normal Map specifies the angle, with which virtual light is reflected over a digital surface.
- With it the appearance of the texture depth is simulated.
- The Normal Map is a required part of digital textures in a 3D software.
- Displacement Map
- Also referred to as Height Map.
- A Displacement Map can artificially generate an additional height of a digital texture.
- This way, a more realistic appearance of three-dimensional surface structure results within a 3D model.
- Exportar como arquivo zip
- File is saved compressed
- Exportar como arquivo U3M
- U3M is a standardized format for 3D visualization.
This includes physical properties data and texture maps, all combined into one ZIP file (U3MA). - Versão de esquema U3M
- Select the U3M schema version
- Exportar como U3MA (arquivo)
- Export the files compressed in a U3MA ZIP file
Tamanho da imagem
- DPI
- Specify the image size by DPI
Saving shapes as DXF files speichern
You can export shapes from your design project as a DXF file.
- A design project is open.
- Shapes are loaded or created
- 106
- Click
 Exportar como arquivo DXF in the Exportar group of the Início ribbon tab.
- The Exportar cortes dialog box appears.
- 107
- Select the desired shapes in the Exportar cortes dialog box and confirm it.
- 108
- Enter a name and select the folder where the shapes are to be saved.
- The shapes will be saved as DXF file.