Example: Knitting Element for Jacquard float with Transfer or Cast-off
Creating a knitting element for Jacquard float with Transfer or Cast-off:
- 1
- Open
 Knit Explorer.
 - 2
- Under Örme elemanı deposu / / select the desired STOLL knitting element Jacquard, which is appropriate as template for the Jacquard knitting element that is to be created.
- 3
- Open the context menu with RMB and select
 Kopyala.
 - A copy is created.
 : If a write-protected STOLL knitting element is opened and changed, you will be asked whether you want to save the changes when closing the knitting element. Saving the changes results automatically in a copy.
- 4
- Save the copy to the desired directory by
 Yapıştır.
 - 5
- Open the copy by double click.
- 6
- If necessary, remove all the tiles that are not needed.
 Sıra sil
 Sütunları sil
 - At least one tile must be kept.
- 7
- Delete all STOLL standards from the processing area.
- A tile with the entries in the function column and the end column of the search area is retained.
- 8
- Then insert or duplicate the desired quantity of rows (cycle in height) and columns (cycle in width).
- 9
- Select the Kumanda tab.
- 10
- In the search area, make the following entries with symbols from the Kumandatab.
- In the
 attributes row:
 - Resim önde (Jv)
- Resim arkada (J^)
- In the
 repeating row:
 -
Sol desen boşluğundan itibaren tekrarlama

-
Sağ desen boşluğundan itibaren tekrarlama

- In the
 searching row:
Mark the cycle widths with the desired color from the Tanımlama renkleri table ( to
to  )
)
- 11
- Draw-in the desired knitting sequence in the Teknik sırası
 of processing area.
With symbols of the Kumanda and İğne hareketleri / renkler tab. - 12
- Enter the Uygulayan sıra, ekleme modu
 symbol into the function column of the processing area.
 - 13
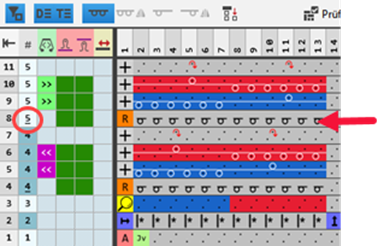
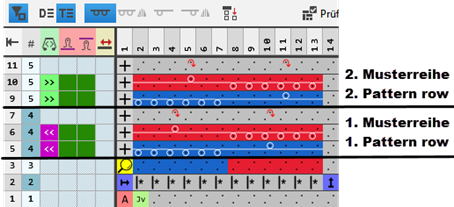
- Group the technical rows belonging together to one pattern row.
- Two pattern rows of this example are knit by a cycle.
- 14
- Enter the desired control column data in the corresponding control column of the corresponding technical rows.
- Stitch Length
- Carriage Direction
- Fabric Take-down
- Carriage Speed
- etc.
- 15
- Check the formal correctness of the knitting element with the
 Kontrol et button.
: The knitting process itself will not be checked.
- 16
- Close the Knitting Element editor.
- 17
- Save the knitting element.
Result without display of the design rows:
: Instead of Arkada ilmek kapama  you can use Öne aktar
  as well.
II. Add an additional design row:
If the knitting sequence in the knitting element consists of several pattern rows, defining additional design rows is necessary.
- A new Jakar modülü knitting element is created.
- The knitting element is opened in the view.
- 1
- Activate the display of the design rows with the
 Tasarım sıraları göster button.
: When creating a knitting element, a design row is automatically generated out of the first knitting technical row. It is displayed underlining the pattern row number, e.g.  .
.
- 1
- Select the first knitting row of the second pattern row.
- 2
- Open the context menu with RMB.
- 3
- Select Alta boş sıra ekle in the menu.
- An empty pattern rows is added to the processing area.
- 4
- Enter the
 symbol into the function column.
 - 5
- Copy the symbol of automatically generated reference row below the knitting row and enter it.
- or -
Open the Tasarım tab, select the desired symbol and enter it. - 6
- Check the Control Column Data.
- 7
- Position the cursor in the control column
 on to the newly added row.
 - 8
- Open the context menu with RMB and select 'Tasarım sırası' tipini ayarla.
- 9
- Insert it into the selection of the new pattern row by the LMB.
- The added pattern row will be marked as design row
 .
.
Result with display of the design rows