Create horizontal and or vertical control dimensioning
The control dimensioning serves for controlling or measuring heights and / or widths in stitches and centimeters / inches.
 : The settings in centimeters or inches depend on the preset stitch density.
Defining and Allocating Stitch Density:
- A basic shape is created with all the desired shape elements.
- The
 Kesimler tab is displayed.
- 1
- Select the shape.
- Lined shape (basic shape) is graphically displayed in the
 document window as rectangle.
 - 2
- Click the
 İlmek yoğunluğu button under Parametreler in the Kesim düzenleme ribbon.
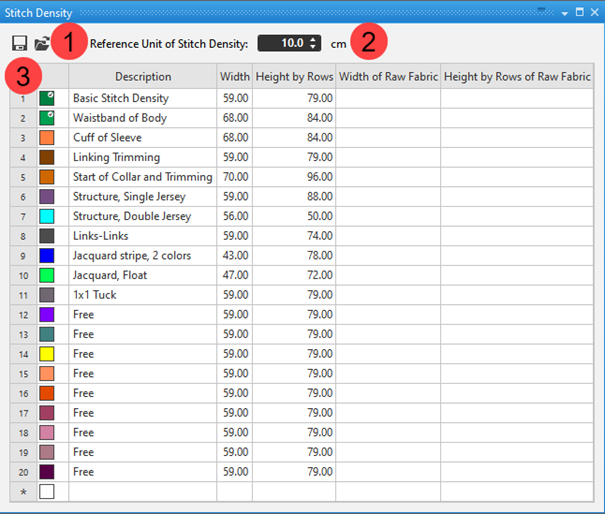
- The Stitch Density tool window appears.
|
| ||
|
| ||
|
1 |
|
Save the self-defined stitch density table of the active Pattern Project as *.sdtpl file. |
|
|
Loading a saved Stitch Density table | |
|
2 |
Display of the reference measurement of the specified stitch densities in the table
| |
|
3 |
1. Column |
Running line numbering |
|
2. Column |
Allocation of a color for the differentiation of the different stitch densities | |
|
3. Column |
Description for using the stitch densities | |
|
Genişlik |
Stitch quantity in the width related to the selected reference measurement | |
|
Sıra olarak yükseklik |
Quantity of stitch rows related to the selected reference measurement | |
|
Ham kumaş genişliği |
Information about stitch quantity in the width related to the selected reference measurement in the raw fabric (before finishing)
| |
|
Ham kumaşın sıra olarak yüksekliği |
Information about the quantity of stitch rows related to the selected reference measurement in the raw fabric (not finished fabric)
| |


- 3
- Change the existing entry in the table.
- or -
Allocate values to an entry labeled Boş.
- or -
Add a new entry to the table. - 4
- In the tool window Örme elemanları select the tab
 Kesimler.
 - In the tool window, the existing shapes of the pattern project are displayed.
- 5
- Select the desired shape.
- 6
- Select Özellikler in the context menu.
- The Kesim özellikleri dialog box appears.
- 7
- Allocate the desired entry of the table under İplik hesaplaması için ön veriler for Desendeki ilmek yoğunluğu.
- The selected stitch density is used in the control dimensioning for the calculation in centimeters / inches.
: The allocation of a stitch density can be different for every shape.
Insert horizontal or vertical control dimensioning:
- A basic shape is created with all the desired shape elements.
- Desired stitch density is allocated to the basic shape.
- 1
- Position the cursor on a shape line point (starting point).
- 2
- Open the context menu with RMB ->Yatay kontrol boyutlandırması ekle.
- or -
Select Dikey kontrol boyutlandırması ekle . - 3
- Position the cursor on the shape line point (endpoint).
- 4
- Confirm with .LMB.
- The horizontal / vertical control dimensioning is displayed in the document window in the status bar with the active
 button.
 - 5
- To position the control dimensioning line move it with the LMB pressed.