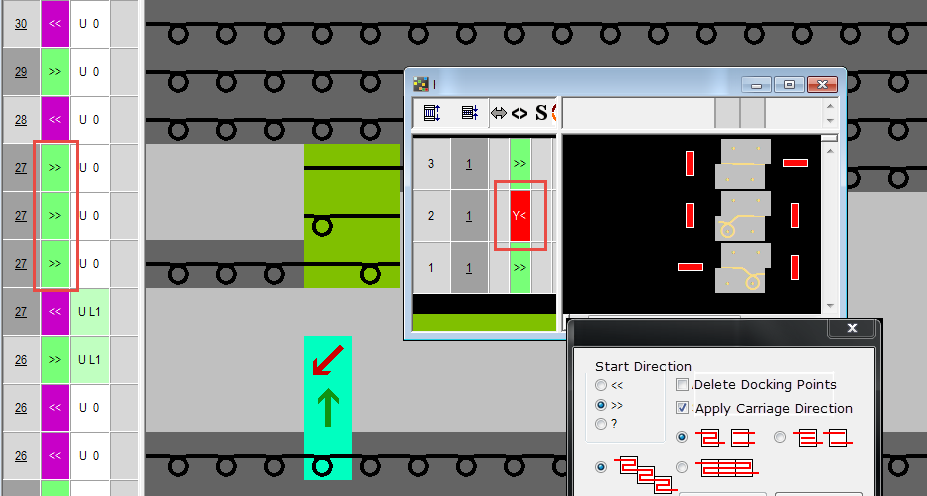
Set Docking Points
A docking point is defined with one row knitting into and one row knitting-out of the module. It therefore designates the point at which the module is connected to the pattern. Several connection points are permitted within a module. Horizontal and vertical colored bars are inserted in the module as docking points. With the horizontal colored bars the module is connected to the pattern. With vertical colored bars, knitting is carried out in the module. Different docking points are given different colors.
When the module is inserted in the pattern, the docking points are ignored. These are first evaluated by the Technical Processing function.
The following criteria must be observed when setting the docking points:
- For calling up the function the module editor must be open in the technical view.
- An odd number of knitting rows must be selected. This means knitting-in is carried out on one side and knitting-out on the other side.
- The selected rows must be grouped to form a pattern row.
The dialog box is opened by the function in the menu.
Make the following settings in this dialog box:
|
Element | Meaning | |
|---|---|---|
Starting direction section | ||
|
| |
| Carriage direction from right to left | |
| Carriage direction from left to right | |
| Undefined carriage direction. This is determined by Technical Processing. | |
| ||
| With the checkbox activated, the docking points (color bars) of the selected rows are deleted when the Apply button is clicked on. | |
| With the checkbox activated, the carriage directions are entered in the module.
| |
|
| Default setting
|
| Connecting points in one carriage stroke with autarkic course (ADF) between the systems
Regardless of the number of knitting rows, the endpoint is always set on the side that is opposite to the one of the startpoint.
| |
| Remove adjacent docking modules separately. | |
| Remove adjacent docking modules together. | |
 :
: 


Buttons in the dialog box:
|
Button | Function |
|---|---|
Apply | Set docking point for the selected stitch rows. The dialog box remains open for additional input. |
Quit | Close the dialog box.
|
I. Set docking points:
- The module is open.
- At least one knitting row is selected.
- An odd number of knitting rows is selected.
- The selected rows are grouped into a pattern row.
- 1
- Call up the function in the menu.
- The Set docking points dialog box appears.
- 2
- Select the starting direction and activate or deactivate the checkbox.
- 3
- Click the Apply button.
- The color bars for the stitch rows are entered in the module.
The picture of a module with docking points has the  symbol in the bottom right corner.
II. Delete docking points:
If all docking points are deleted and the Exit button pressed, you receive a module without docking points.
- The module is open.
- At least one knitting row is selected.
- An odd number of knitting rows is selected.
- The selected rows are grouped into a pattern row.
- 1
- Call up the function in the menu.
- The Set docking points dialog box appears.
- 2
- Activate the checkbox.
- 3
- Click the Apply button.
- The docking points (colored bars) of the selected rows are deleted.
Example:
Closing stitch in one carriage stroke