Coordinate Display (dialog)
The dialog box is called up with the / / function in the context menu of the active view.
In this dialog you define the data that is displayed at the cursor position.
Three profiles, , and can be defined.
|
Element |
Meaning | |
|---|---|---|
|
|
Set unit for linear measures | |
|
|
|
Coordinates are displayed in Inch or mm. |
|
: |
Display the stitch density of the pattern. | |
|
|
Select the marking for the lines. | |
|
|
|
Select the designation for the line start. |
|
|
Select a symbol or abbreviation for the line start. | |
|
|
Display the values only. | |
|
|
Achieving or exceeding it will be displayed by the *** label. < : Threshold value not yet reached | |
|
|
Input field |
Enter a threshold value. |
|
|
Calculate the measures corresponding to the preset stitch density. | |
|
|
Calculate the measures regarding the quantity of needles. | |
|
|
List of all the entries that are not selected for the display at the cursor. | |
|
|
List of all the entries that are selected for the display at the cursor. | |
|
|
Shift the available entry to the current entries | |
|
|
Shift the available entry to the current entries | |
|
|
Shift the selected entry to the top. | |
|
|
Shift the selected entry to the bottom. | |
|
|
Display the selected entries according to the settings | |
|
OK |
Apply the settings and close the dialog box. | |
|
Cancel |
Close dialog box without applying changes. | |

 : Display only, no input
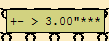

Select the desired profile:
- 1
- Run the / / function.
- or -
Press the . key for , the , key for or the - key (/) for .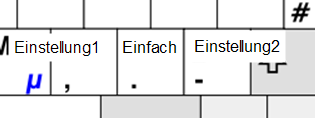
Define the profiles:
- 1
- Double click the desired entry in the left column.
- or -
Select the desired entry in the left column and click on it.
 - The entry will be applied in the right column.
- 2
- Repeat the process for further entries.
- The entries will be listed in the same order in which they were applied.
The preview displays the data in the same order. - 3
- Select the entry and classify it with
 or
or  at the desired position.