ShapeWizard and Shape Display
ShapeWizard
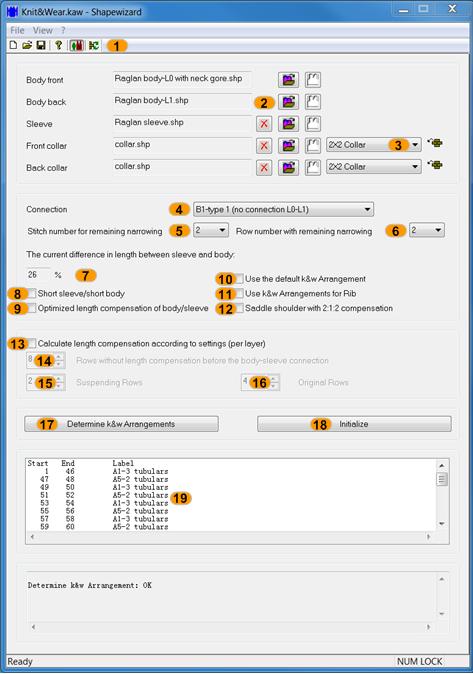
- In the ShapeWizard the shape parts are generated into a k&w file.
- The k&w file contains the shape parts put together with the corresponding knitting sequences (k&w arrangements)
- 1
- Open the ShapeWizard dialog box via the \ menu.
|
No. |
Function | ||||
|---|---|---|---|---|---|
|
1 |
|
Opening shape display: Graphic presentation for defining the docking points | |||
|
|
Updating the used k&w arrangements | ||||
|
2 |
|
Delete the loaded shape parts | |||
|
|
Load shape part | ||||
|
|
Open Shape Editor | ||||
|
3 |
Specify the module for knitting mode of the collar. | ||||
|
4 |
Select the type of the sleeve-body connection. | ||||
|
5 |
Select the number of stitches per remaining narrowing. | ||||
|
6 |
Select the number of knitting rows per remaining narrowing. | ||||
|
7 |
Percentage display of the length difference between sleeve and body | ||||
|
8 |
Short sleeve/short body | ||||
|
|
Use of residual yarn in case of too much length difference between sleeve and body. | ||||
|
9 |
Optimizing length compensation Sleeve / Body | ||||
|
|
Alternative length compensation between sleeve and body k&w Arrangement (A25-3 tubulars x:1:x) | ||||
|
10 |
Use the standard k&w arrangement | ||||
|
|
The X-Standard k&w Arrangement is inserted in areas without a automatically determined k&w Arrangement. You have to overwrite this in the Shape View later. | ||||
|
11 |
Use k&w Arrangements for Rib | ||||
|
|
k&w Arrangements for the knitting mode 2x2 rib will be used. |
| |||
|
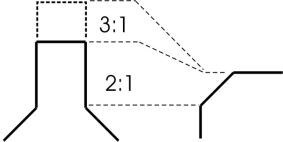
12 |
Saddle shoulder with 2:1:2 compensation | ||||
|
|
The shape with saddle shoulder will be edited in the 2:1 ratio. The saddle shoulder is process in the 3:1 ratio as default. |
| |||
|
13 |
Calculate length compensation according to setting | ||||
|
|
User-defined length compensation | ||||
|
|
14 |
Distance from the first suspending rows to the sleeve body connection | |||
|
15 |
Number of the Suspending rows each time between the knitting rows | ||||
|
16 |
Number of the knitting rows each time between the suspending rows | ||||
|
17 |
k&w arrangements Generating the knitting sequences, the k&w file cannot be saved. | ||||
|
18 |
Delete the determined k&w arrangements. | ||||
|
19 |
Display window of the determined k&w arrangements | ||||


Shape Display
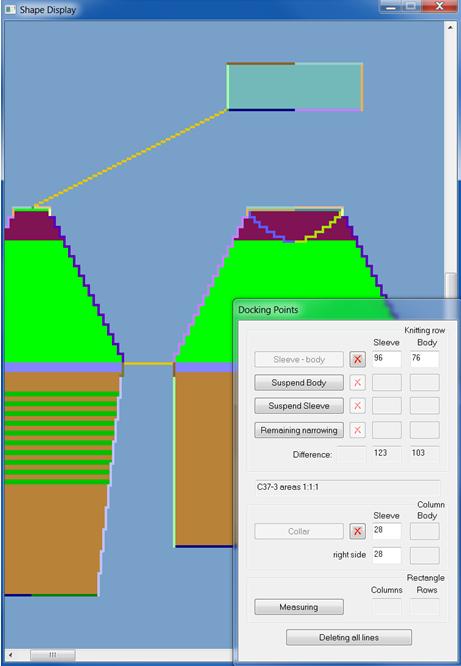
- Open the graphical shape display in order to define the docking points:
- 1
- Via the docking points, the positions of the shape parts to each other are established. In the process the shape parts are connected with each other at these positions and receive the corresponding k&w arrangements (knitting sequences).
- 2
- Open the Shape View with the
 button in the toolbar of the ShapeWizard.
|
Docking points |
Function |
|---|---|
|
Sleeve - body |
First docking point, all the other docking points are based on the sleeve body connection. References the position of the sleeve in relation to the body. |
|
Suspend Body |
Length compensation above the sleeve body connection: if the sleeve is longer than the body. Example: Saddle shoulder |
|
Suspend Sleeve |
Length compensation above the sleeve body connection: if the body is longer than the sleeve. Example: Set-in sleeve, French Shoulder |
|
Remaining narrowing |
Connection of the remaining narrowing of the sleeve with the shoulder gore in the body. With set-in sleeve and French shoulder |
|
|
Displays the knitting row difference between the sleeve and the body within the shapes |
|
|
After generating the k&w arrangements, the used sequence can be called-up in the dialog window. |
|
Collar |
The collar element is set to corresponding width by the connection. |
|
Measuring |
You can measure a distance within a shape part holding down the left mouse button. |
|
Deleting all lines |
Delets all specified docking points. |