Step 1: Creating shape
- 1
- Open the Shape editor via /.
- 2
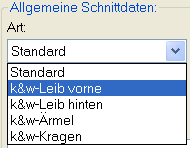
- Under select the corresponding k&w ... shape type.
- 3
- Set to Stitches.
- 4
- Activate
 under .
 - 5
- Enter coordinates and allocate attributes.
Front piece

- 1
- Under allocate the desired attribute to the Narrowing edge.
- 2
- Allocate the end line to the Binding-off tab under .
- 3
- Select the binding-off module Neckline open L0 end on the right.
Shape element Neckline in the front
- 4
- Create a new
 element and select the Neck opening entry under .
 - 5
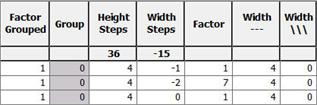
- Specify the coordinates for the Neckline via the .
- Option : The neckline steps can be repeated via the factor.
- 6
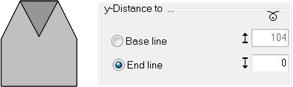
- Specify the neckline distance until the :
Back
- 1
- Under allocate the desired attribute to the Narrowing edge.
- 2
- Allocate the end line to the Binding-off tab under .
- 3
- Select the binding-off module Neckline open L0 end on the right.
Sleeve

- 1
- Allocate the desired attributes and Narrowing to the edges under Function.
- 2
- Allocate the end line to the Binding-off tab under .
- 3
- Select the binding-off module Neckline open L0 end on the right.
To the next step 2: Loading and Adjusting Shape in the ShapeWizard