Version 3: Skirt with plissee
The plissee is generated starting in the pattern center with the narrowing technique Fair isle and arranged curved by several rows of intermediate knitting.
I. Generate pattern and shape for a plissee skirt with Fair Isle narrowing technique:
- 1
- Generate a New pattern via / menu bar.
- 2
- Select machine type.
- 3
- Select Basic pattern (pattern without shape) and .
- 4
- Set pattern size and select the Front stitch basic pattern.
- 5
- Select the start Tubular with draw thread end for the beginning.
- 6
- Confirm the settings with Generate Design Pattern.
II. Create shape:
- 1
- Call up the via the / Shape Editor (Generate or Edit Shapes)... menu.
- The dialog box will be opened.
- 2
- Generate a new shape in the shp format via / .
- or -
Click the icon.
icon. - 3
- Create a element:
- The checkbox is activated.
Example:
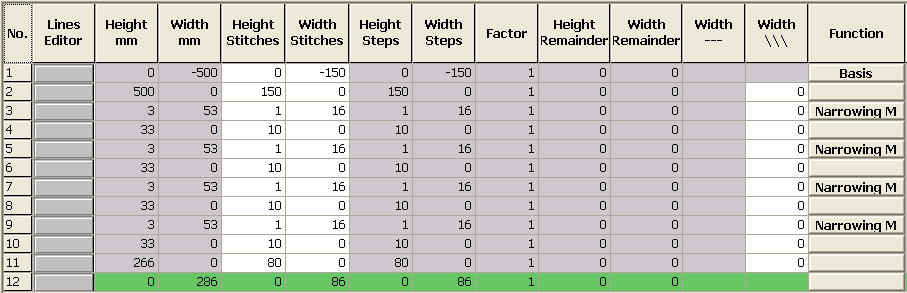
Specifications for a total knitting width of 300 needles for 4 pleats with plissee module 16 needles wide and pleats with 8 needles overlapping.
Basic element
- 4
- Allocate multi-step narrowing and the following settings to the edge lines.
|
Line of edge |
General tab |
Tab |
Tab |
|---|---|---|---|
|
3, 5, 7, 9 |
Narrowing |
Module allocation:
Module:
|
No fading-out required |
- 5
- Call-up the shape attributes of the shape edges.
- 6
- Under the general tab: adjust Narrowing.
- 7
- Select the narrowing cycle multi-step and underneath.
- 8
- Under module select: Fair Isle + Doubling_Stitch v
- 9
- Save the shape via the / or menu.
- The shape will be saved in the shp format.
- 10
- Close the M1plus Shape Editor with
 .
.
III. Placing the shape in the pattern:
- 1
- Load shape via / .
- The Open dialog box will be displayed.
- 2
- Specify path and select the desired shp shape.
- 3
- Click the Open button.
- The shape is laid on the pattern. The narrowing markings for multi-step narrowing are arranged according to the narrowing step width.

IV. Correcting narrowing markings:
- 1
- Correct the narrowing markings positioned in the shape.
- 2
- Use the tools
 and
and  to arrange manually the narrowing markings for multi-step narrowing next to one another. The cover width has to correspond to the narrowing step width.

Example:
The defined step width in the shape amounts to 16 stitches, the cover width of the narrowing marking multi-step is 16 stitches as well.
- 3
- Adjust the cover width 1 for the first and the last narrowing, for all the other narrowings adjust the cover width 2.