What was new in CREATE PLUS V2.0 and V2.1
Editing in the Symbol View
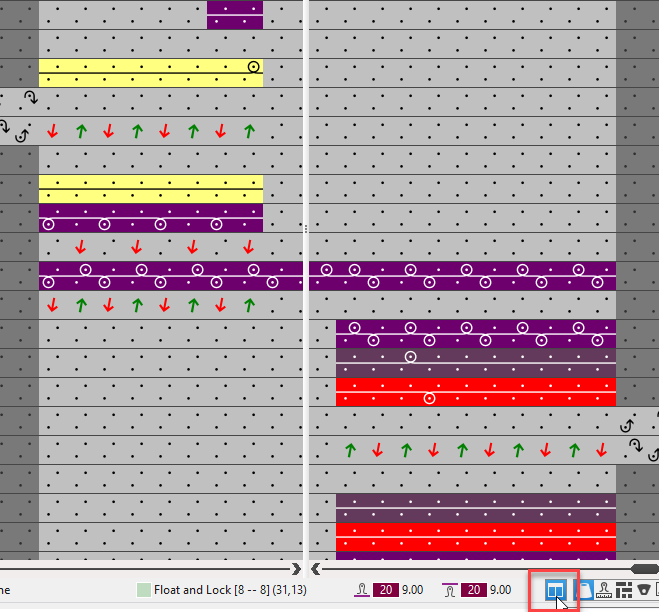
- Vertically Split View
- Tile the symbol view into two side by side views by the Split View Vertically button of the status bar.
- View and edit the left and right edge of big patterns at the same time.
- Even at a large zoom level without additional scrolling.
-
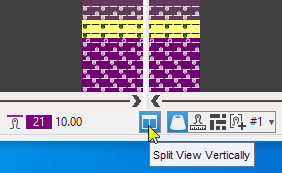
- The drawing tools work across the board.
You can start and end the drawing action in different halves of the view. - Splitting the expanded preview
- Splitting the symbol view after technical processing
-
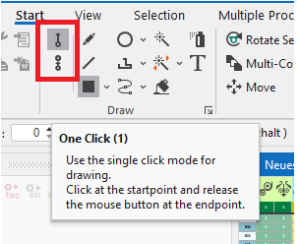
- Single Click Mode for Drawing
- Up to now within the control columns only
- Now within the needle area of the symbol view as well
- Key combination 1
- Key combination 2
 Double Click
 -
 : Drawing by the single click mode is possible even within the double click mode.
→ Start to draw with the mouse button pressed after a first click. - Drawing with a module with repetition
- Drawing in modules with repetition element (pointelle module e.g.) is reduced to two clicks defining the start and the end of the action.
In between, you define the with by drawing up. -
: Hit the CTRL + Alt key combination before the first click and move the mouse in order to draw in the module according to the previous method.
First specify the width which you can then enter several times. - Copy selection (CTRL + C)
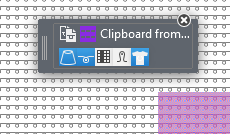
- If you copy a selection, the individual parameters of the clipboard appear in the user control to switch them on or off.
- By V2.0, the user control appears in case of each copy action with theApply Control Columns setting disabled (screen of V2.0).
-
Each time, you had to repeat the individual setting. - In V2.1:
The setting once done is kept for each new action of copy or insert during the current session. - Insert Selection
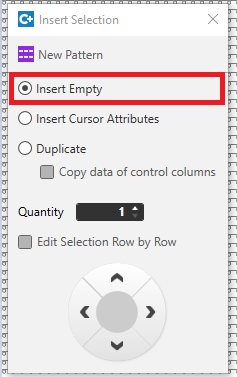
- In order to insert empty rows, you had to use the Insert Drawing Attributes option without having selected a drawing attribute.
- Now the Insert Empty option is available to insert empty rows.
-
- Extension of Key Combination O (Open)
- Up to now, you could only open the module below the cursor in the symbol view by O key.
You could open CA or MA of this row via the control column only. - Now you can open CA and MA by the O key as well if they are assigned to the row below the cursor.
If necessary, this will open the three corresponding editors (Module, CA, MA). - You can open CA or MA by the O key if the cursor is positioned over an assigned CA or MA in the control column.
- You can open the corresponding Setup Data by the O key if the cursor is positioned in a control column with the Show in Table context menu.
-
 : The same behavior is valid for the expanded symbol view and for the symbol view after technical processing.
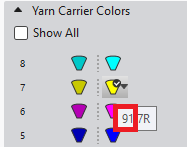
- Colors
- The index of Yarn Carrier Colors is displayed.
-
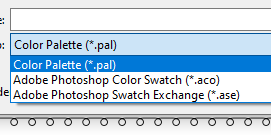
- You can load color palettes of the M1plus and of other programs.
-
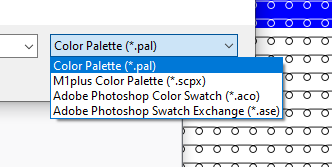
- You can save in file formats of other program.
-
- You will find the import and export functions in the Pattern Colors tool window.
-

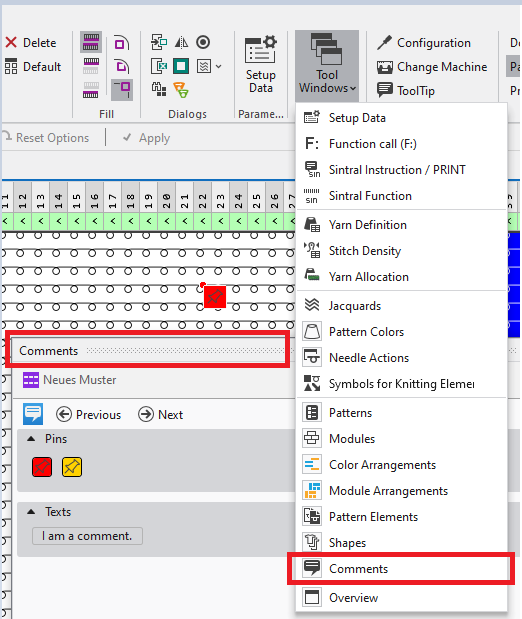
- Comments
- You can place comments exactly to the needle in symbol view of the pattern. You will find the menu items in the context menu of the view.
-
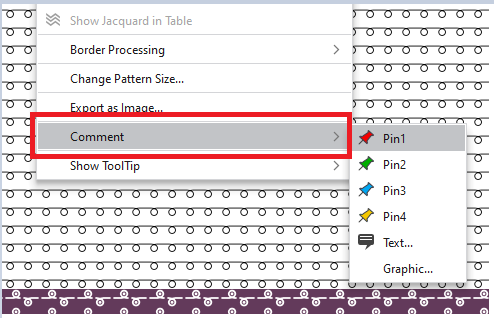
- You can move the comments by the left mouse button.
Deleting and resetting the move are available in the context menu of the comments. - You can navigate through the comments by the new Comments tool window.
-
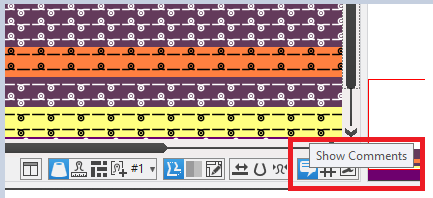
- You can control the display of the comments by the status bar of the view.
-
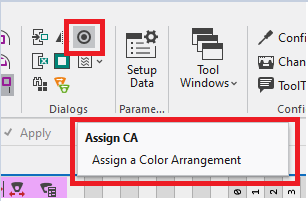
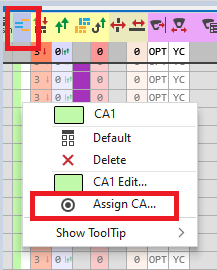
- Assign Color Arrangements Automatically
- You can assign Color Arrangements automatically to the rows of the pattern by this new function. To do this, the colors in the pattern rows are determined and compared to the search colors of the CA.
- You call-up the function via the Dialog Boxes ribbon group or via the Color Arrangement control column.
-
- Select the desired patterns in the Assign Color Arrangements Automatically dialog box.
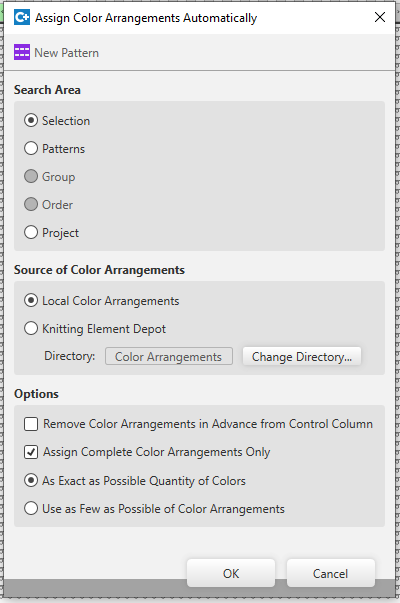
Available are the active pattern or a row selection of it as well as all patterns of the project.
The Group and Order options are only available if they are enabled in the Patterns tool window.
Fully Fashion
- DXF Import
- Improved usability of the Scaling function.
- After opening the file, the Scale By slider is positioned in the center.
- Default 1.00 (= 100 %), step width 0.01 (= 1 %).
- New function Move Fabric Pieces
-
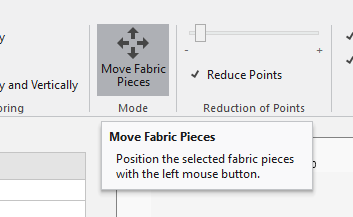
- With the function enabled, the fabric piece selected in the Fabric Pieces table will be positioned by the point of the lower left of its circumscribing rectangle to the point on which you click with the left mouse button.

-
: A multiple selection is possible
- You will find the new Fabric Pieces function in the context menu of the fabric pieces in hte Align at Origin table.
- With it, the 0 point of coordinates is set to the point of the lower left of the circumscribing rectangle.
- Shape element Dart
- Optimized template Dart
- Without any time-consuming post editing
- The shape elements orientate themselves matching the left or right side of the fabric piece.
-
- The symmetrical variant of the shape element is omitted.
-
: In the context menu of the shape under Add New Shape Element....
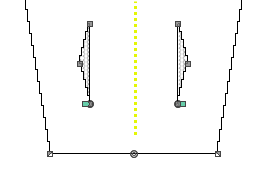
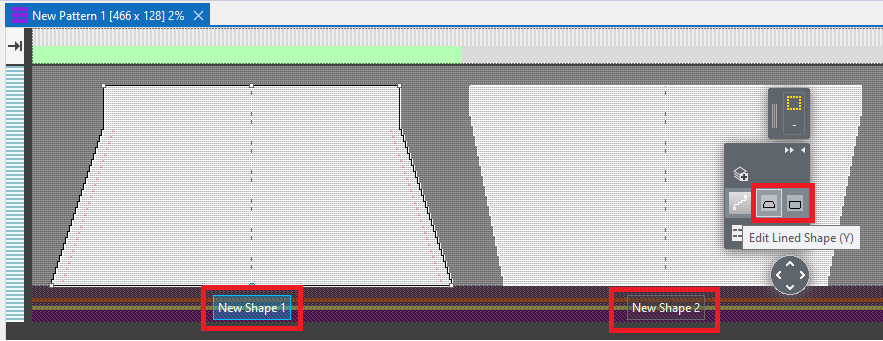
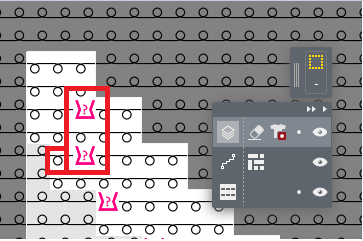
- Positioning Shapes on Pattern
- You can position two lined shapes on the pattern.
Important pre-condition for Multi-Piece Knitting - Two different shapes
- Twice the same shape
- You can select the shapes individually to edit by the Edit Lined Shape Layer (Y) mode of the user control.
-
-
: With two different shapes containing a start, both of the shapes must contain the same start in order to get a proper technical processing.
At the moment, the same quantity of rows is required for both shapes.
- Finishing Layer
- Up to now, you could indeed edit on the pattern data of the lined shape but only for a complete shape line.
You could not edit exactly to needles. - Now, the Finishing Layer is available.
-
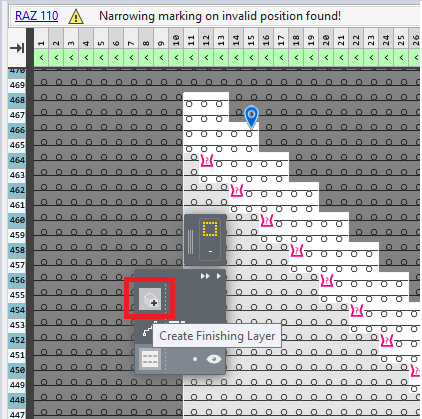
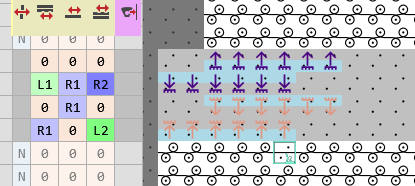
- Example as image:
Rasterizing error due to the narrowing width of the shape line which does not allow the narrowing of row 466.
In addition, the narrowing of row 464 is not correct due to stitch at Outside Shape. - Without editing the lined shape, you can fix both of the errors in the Finishing Layer.
Create this layer by the Create Finishing Layer button.
 -
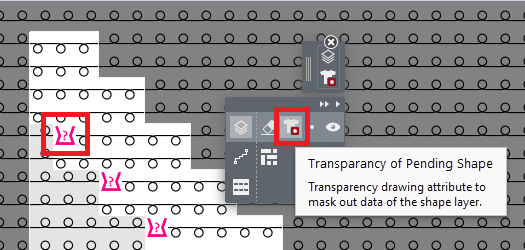
- Mask out the narrowing at marked position of the pattern by the Transparency of Pending Shape drawing attribute.
-
: The fading-out by the shape line will be masked out.
The needle action of the pattern appears. -
- Draw in both of the shape symbols for narrowing and the needle action for fading-out.
- By the
 Finishing Eraser drawing attribute you can delete data of the Finishing Layer.
 -

- By the
 Delete Finishing Layer context menu of the
  button you delete the complete Finishing Layer.
Multi-Piece Knitting
Knitting two fabric pieces side by side is possible if the pattern contains a comb start.
- Two ways of knitting several pieces
- The Knitting Ranges tab of theConfiguration tool window contains both variants.
- Duplicate Pattern
-
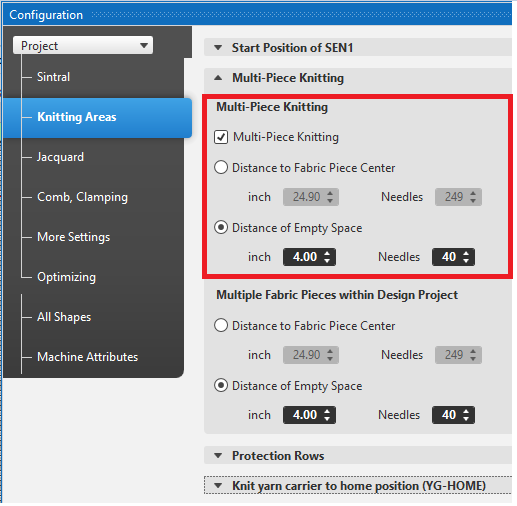
- Two Positioned Shapes
-
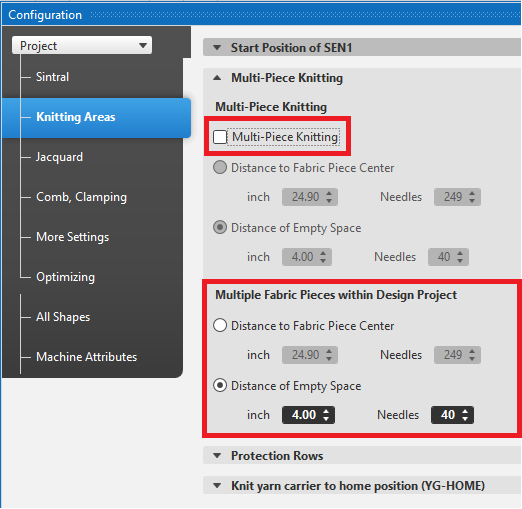
-
: If two shapes are positioned side by side, the Multi-Piece Knitting option must be disabled as otherwise four fabric pieces would be given to the technical processing.
- In contrast to M1plus, no special technical processing is required for multi-piece knitting.
Output of Warnings and Errors
The technical processing may lead to warnings and errors (abort of processing). The output of these messages is reworked.
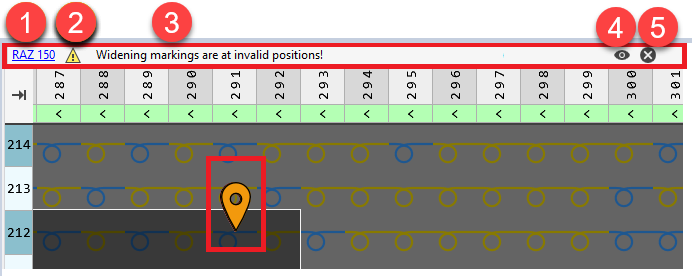
A message contains the following parts:
- Number of the message with link to detailed help.
- Type of the message (here warning)
- Text of the message.
A link to the pin will appear if the message can be located.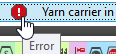
- Toggle the display of pins
- Delete message
(available for warnings only)
Further Improvements:
- Several messages of the same error will be combined to one message.
Therefore, several pins appear within the pattern to which you can navigate. -
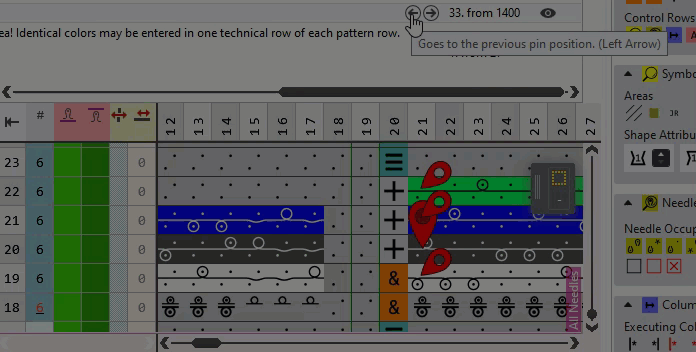
-
 The upright Pin shows the selected message.
 - If the message refers to a control column, a pin will be set to the control column and it will be displayed.
Electronic Feed Wheels
Controlled feed wheels are supported.
Activate them by Configuration → Machine Attributes.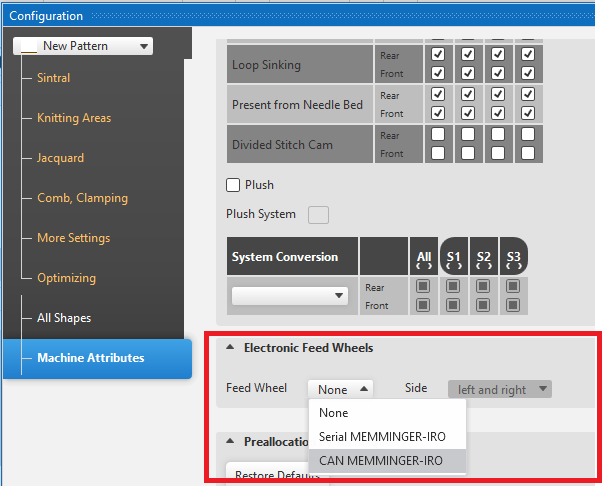
- Serial MEMMINGER-IRO
- EFS 820
- EFS 920
- CAN MEMMINGER-IRO
- EFS 820
- EFS 920
- CAN BTSR
- CAN LGL
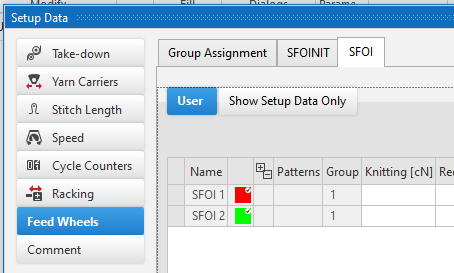
- New tab Group Feed Wheels
- Here you assign yarn carriers to a group, which shall work with common settings.
- Yarn Carriers tool window → Yarn Carrier View
-
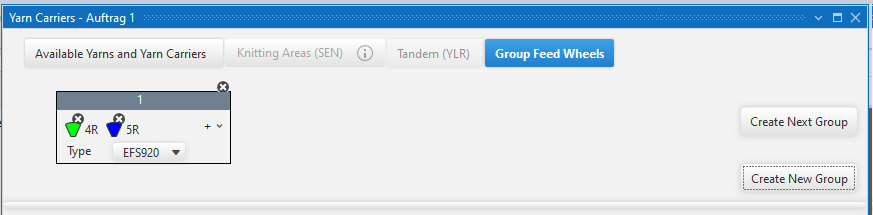
- Control column Feed Wheel
- Here, you can allocate the desired feed wheel index SFOI to the knitting rows.
-
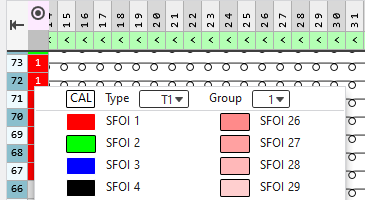
- Feed Wheels Setup Data
- Here, you can specify the parameters for the feed wheels.
-
Knitting Machine with Additional Beds
- CMS 730 T machine is a available to select
- There are special narrowing, widening and binding-off modules for Fully Fashion which you have assign to the shape lines.
-
- Additional control columns for racking are available among the control columns of the pattern.
-
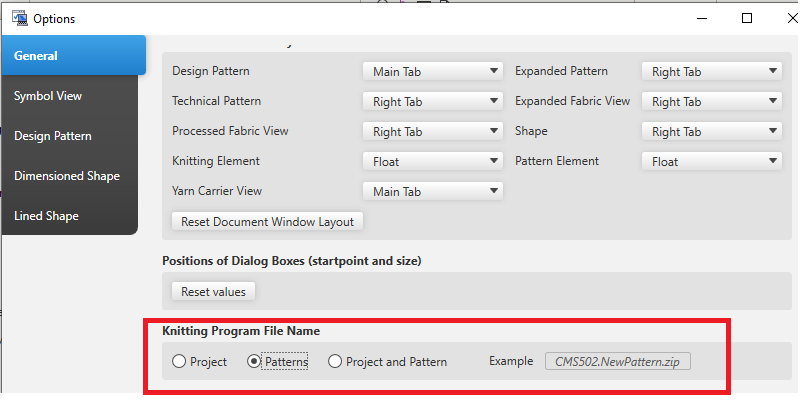
Name of the Knitting Program
- Up to now, the name of the knitting program was build from the name of the pattern.
- Now you can select how the knitting program name will be created:
- Project
- Patterns
- Project and Pattern
- The presetting of Options, General tab works globally until to its modification.
-
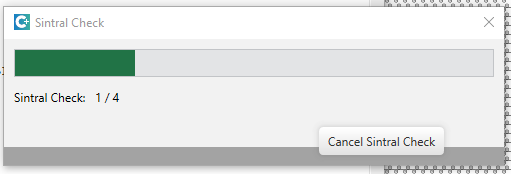
Check of Knitting Program
It was not possible to cancel the common check of several knitting programs by theSintral Check.
- Now, you can cancel the Multiple Processing .
-
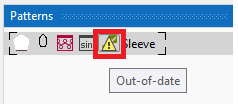
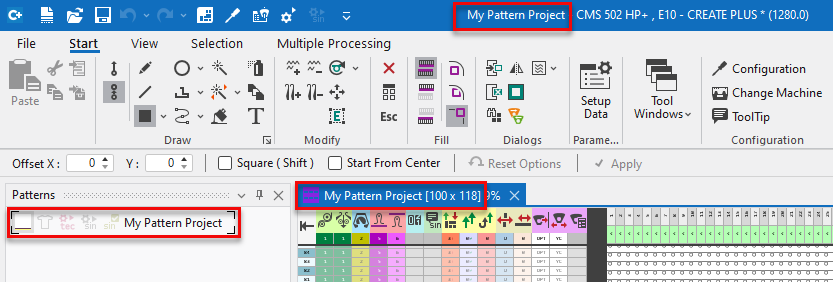
- The Sintral Check icon of the Patterns tool window will be marked if the pattern was edited and the knitting program was re-created after the check.
-
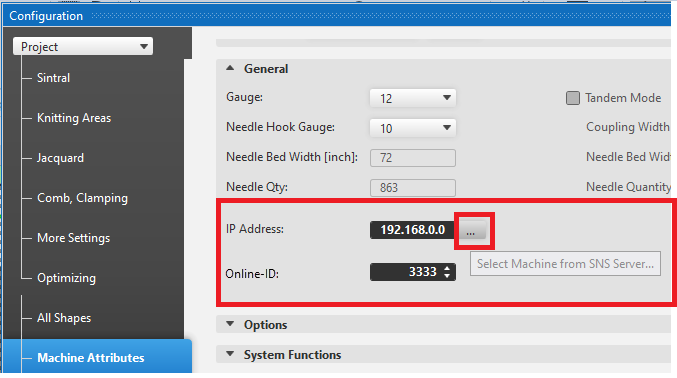
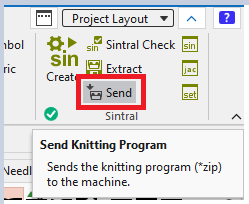
Send the knitting program to the knitting machine
- You can send the knitting program directly to networking knitting machines.
- Set-up the online connection to the machine in Configuration, Registerkarte Machine Attributes tab.
- IP Address:
- Online ID:
-
-
 Send function of the ribbon group
 -
Please Report Errors with The Project File

- 75
-
If possible, enter a short description of how the error occured.
Can you reproduce the error?
Does the error appear on other computers?
What is the goal of your action which led to the error? - 76
- Attach file for error analysis (e.g. pattern file or shape file)
- 77
- Click Send by E-mail to send Automatic Error Response to the CREATE Helpline .

CREATE PLUS
Continuity and Innovation
STOLL and KM.ON are two successful brands of the KARL MAYER Group combining their expertise and creativity for highest customer benefit.
- From one side, STOLL is leading in flat knitting technology and is a solution provider with a process know-how.
- In the other side, KM.ON is specialist on software products, digital solutions and services for the textile business.
To clarify the membership in KM.ON, the former STOLL software (CPS) was renamed into CREATE PLUS
.
The PLUS in the name stands for the complete integration of all features of CREATE DESIGN
.
Starting with version 2.0.6
User Interface
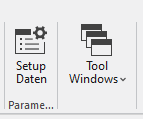
- Parameter ribbon group
- Only one button in the Parameter ribbon group in order to open the Setup Data.
The individual buttons for the tables and the corresponding entries of the Tool Windows list box are removed. -
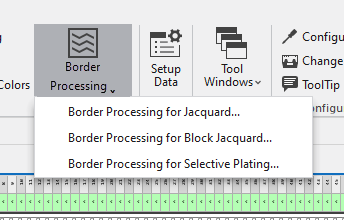
- Dialog Boxes ribbon group
- The border processings are combined to the Border Processing button of the Dialog Boxes ribbon group.
The Border Processing for Selective Plating... entry appears only with a machine (ADF) which supports this. -
- Correspondingly in the context menu of the view
-

- AutoScroll and User Control within Needle Area
- You had to move the visible area by the scroll bar to draw within great patterns.
- A real autoscroll function considerably improves working in the control columns and the search area of CA and MA.
- With drawing up the drawing echo, the autoscroll function starts automatically as soon as the cursor is at edge of the visible area.
-
Do not move the cursor too fast and do not move it outside the document window. - The user control was often annoying when drawing up the drawing echo.
- Starting the drawing actions toggles the user control.
With it, you can move the cursor freely over the user control - You can enable the user control by the CTRL key e.g. to deselect the color.
-

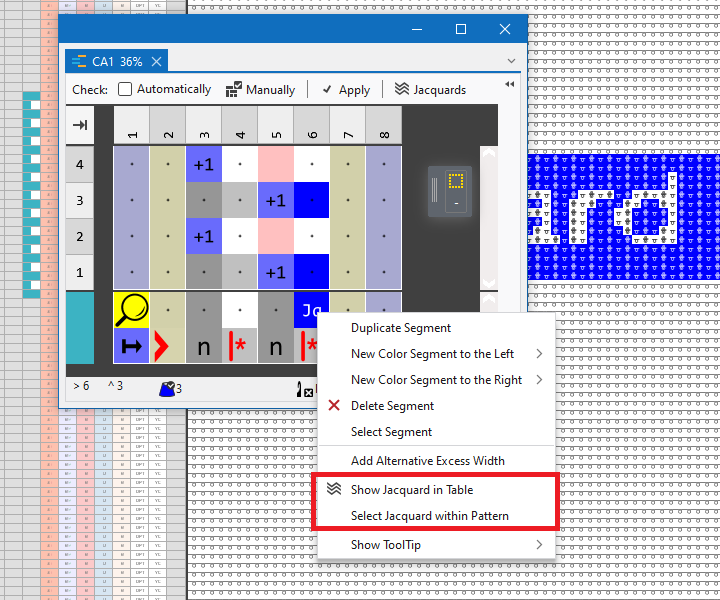
Color Arrangement
- Two function in order to trace back within the pattern are available for CA with Jacquard area.
-
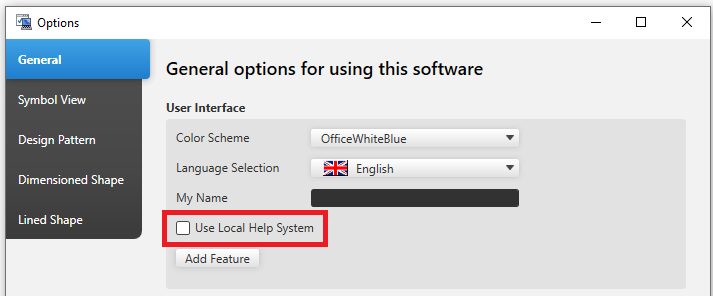
Help System
- You can switch between locally installed help and the web-based help in Options → Registerkarte General.
-
U3M Export of the Fabric Preview
U3M is a standardized format for 3D visualization.
This includes physical properties data and texture maps, all combined into one ZIP file (U3MA).
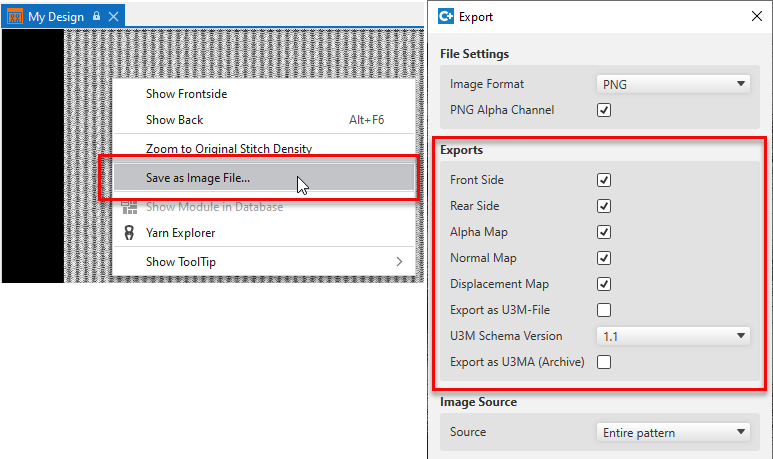
→  Fabric View → Export as Image File...
context menu → Image File Settings dialog box
Fabric View → Export as Image File...
context menu → Image File Settings dialog box
Already with version 2.0.4 :
Start Window

- You can edit shapes in DXF format by the DXF Import application before importing them.
-
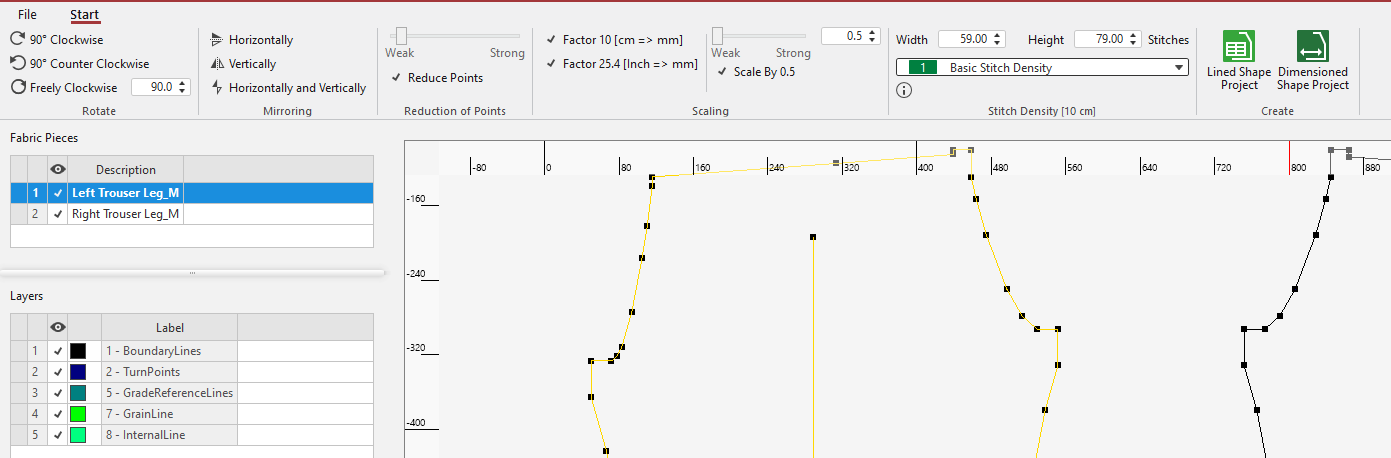
- Following functions are available in the ribbon for selected fabric pieces:
- Rotate
- Mirroring
- Reduce Points
- Scaling
- You can manage the fabric pieces by the Fabric Pieces table:
- Delete
- Rename (double click on the Description column)
- Show or Hide
- A new lined shape or dimensioned shape project will be created with all the visible fabric pieces.


: As up to now, you can open a *.dxf file within the CREATE PLUS.
However, it will not be imported directly into a dimensioned shape but loaded into the DXF Import application.
: Within a pattern project, you can start the DXF Import by File → Import → Import DXF.
The imported fabric pieces will appear in the Shapes tool window.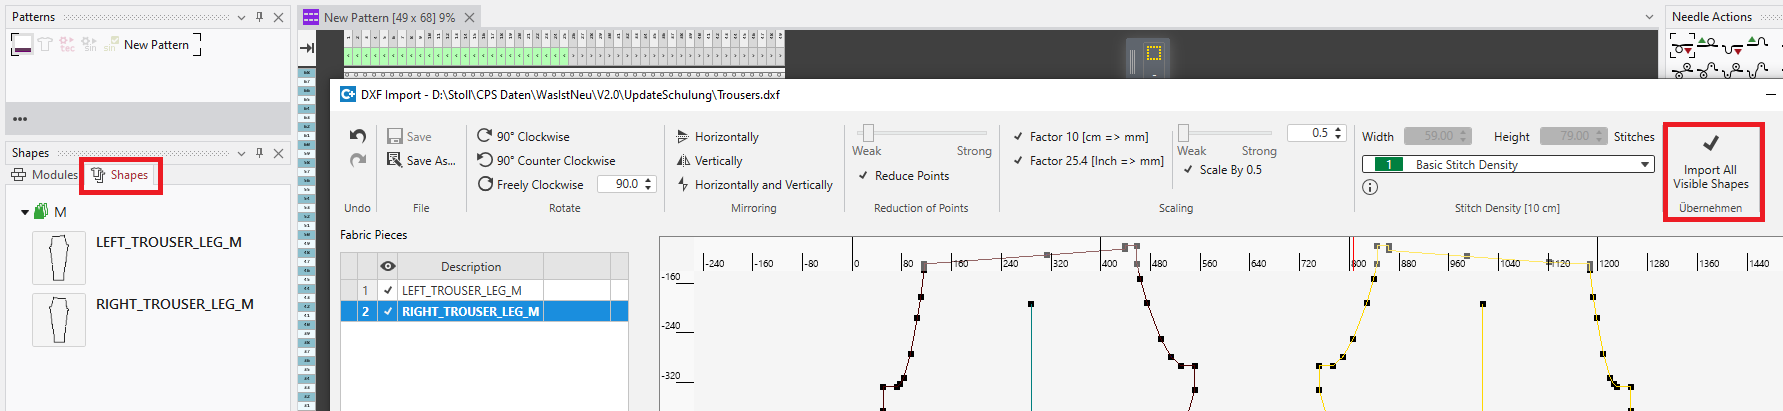
-
 New Design Project
 - Within the CREATE PLUS, you can create new design projects or open existing ones.
- With it, the features of the CREATE DESIGN application are fully integrated.
-
 New Pattern Project
 -

- You can directly name the project.
This name is used for the project file as well as in the Patterns tool window. -
-
 New Knitting Element
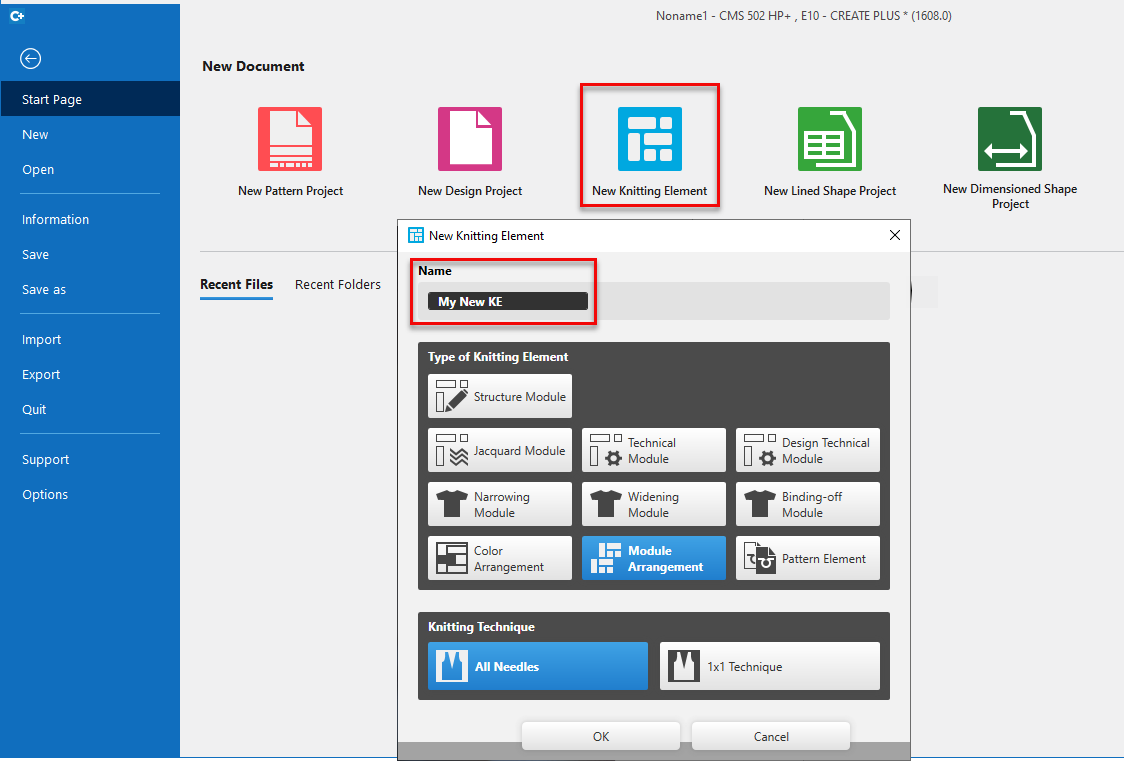
- Up to now, only structure modules could be created.
Now you can create all kinds of knitting elements: - Different types of modules
- Color Arrangement
- Module Arrangement
- Pattern Element
- You can directly name the new knitting element.
: The assignment of names by the user was introduced in many places:
- For a new project or a new knitting element
- For an new local knitting element, even if it is created from a selection of the pattern.
- For duplicating orders or sizes
User Interface of CREATE PLUS
- The user interface of the complete application is adopted to the Office 2019 Style.
- Ribbon is optimized for the standard size of monitors (1920 Pixel).
-

- The drawing tools are separated to the groups Drawing , Modify (new) and Dialog Boxes (new).
- You can start the Knit Explorer via the quick access toolbar.
- The Project ribbon group is renamed to Multiple Processing and moved from the Start ribbon to the new Multiple Processing ribbon. New in this group is the possibility to get the Sintral Check for several pattern done.
- Credit group is now part of the View tab.
-
Layout Management dialog box had a function to reset the positions of dialog boxes.
This function moved to Options → General group. - The buttons Knit Explorer and Quick Access are available in the tool windows of Color Arrangement, Module Arrangement and Pattern Elements.
-

- Pattern elements are available in the Quick Access of the database.
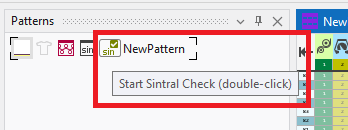
- In the Patterns tool window, the Sintral Check-Check can be started and will be shown as done.
-
- The new fabric view of design projects is used for pattern projects as well now.
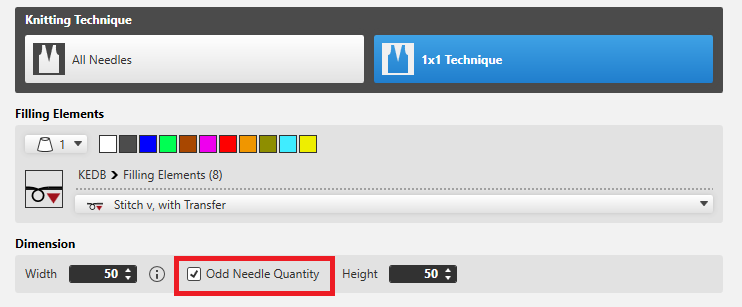
Pattern in 1x1 Technique
- To get a stitch at the right edge of the pattern with 1x1 technique, the new Odd Needle Quantity option is available here:
- New Pattern Project / New Pattern
-
- Lined Shape / Shape Properties
-
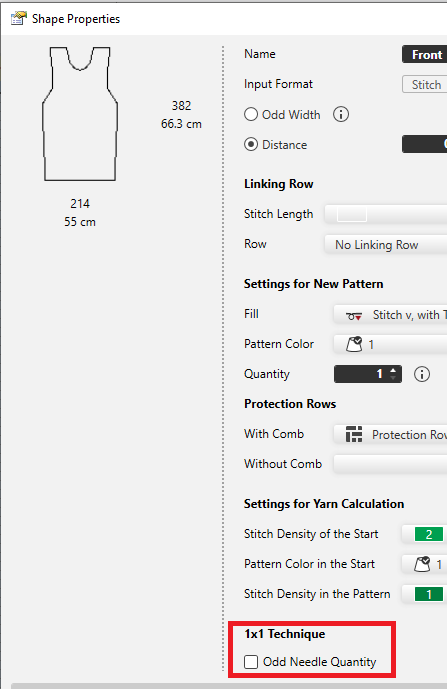
- Dimensioned Shape / Properties of Fabric Piece
-
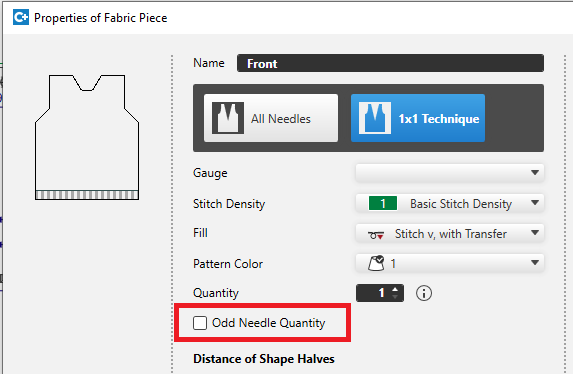
- When converting the knitting technique from All Needles to 1x1 Technique, the odd quantity of needles can be created as well.
- A prompt appears for this case.
-
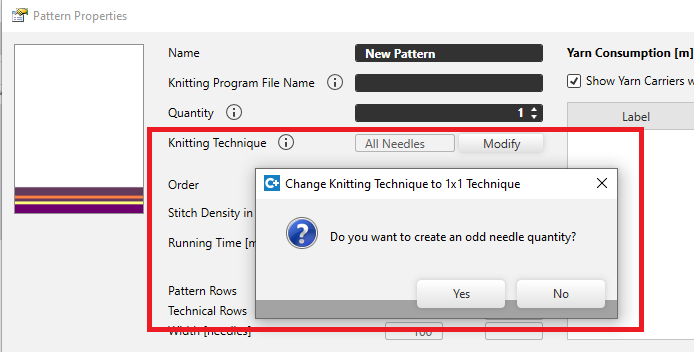
- The prompt about the odd needle quantity does not appear if a shape is already positioned on the pattern.
If you whish to convert with an odd needle quantity, enable the Odd Needle Quantity check box of the shape properties.
Editing the Pattern
- Find and Replace / Exchange
-
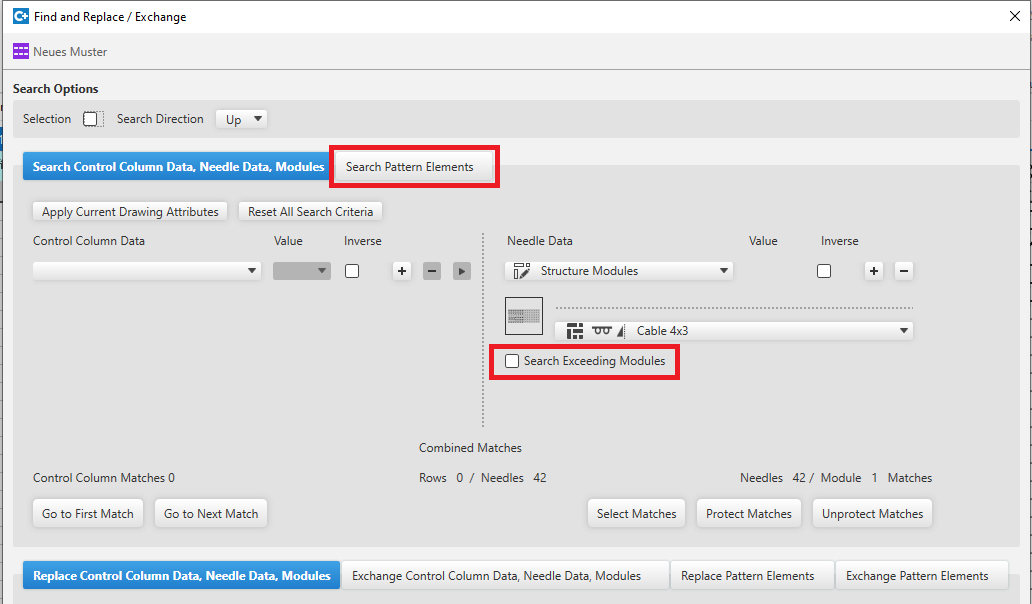
- Working with pattern elements is improved and integrated into the user interface of the dialog box.
With selecting a pattern element and opening the dialog box, the pattern element will be applied at once for editing and the user interface will de switched. - You can search exceeding modules if the check box is enabled.
- Search an object and replace it with another object in order to replace an exceeding module by a needle action.
- Insert Selection (rows)
-
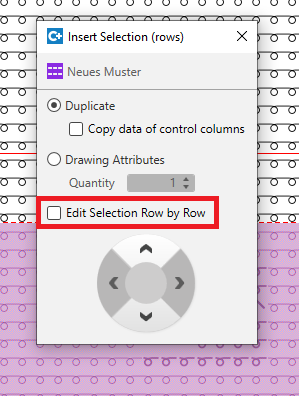
- Extension of the Insert Selection (rows) function by Edit Selection Row by Row and Edit Selection Row by Row
Both variants are possible with inserting: - As contiguous block
- Row by row or column by column
Colors and Yarn Carriers
- Multiple System Color for Multi-system Knitting
-

- The quantity of slots for multiple system color is increased from 4 to 6 (A-F).
- Optimized editing in the tool window
Copy and paste of a cell was only possible within the same column.
This restriction is obsolete for the Multiple System Colors and Plating Colors tool window. - Yarn Carrier Colors und Magazine Colors within the project
- If a color appears several times within the pattern, Find and Replace may be a great effort for a pattern project with many single patterns and color arrangements.
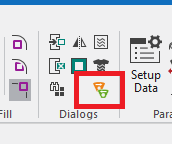
In the Dialog Boxes ribbon group the Exchange Yarn Carrier Colors dialog box is available in order to reduce this effort. -
-
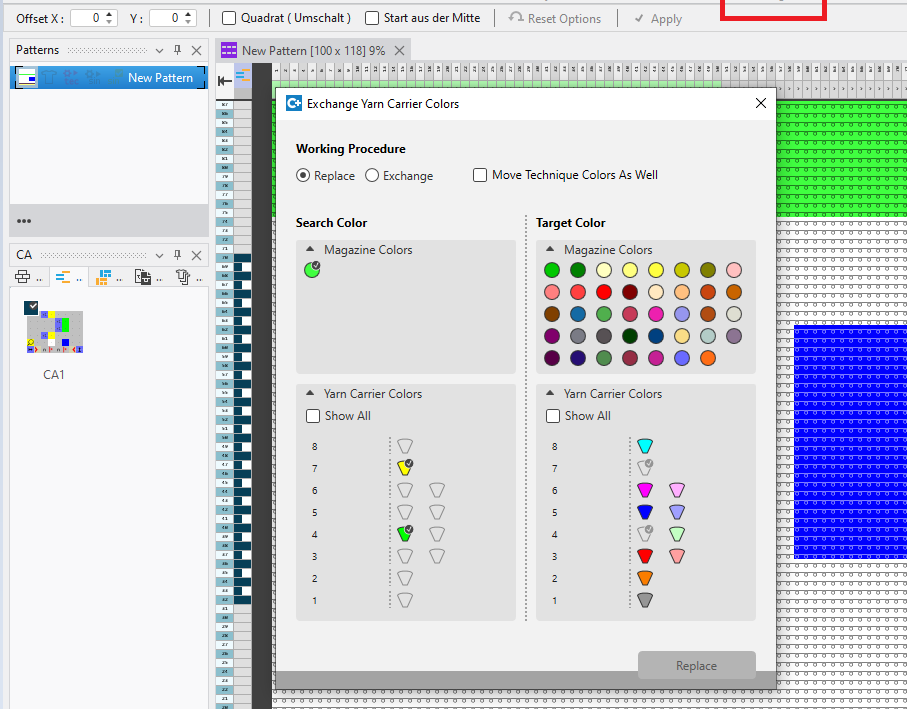
- All Yarn Carrier Colors and Magazine Colors used within the pattern project are available in the dialog box.
This colors can be replaced or exchanged with unused yarn carrier colors or magazine colors. -
The magazine color of the pattern is used within this picture.
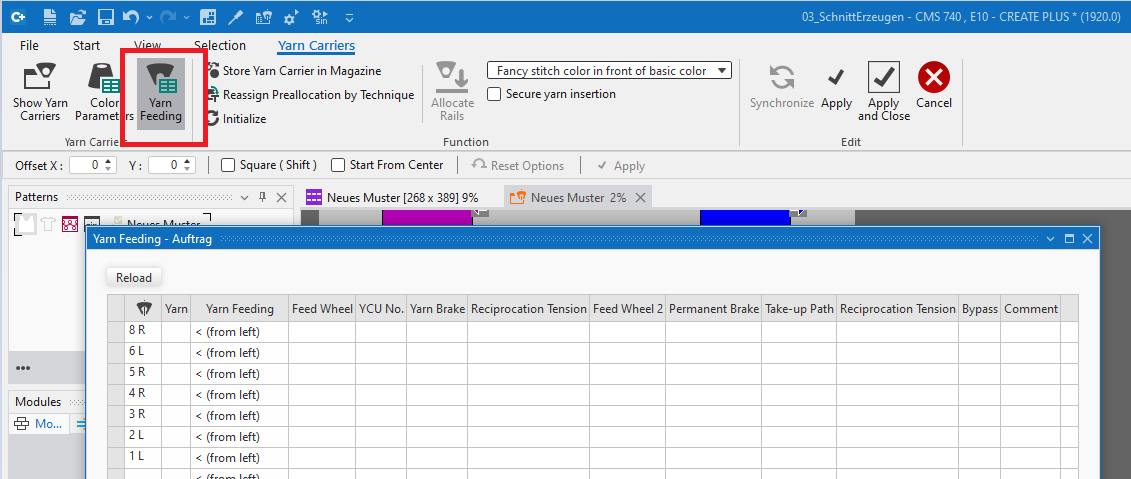
Both the yarn carrier colors are contained in the CA. - Yarn Carrier View ( Preview group)
- Data of the Color Parameters tool window are shown additionally in the expandable part of the Yarn Carriers tool window.
- You can enter the placement plan of the report for the pattern database.
Yarn Carriers → Yarn Carriers → Yarn Feeding -
-
File → Export →
 Create Report
Color Arrangement
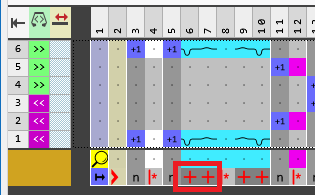
- Extension of the Excess Width definition of areas of CA
- You can create an additional knitting technique (e.g. tie-off) beside the color area by the excess width. This will be created only if no knitting technique of the neighboring color area must be overwritten.
- The following picture shows the result with V.1.3.4.
The tie-off is inserted on the right-hand side only. -

- To get the same result with V2.0, you have to use the new Excess Width symbol (red plus character) in the CA.
Former patterns will be converted with opening. -
- The previous symbol (black plus character) now means Excess Width, Overwriting .
-
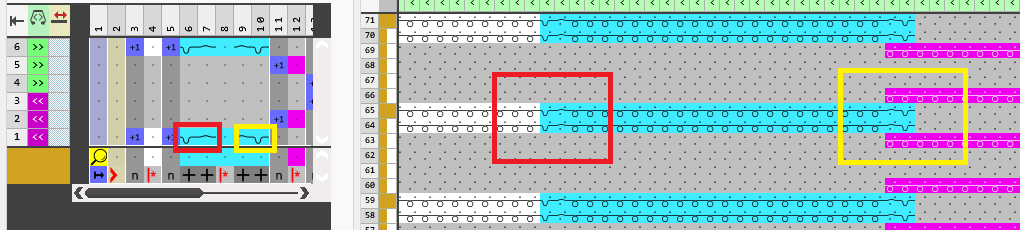
- The tie-off will inserted overwriting on the left-hand side.
Fully Fashion
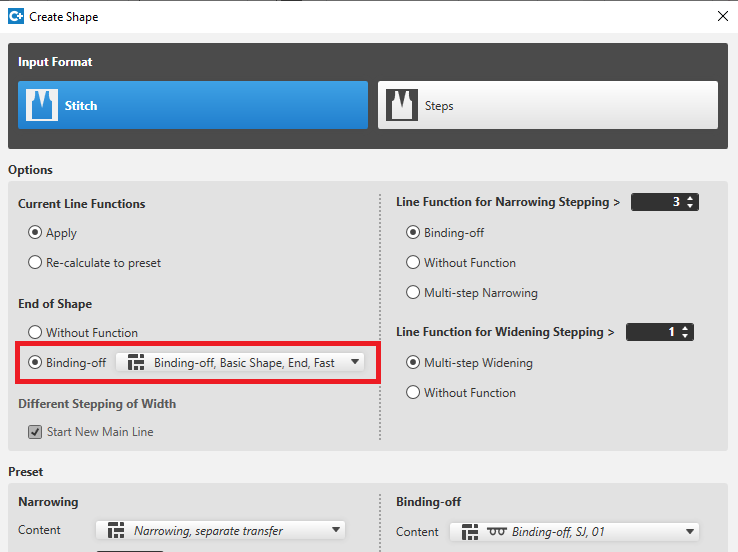
- Create lined shape for a pattern
- In the Create Shape dialog box, you can select a module for binding-off at the line end.
-
- Editing the shape on the pattern.
-

- The Change Shape Dimensions... function is part of the context menu of the view now.
The pattern is in the shape editing mode. - The user control is prepared for the coming development of fully fashion.
To toggle by two steps.
Machines
- Extract knitting program from the pattern project file
- In the Windows Explorer you find the menu item in the context menu of the (*.spf) file under .
- S-Machines
-
CMS 730 S and CMS 830 S are fully supported now.
In Setup files, control columns and in the pattern view you will find the corresponding settings for NPS (second stitch tension) und PNP (reclaiming). - The second stitch tension can be toggled via the status bar of the pattern view.
-

- BMS
- Not Sunken Tuck:
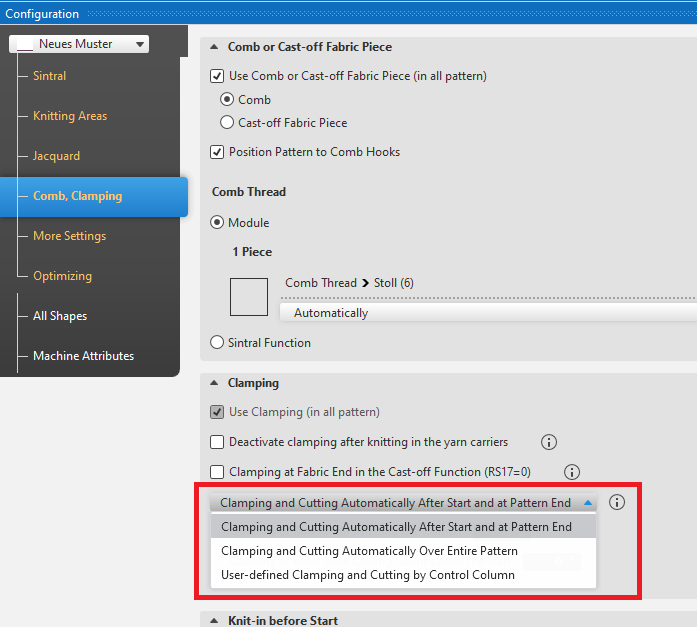
You will find the corresponding functions in the System Function control column. - Semi-automatic of clamping and cutting:
Up to now, you could only toggle on or off the automatic of clamping and cutting.
After disabling the corresponding setting of the configuration you had to enter the user defined clamping commands manually. - With the new version, the Clamping and Cutting Automatically check box is replaced by a list box with different items.
With it, you can get the automatic to work at start and pattern end only. -
You can find the news of the previous releases in the CREATE Help (F1) help.