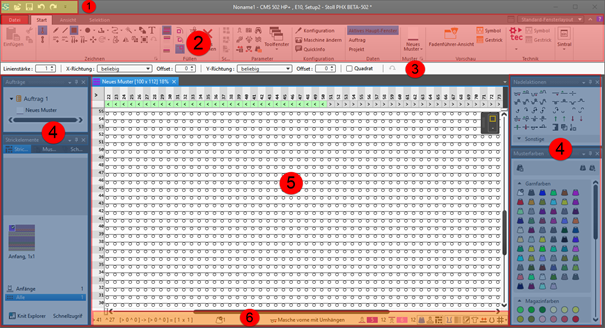
User Interface of CREATE PLUS
|
|
|
1 |
Quick Access Toolbar |
Adjusting via the |
|
2 |
Ribbons |
Ribbons containing the necessary groups for editing
|
|
3 |
Properties of Drawing Tools |
Adjusting the selected drawing tool |
|
4 |
Tool Windows |
Selection of the corresponding tool windows by
|
|
5 |
Document Window |
Display and editing of pattern information
|
|
6 |
Status Bar |
|
 : The ribbon can be minimized.
 in the ribbon


 :
: 


Adjusting and Saving the User Interface as User Profile
You can position the tool windows and document windows of CREATE PLUS as desired and save it as user profile.
Profiles
-
Tool Window Layout
 : Default layout of windows provided by STOLL which is used for all new pattern projects.
 - Creating Private Tool Window Layout: Default Window Layout from STOLL will be overwritten.
- Resetting the private tool window layout to the STOLL tool window layout.
-
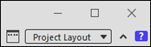
Project Layout
Due to modifying the default window layout, these window positions will be saved as project layout in the *.spf file as Project Layout when closing the CREATE PLUS. They will be used within this pattern project only. -
Additional Private Profiles
Change position of windows and save them under a profile name.
Positioning tool windows and document windows, saving and loading them:
Display and selection of the profiles at the top right of the main window
Creating a single additional window layout only (project-related):
- 1
- Position windows as desired.
- The display is automatically switched from Default Window Layout to Project Layout.
- 2
- Close or exit the CREATE PLUS main window.
- The positioning of the windows is saved as Project Layout within the pattern project and will automatically be used when opening the pattern project.
: Keep an eye on the current layout setting when closing the CREATE PLUS!
Creating more additional window layouts:
- 1
- Position windows as desired.
- The display is automatically switched from Default Window Layout to Project Layout.
- 2
- Click the
 button next to the selection list.
 - The Layout Management dialog box appears.
- 3
- Enter a name under New Layout:.
- 4
- Click the Save button.
- All saved layouts are listed under .
- 5
- Click the Close button.
- Profile is saved and available for further projects.
You can create several different user profiles for the CREATE PLUS following this procedure.
Selecting Saved Profiles:
- Project Layout is selected.
- 1
- Open the selection list with the
 button.
 - 2
- Select the desired profile from the list.
- Selected windows layout is shown.
Deleting or Renaming Saved Profiles:
- 1
- Open the Layout Management dialog box with the button.
- 2
- Select the desired profile from the list.
- 3
- Open the context menu with RMB ->delete the profile by
 .
.
- or -
Change the profile name by Rename
Create and save a private default window layout:
- Project Layout is selected.
- 1
- Position windows as desired.
- 2
- Select the File tab of the main window.
- 3
- Click the Use current window layout as default window layout button under Options / General at Layout.
- The arrangement of the windows when closing the program is saved as default window layout and the STOLL default of the tool window layout will be overwritten.
- 4
- Close the Options dialog box with OK.
Resetting the Private Default Layout to STOLL Default Layout:
- 1
- Select the File tab of the main window.
- 2
- Click the Reset Layout Information button under Options / General at Layout.
- The arrangement of the windows is set to the STOLL default window layout.
- 3
- Close the Options dialog box with OK.
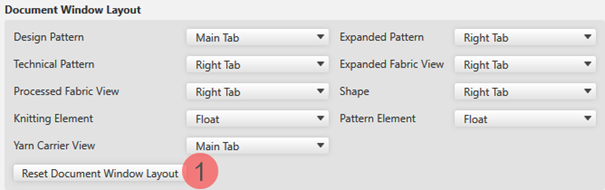
Define the Behavior of Document Windows:
- A pattern project is created.
- 1
- Select the File tab of the main window.
- 2
- Make the desired settings under Options -> General -> Document Window Layout.
- 3
- Close the Options dialog box with OK.
- The Options dialog box gets closed and the setting applied.
|
| |
|
You can define the behavior of the listed document windows as follows: | |
|
Main Tab |
The selected document window is added as an additional window (register) to the other windows that are set as main windows. |
|
Right Tab |
The selected document window is arranged as a new main window to the right of the open main windows. |
|
Float |
The document window is opened floating and can be positioned as desired. |
|
Reset Document Window Layout |
The existing document window layout is restored to the STOLL document window layout. |