Step by Step to 'Pattern-7'
- A pattern project with one pattern and the desired settings is created.
- 1
- To draw select any desired drawing tool under the Drawing group.
- 2
- In the Pattern Colors tool window, select the desired pattern colors from the Yarn Colors color palette to draw the motif:
- Yarn Colors:
-
 : The yarn carriers are not automatically placed on the yarn carrier rails.
The yarn carrier home position is determined in the Technical Processing.
- 3
- In
 Design Pattern draw the desired motif.
|
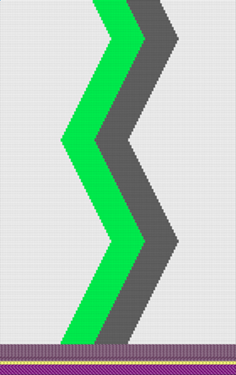
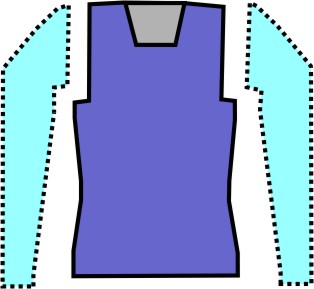
Example with 3 yarn colors without shape | |
|
|
Pattern neckline
|
|
| |
|
|
Notice:
|

- 4
- In the Design Pattern adjust the motif accordingly, if desired.
- 5
- To create a project-related lined shape, select the
 Shapes tab in the tool window.
 - 6
- Open the context menu with RMB and select Create New Shape of Size M....
- The New Lined Shape tool window is opened.
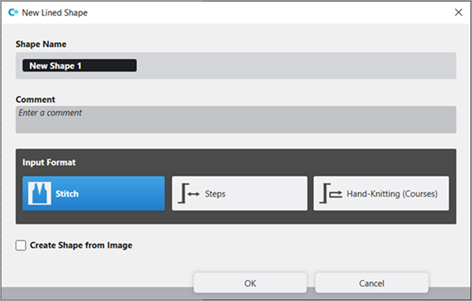
- 7
- Make the desired entries:
- Shape Name: Any
- Input Format: Stitch
- 8
- Confirm with the OK key.
- The new lined shape (basic shape) is graphically displayed in the Shapes tab and in a new document window
 as rectangle.
: The default attributes will be used for the shape edges of the lined shape.
Menu File -> Options -> Lined Shape -> Options for New Lined Shape
- 9
- To create a lined shape based on the displayed rectangle in the ribbon Shape Editing under Properties, click the Line Table button.
- or -
Use the graphic displayed in the document window.
: The method (table or graphic) to create a project-related lined shape is freely eligible, since the views are always updated simultaneously.
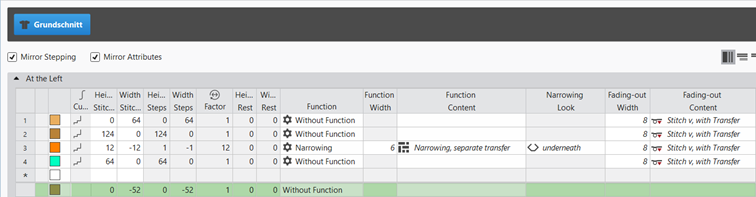
- 10
- Insert new shape lines in the table and enter the desired values for the basic shape.
- Standard attributes from configuration are assigned to those shape lines.
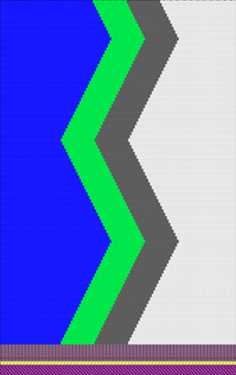
Example: Lined shape for Pattern-7
|
Basic Shape: Front without neckline |
|
|
Rules for creating a shape for the knitting mode SJ:
Example Front:
|
Shape Attributes |
Rules / possible settings |
|---|---|
|
Knitting Mode: |
Single Jersey |
|
Step width of widening |
1 needle (stitch) per knitting row |
|
Step height of widening |
As desired |
|
Quantity of rows without shape modification |
As desired |
|
Step width when narrowing |
1 - 3 needles (stitches) |
|
Step height when narrowing |
As desired |
|
Fading-out Width |
As desired |
|
Knitting mode for fading-out |
Front Stitch with Transfer |
|
Binding-off width: |
Stepping > 3 stitches |
|
Binding-off methods |
Binding-off, Structure, Single Jersey
|
- 11
- Allocate the desired attributes to the shape lines.
- 12
- In the Shapes tool window select the created shape with LMB.
- 13
- Open the context menu -> Position Shape -> select Pattern name.
- The shape is floating in the selected basic pattern.
- 14
- To position the shape, enable the
 button of the document window.
 - 15
- Carry out
 Technical
Processing if necessary.: After carrying out the Technical
Processing you are able to view and weigh up the result of the automatic processing, if corrections / optimizations are necessary.
Technical
Processing if necessary.: After carrying out the Technical
Processing you are able to view and weigh up the result of the automatic processing, if corrections / optimizations are necessary. - 16
- Back to the Design Pattern to make pattern-related changes.
- 17
- Open the Yarn Carriers tool window for this purpose.
- 18
- In the Color Parameters table make the desired changes in the following groups, if necessary:
- Knitting-in and Out
- Intarsia Binding
- Border Processing
- 19
- If desired, make the desired presets in the following control columns:
- Stitch Length (NP)
- Main Take-down (WMF)
- Speed (MSEC)
- 20
- If necessary, make the desired presets for combining yarn carriers in the More Settings tab of the Configuration dialog box.
Several yarn carriers are combined in one system by the technical processing (knitting sequence) to optimize the production time.
:
The yarn carriers will be combined only if this is possible based on the color field distances.
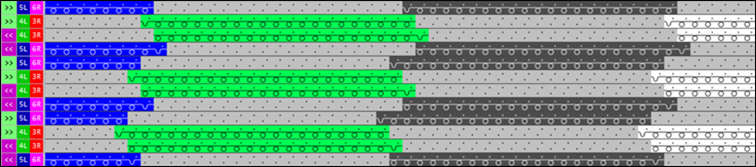
The result is visible in the  Symbol View after the technical processing.
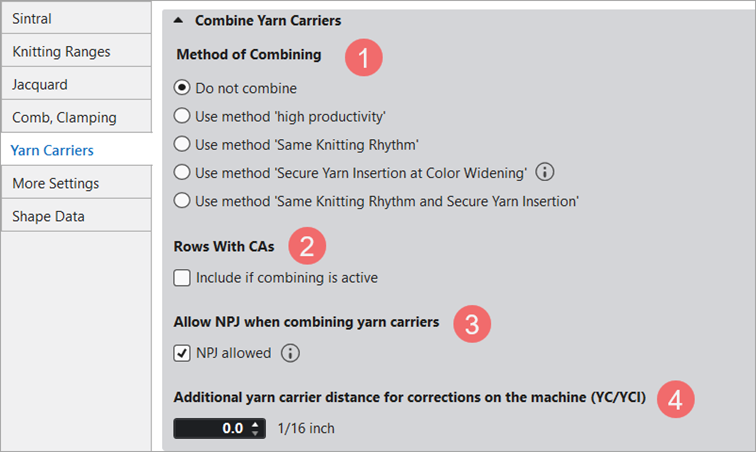
Options in the Configuration dialog box
- 1
- In the ribbon select the
 Configuration button.
 - The dialog box appears.
- 2
- Select the More Settings tab.
- 3
- Make the desired presettings for the Combine Yarn Carriers.
-
Yarn Insertion:
 Secure Yarn Insertion at Color Widening is active (standard)
|
| ||||
|
1 |
Yarn Insertion | |||
|
|
Do not combine (Default setting) | |||
|
No automatic combining of the yarn carriers.
| ||||
|
|
Combining with high productivity | |||
|
Automatic combining of the yarn carriers, where the result cannot be influenced.
| ||||
|
|
Secure Yarn Insertion at Color Widening | |||
|
Automatic, uniform combining of the yarn carriers with an optimized knitting process for secure yarn insertion with the tuck binding.
| ||||
|
2 |
Allow NPJ when combining yarn carriers | |||
|
|
NPJ allowed (default setting)
Result:
| |||
|
|
NPJ allowed is disabled
Result:
| |||
|
3 |
Additional yarn carrier distance for corrections on the machine (YC/YCI) | |||
|
|
Adjust the safety distance in order to make corrections on the machine (YC/YCI in the setup).
| |||


- 21
- Start the Technical
Processing.
With the button, show Symbol view after technical processing. - The yarn carriers are automatically combined after the set specifications and the Intarsia rules (constructive facts of the Intarsia yarn carriers on the machine).
Setting in the Configuration dialog box
- 4
- In the ribbon select the Configuration button.
- The dialog box appears.
- 5
- Select the More Settings tab.
- 6
- Make the desired presettings for the Combine Yarn Carriers:
-
Yarn Insertion: Do not combine is enabled
- 7
- Start the Technical
Processing.
- The yarn carriers will not be combined automatically. This corresponds to a nice, uniform Intarsia knitting process with a high machine run time.
- 22
- Generate
 Sintral.
 - 23
- Start the
 Sintral Check.
 - 24
-
 Extract the knitting program.
 - A program for the knitting machine will be created: CMS530.Pattern-7.zip.
- 25
- Load knitting program into the machine.
 : The extracted file CMS530.Pattern-7.zip can be loaded onto the machine with an USB stick or via Ethernet.