Border Processing with Intarsia Jacquard
 :
:
Due to the motif and the inserted jacquard back, adjustments to the back of the jacquard may be necessary at the border regarding the carriage direction.
- Correction of the border of the motif depending on the carriage direction
- Correction of the Jacquard at its end - net ending
Options of border processing with Intarsia Jacquards:
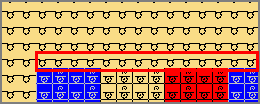
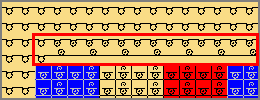
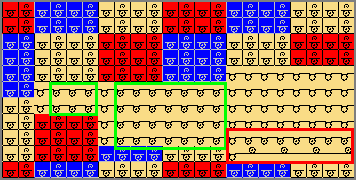
Example:

- The border processing depends on the carriage direction
- The borders of the left and right will be corrected according to the carriage direction.
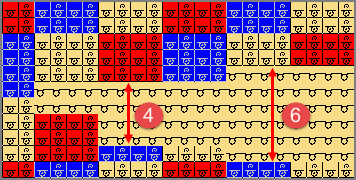
- The inserted jacquard back is repeatedly inserted up to the quantity of needles, which is entered under allowed stepping.
Processing steps for the border processing
Recommendation:
Edit the border processing and net end following each other as the pattern will be modified by the border processing.
This change can affect the net ending and require a Net-end module to be inserted.
- A Jacquard back is applied to the a selected Jacquard area.
- A row selection in the height of the motif is created.
- 1
- In the ribbon under Dialog Boxes -> click on
 Border Processing
- or -
Place the cursor in the pattern area of the design pattern -> open the context menu with RMB. - 2
- Select Border Processing for Intarsia Jacquard....
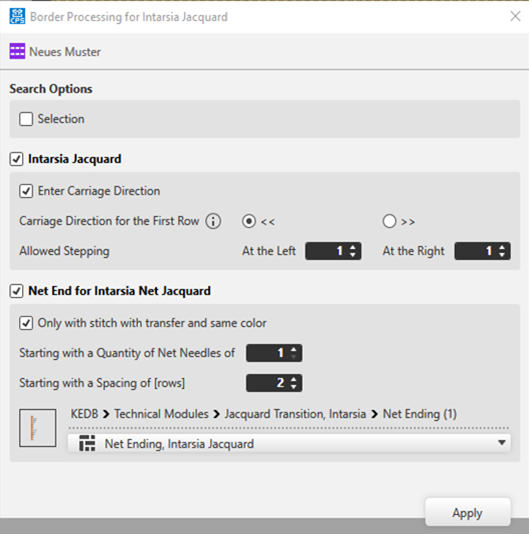
- The Border Processing for Intarsia Jacquard dialog box appears.
|
| |||||||
|
Border Processing for Intarsia Jacquard - pattern name | |||||||
|
Search Options | |||||||
|
|
Edit the border processing of the Jacquard areas within the whole pattern. | ||||||
|
|
Border processing only of the Jacquard areas within a selection.
| ||||||
|
Intarsia Jacquard | |||||||
|
|
Default Setting: | ||||||
|
|
The border processing of the Intarsia Jacquard motif will not be carried out. | ||||||
|
|
Enter Carriage Direction | ||||||
|
|
The carriage directions will be applied to the control column of the pattern. | ||||||
|
|
The carriage directions will be not applied to the control column of the pattern. | ||||||
|
Carriage Direction for the First Row | |||||||
|
|
Carriage direction to the left for the first row of the Jacquard area | ||||||
|
|
Carriage direction to the right for the first row of the Jacquard area | ||||||
|
Allowed Stepping | |||||||
|
At the Left |
|
Preset of allowed stepping by needles at the left border | |||||
|
At the Right |
|
Preset of allowed stepping by needles at the right border | |||||
|
| |||||||
|
| |||||||
|
Net End for Intarsia Net Jacquard | |||||||
|
|
Default Setting: | ||||||
|
|
No Net ending module will be inserted at the end of the inserted Jacquard back. | ||||||
|
|
| ||||||
|
|
The following requirements have to be fulfilled:
| ||||||
|
Original
|
Result
| ||||||
|
Starting with a Quantity of Net Needles of Net Stitches |
|
Specify the quantity of net stitches at the Jacquard back from which the selected module is to be inserted.
| |||||
|
Starting with a Spacing of [rows] |
|
Quantity of SJ rows interrupting the Jacquard (space)
Example: without net ending
Example:Preset 5 [rows]
| |||||
|
Selection of the module for net ending
| |||||||

 <<
<<


- 3
- Make the desired settings under
 Intarsia Jacquard.
 - 4
- Disable the
 Net End for Intarsia Net Jacquard function.
 - 5
- Apply the settings to the pattern with the Apply button.
- The dialog box will not be closed.
- 6
- Disable the Intarsia Jacquard function.
- 7
- Make the desired settings under Net End for Intarsia Net Jacquard.: Inserting the module for the net ending avoids the stitches transferred at the net ending to shine through.
- 8
- Apply the settings to the pattern with the Apply button.
- The dialog box will not be closed.
- 9
- Close the dialog box with X.