Example 8: Color Arrangement with Sub-color
With this Color Arrangement CA8 and using a sub-color, the structure and stitch length of the design pattern (basic pattern) will be changed for one color area (search color).
Example:
- For the color area of yarn color #1.
- Allocate the structure via sub-color
- Enter the stitch length via sub-color
Create the Color Arrangement CA8:
- The pattern project of pattern Pattern-7 is open.
- Pattern in
 Design Pattern is active.
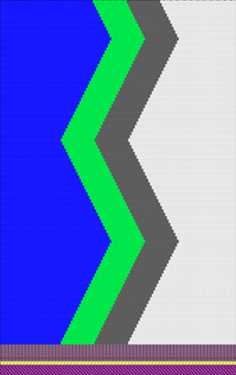
 : Colors from the Yarn Colors table were used to draw the basic pattern.
- 1
- If necessary, save the pattern project under a new name.
- 2
- Create a sub-color for the desired yarn color.
- For example: Sub-Color for yarn color #1
- 3
- If necessary, change the color value of the sub-color.
Creating Sub-colors:
: Be sure to create the sub-color for a main color used in the pattern only, as no additional yarn carrier should be added to the pattern.
With the help of the sub-color, you can allocate others attributes to a yarn carrier.
- 1
- Position the cursor to the main color
 in use (e.g. yarn color #1) in the tool window Pattern Colors / Yarn Colors.
 - The
 icon appears beside the symbol.
 - 2
- Click the icon.
- The input panel for the sub-color appears.
- 3
- Click on the
 icon.
icon. - A new empty sub-color will be created and selected.
- 4
- If required:
Call up the Change Color Value... context menu in order to change the color.
- or -
Delete the sub-color by Delete Sub-Color. - 5
- If required, create additional sub-colors for the same main color.
- or –
Switch to another main color in order to add sub-colors. - 6
- Select sub-color und draw it into the area of Design Pattern for which different specifications are necessary.
- The sub-color will be marked by the
 icon and appears in the color parameter table.
- 4
- Draw this sub-color into the color field of yarn color #1 of the Design Pattern .
|
|
1 |
Yarn Color #3 |
|
2 |
Yarn Color #4 | |
|
3 |
Yarn Color #2 | |
|
4 |
Yarn Color #1 | |
|
5 |
Sub-color #1/1 of yarn color #1 |
- 5
- In the Pattern Row control column, select the first 2 pattern rows.
- 6
- Position the cursor in the pattern area.
- 7
- Call up the Selection
/
 Create Color Arrangement:
context menu.
Create Color Arrangement:
context menu.
- or -
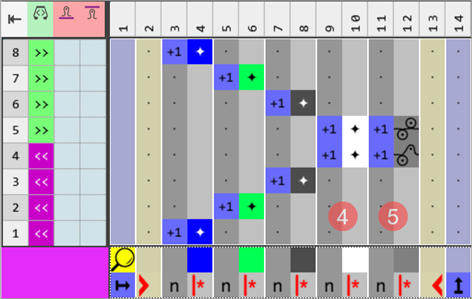
Click directly the button in the ribbon. - The Color Arrangement Editor with the original standard knitting process of the 2 selected pattern rows is opened.
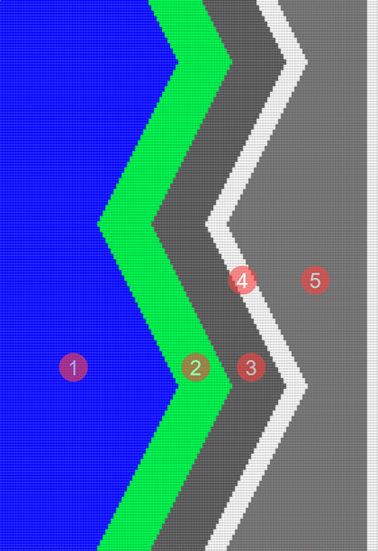
|
| |
|
4 |
Color segment of the yarn color #1 |
|
5 |
Color segment of the sub-color of yarn color #1 |
|
Result after technical processing
| |
|
| |
|
The colors (= yarn carrier) from the 'processing area' of the CA are processed according to the number of knitting systems of the selected machine.
| |

 symbol (default entry) repeats the needle action from the source row in the entire color area from the left to the right
 symbol, the corresponding needle action from the source row of the design pattern is read out and knitted according to the search color.
- 8
- Draw the desired structure e.g. in the color segment of the sub-color #1/1.
- 9
- In the tool window of the CA editor change to the Needle Actions / Colors tab.
- 10
- Select the desired needle actions to draw:
- Example: Structure Half Cardigan
- Front Stitch - Rear Tuck
- Front Stitch - Rear Stitch
|
Example: Half Cardigan structure in the color segment of the sub-color #1/1 |
|
|
|
|
- 11
- Switch from
 Pattern Color to
  Stitch Length in the status bar of the Color Arrangement Editor
|
CA8 |
|
|
|
|
- 12
- Select
 Pattern Parameters
in the Home ribbon at Parameter.
Pattern Parameters
in the Home ribbon at Parameter. - The Pattern Parameters dialog box appears.
- 13
- Select the
 Stitch Length section.
 - 14
- Open the Stitch Length (NP) tab.
- 15
- Open the Default tab.
- or -
Open the User tab. - 16
- Select the desired existing entry from the tables.
- or -
In the User tab position the cursor in the first column and select Add Table Row... in the context menu. - New entry is added at the end of the table.
- 17
- Make the desired presettings for the entries in use:
- Define NP index.
- Change Color.
- Enter NP value.
- Enter the description.
- 18
- Select the desired stitch length in the
 or
or  column of the table and insert it into the needle actions of the sub-color #1/1.
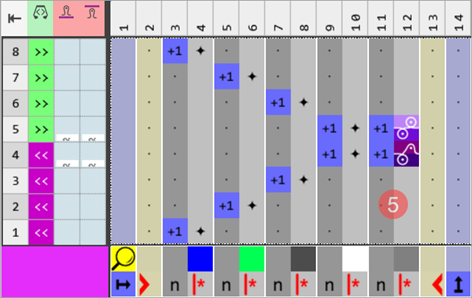
CA 8 with stitch lengths allocated exactly to needles | |
| |
5 | Stitch lengths allocated exactly to needles by the sub-color #1/1
|
- 19
- If necessary, set NPJ -> Extra Row in the Stitch Length table for the sub-color of used NP data.
- 20
- Check the generated Color Arrangement on correct entries with the
 Check button.: The knitting procedure cannot be checked!
 - 21
- If necessary, in case of a Color Arrangement already used in the design pattern, apply the changes to the basic pattern with the
 Apply button.
- or -
Close the tool window with .
. - 22
- Close the prompt with the desired button:
- Save:
Color Arrangement is saved locally in the CA tool window.
 - Reject:
The changes will not be saved. - Copy:
The changed Color Arrangement is saved as copy in the CA tool window.
- 23
- Enter the Color Arrangement via the
 control column into the desired rows of the design pattern.
 - 24
 Start Technical Processing
 - The Color Arrangement is expanded by the technical processing.
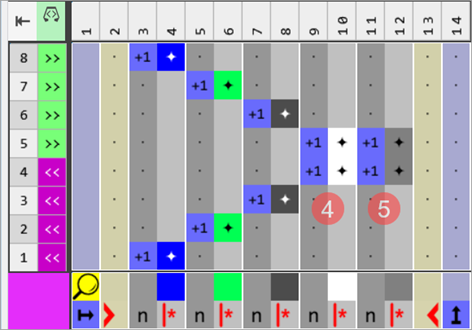
Result after technical processing | |
| |
4 | Yarn Color #1 |
5 | Sub-color with Half Cardigan structure
|

- 25
- Generate
 Sintral.
 - 26
- Start the
 Sintral Check.
 - 27
 Extract the knitting program.
- 28
- Load knitting program into the machine.