Step by Step to 'Pattern-15'
- A pattern project with one pattern and the desired settings is created.
- 1
- To draw select any desired drawing tool under the Drawing group.
- 2
- In the Pattern Colors tool window, select the desired pattern colors from the Yarn Colors color palette to draw the motif:
- Yarn Colors:
-
 : The yarn carriers are not automatically placed on the yarn carrier rails.
The yarn carrier home position is determined in the Technical Processing.
- 3
- In
 Design Pattern draw the desired motif.
|
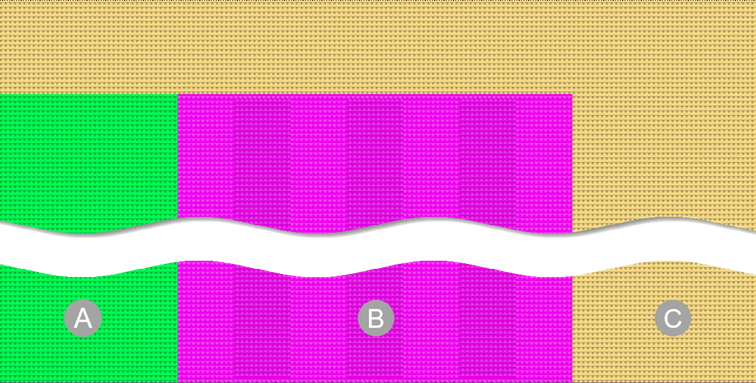
Basic pattern with 3 yarn colors | |
|
| |
|
A |
Yarn color #4 with needle action Front Stitch with Transfer |
|
B |
Yarn color #6 with a structure consisting of
|
|
C |
Yarn color #31 with Front Stitch with Transfer needle action |

- 4
- In the Pattern Row control column, select the first 2 pattern rows.
- or -
Select the total height of the pattern area for the CA. - 5
- Position the cursor in the pattern area.
- 6
- Call up the Selection
/
 Create Color Arrangement:
context menu.
Create Color Arrangement:
context menu.
- or -
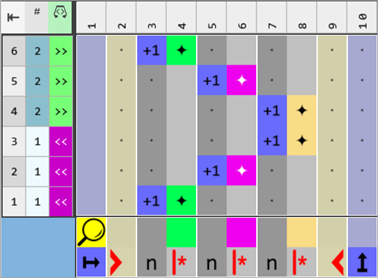
Click directly the button in the ribbon. - The Color Arrangement Editor with the original 'Default knitting process' of the 2 selected pattern rows is opened.
|
Original Color Arrangement |
|
|
- 7
- Position the cursor on the column selection bar.
- 8
- Select the color column in the color segment of the yarn color #6 (pink) with LMB.
- 9
- Position the cursor on the column selection bar.
- 10
- Open the context menu with RMB and paste or duplicate the desired quantity of columns.
- For example:
- 3 additional columns for the structure of the additional yarn carrier: The available quantity of columns depends on the desired structure.
- 2 additional columns for the edge at the left and right of the color field
- 11
- Select the technical rows no.2 and no.5 additively.
- 12
- Add the quantity of needed rows as additional rows:
- For example:
- 3 additional rows for the structure of the additional yarn carrier: The available quantity of rows depends on the desired structure.
- One additional column each for the edge at the left and right of the color field of yarn color #6
- 13
- Draw the desired structure for working with the additional yarn carrier and the edge of the color field in the color segment of the yarn color #6 (pink) in the 'Processing Area':
- In the additional rows:
- Color + needle action
- Transfer + casting-off
- 14
- In the tool window of the CA editor change to the Needle Actions / Colors tab.
- 15
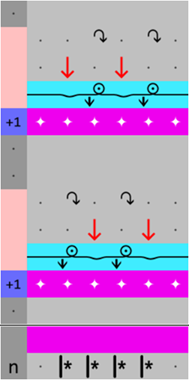
- Select the desired needle actions to draw:
|
Example CA#1 | ||
|
|
First Additional Row | |
|
|
Float
| |
|
|
Front Stitch with Transfer to the Rear
| |
|
|
Float with automatic transfer to the rear
| |
|
Second Additional Row | ||
|
|
Transfer to Front | |
|
Third Additional Row | ||
|
|
Casting-off at Rear | |


- 16
- In the 'Search area' in the columns for the edge of the color field, define 'no entry'.
- 17
- In the tool window of the CA editor change to the CA tab.
- 18
- In the Reference Numbers section select
 For Additional Rows.
 - 19
- In the 'Reference column with reference numbers' of the inserted rows, insert the
 symbol.
 - 20
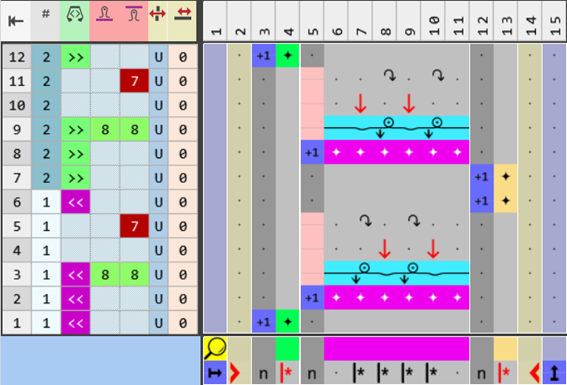
- Make the desired entries in the control columns of the CA:
-
 Carriage Direction
-
 /
/  stitch length
 - Racking Type
|
Modified Color Arrangement CA#1 |
|
|
- 21
- Check the generated Color Arrangement on correct entries with the
 Check button.: The knitting procedure cannot be checked!
 - 22
- If necessary, in case of a Color Arrangement already used in the design pattern, apply the changes to the basic pattern with the
 Apply button.
- or -
Close the tool window with .
. - 23
- Close the prompt with the desired button:
-
Save: Color Arrangement is saved locally in the
 CA tool window.
 - Reject: The changes will not be saved.
-
Copy: The changed Color Arrangement is saved as copy in the CA tool window.
- 24
- Enter the generated Color Arrangement via the
 control column into the desired rows of the design pattern.
 - 25
-
Start the
 Technical
Processing:
Technical
Processing: Show symbol view after technical processing.
 - 26
-
Generate
 Sintral.
 - 27
-
Start the
 Sintral Check.
 - 28
-
 Extract the knitting program.
 - A program for the knitting machine will be created: CMS530.Pattern-15.zip.
- Load knitting program into the machine.
 : The extracted file CMS530.Pattern-15.zip can be loaded onto the machine with an USB stick or via Ethernet.