Step by Step to 'Pattern-19'
- A pattern project with one pattern and the desired settings is created.
- 1
- Rename the pattern e.g. to Pattern-19_CA1_Qs.
- 2
- Duplicate the Pattern-19_CA1_Qs pattern.
- 3
- Rename the generated pattern e.g. to Pattern-19_CA2_Qw.
- 4
- Duplicate the Pattern-19_CA1_Qs pattern a second time.
- 5
- Rename the generated pattern e.g. to Pattern-19_CA3_Qs+Qw.
- 6
- Open the Pattern-19_CA1_Qs pattern.
- 7
- Select the total height of the pattern in the Pattern Row control column to enter CA1.
- 8
- Position the cursor in the pattern area.
- 9
- Call up the context menu and select Selection
/
 Create Color Arrangement:
.
Create Color Arrangement:
.
- or -
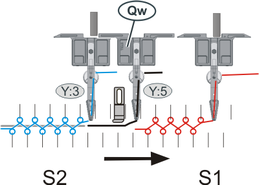
Click directly the button in the ribbon. - The Color Arrangement Editor with the original standard knitting process of the 2 pattern rows is opened.
|
Original Color Arrangement for these three examples |
|
|

- 10
- Insert an additional row into the processing area.
- 11
- Mark the additional row with
 Keep reference row number in the Reference Numbers column as additional row.
 - 12
- Make entries to the following control columns:
-
 Presser Foot Correction :
 - If necessary, set a different ESCI index for each of both the carriage directions in those technical rows in which the weft yarn presser foot is active.
 : A placeholder entry makes working on the machine easier
The following link opens the corresponding chapter of the online help:
: Use the Back button of the browser to go back chapter by chapter.
- 13
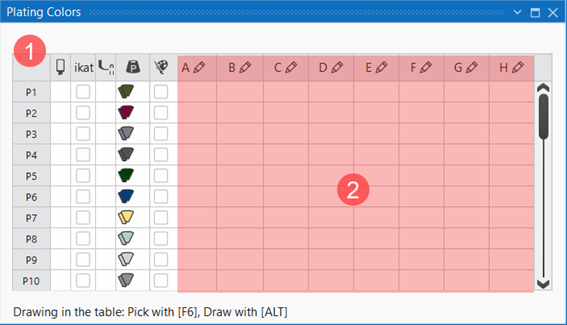
- With the
 button in the Pattern Colors tool window open the Plating Colors dialog box.
 - The Plating Colors tool window is displayed.
|
| ||||
|
1 |
Column 1 |
Default entries from P1 to P40 to use in the pattern for plating and knitting with weft yarn carriers
| ||
|
Column 2 |
|
Selection of the plating color to draw in the design pattern | ||
|
Column 3 |
ikat |
|
Plating color is not defined as Stoll-ikat plating. | |
|
|
Plating color is defined as Stoll-ikat plating. | |||
|
| ||||
|
Column 4 |
|
Define presser foot type
| ||
|
Column 5 |
|
Color value of the plating color
| ||
|
Column 6 |
|
|
The color value of the plating color is not automatically mixed from the selected colors. | |
|
|
The color value of the plating color is automatically mixed from the selected colors. | |||
|
| ||||
|
2 |
Enter the different colors and settings for plating or knitting with weft yarn carriers in the columns A to H via the | |||


- 14
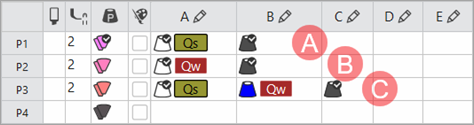
- Under P1 (Plating color 1) in the columns A to H allocate the desired colors for plating.
- In the column under P1 the automatically generated plating color is displayed.
|
| |
|
A |
Entry for plating color P1 (used in CA1)
|
|
B |
Entry for plating color P2 (used in CA2)
|
|
C |
Entry for plating color P3 (used in CA3)
|
- 15
- If necessary change the color value in the column via the

 menu.
menu. - 16
- Select the P1 entry in the
 column.
 - 17
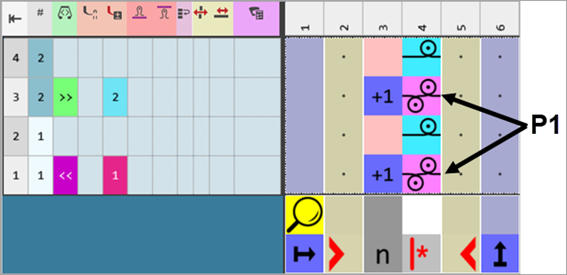
- Draw the plating color into the desired reference rows 1 + 3 of CA1.
- 18
- Draw the yarn color #10 into the additional rows.
- 19
- Draw the 'half Milano' structure with needle actions.
|
Color Arrangement CA1 | |
|
| |
|
P1 |
Plating Color 1 composed of: :
|
|
Result after technical processing
| |

- 20
- Check the generated Color Arrangement on correct entries with the
 Check button.: The knitting procedure cannot be checked!
 - 21
- If necessary, in case of a Color Arrangement already used in the design pattern, apply the changes to the basic pattern with the
 Apply button.
- or -
Close the tool window with button.
 - 22
- Close the prompt with the desired button:
-
Save: Color Arrangement is saved locally in the
 CA tool window.
- 23
- The Color Arrangement CA1 is saved.
- Enter the Color Arrangement CA1 in the
 control column over the entire height of the design pattern.
 - 24
- Click the
 Home button under Preview in the Yarn Carriers ribbon.
 - The document window is opened as view and the Yarn Carriers ribbon appears.
- 25
- Open the dialog box via
 Show Yarn Carriers.
 - 26
- If necessary, make further settings for allocating yarn carriers.
- 27
- Create the CA2 and CA3 from the original following the same procedure.
|
Color Arrangement CA2 | |
|
| |
|
P2 |
Plating Color 2 composed of: :
|
|
Result after technical processing
| |
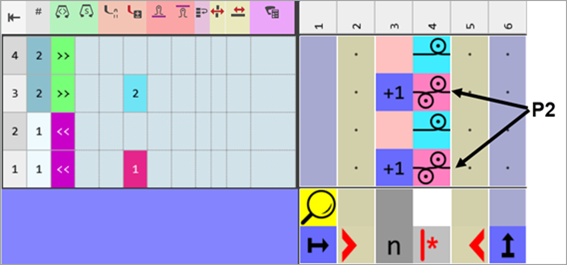
- 1
- Check the generated Color Arrangement on correct entries with the Check button.: The knitting procedure cannot be checked!
- 2
- If necessary, in case of a Color Arrangement already used in the design pattern, apply the changes to the basic pattern with the Apply button.
- or -
Close the tool window with button. - 3
- Close the prompt with the desired button:
-
Save: Color Arrangement is saved locally in the CA tool window.
- 4
- The Color Arrangement CA2 is saved.
- Enter the Color Arrangement CA2 in the control column over the entire height of the design pattern.
- 5
- Click the Home button under Preview in the Yarn Carriers ribbon.
- The document window is opened as view and the Yarn Carriers ribbon appears.
- 6
- Open the dialog box via Show Yarn Carriers.
- 7
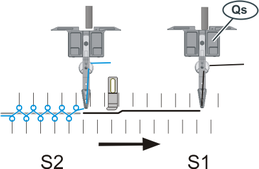
- Select the yarn carrier with yarn color #1.
- 8
- Select in the dialog box under Type the
 Weft Yarn Qw type of yarn carrier.
 - The yarn carrier will be marked with the
 icon.
icon.
|
Color Arrangement CA3 | |
|
| |
|
P3 |
Plating Color 3 composed of: :
|
|
Result after technical processing
| |
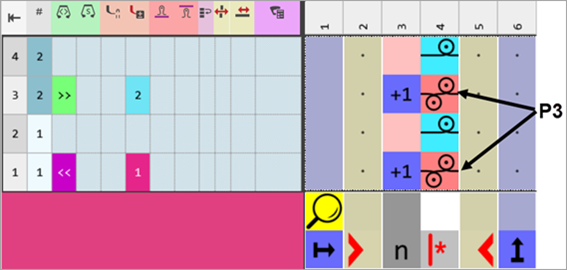
- 1
- Check the generated Color Arrangement on correct entries with the Check button.: The knitting procedure cannot be checked!
- 2
- If necessary, in case of a Color Arrangement already used in the design pattern, apply the changes to the basic pattern with the Apply button.
- or -
Close the tool window with. - 3
- Close the prompt with the desired button:
Save: Color Arrangement is saved locally in the CA tool window. - The Color Arrangement CA3 is saved.
Enter the Color Arrangement CA3 in the control column over the entire height of the design pattern. - 4
- Click the Home button under Preview in the Yarn Carriers ribbon.
- The document window is opened as view and the Yarn Carriers ribbon appears.
- 5
- Open the dialog box via Show Yarn Carriers.
- 6
- Select the yarn carrier with yarn color #3.
- 7
- Select in the dialog box under Type the Weft Yarn Qw type of yarn carrier.
- The yarn carrier will be marked with the icon.
- 28
- Click the Home button under Preview in the Yarn Carriers ribbon.
- The document window is opened as view and the Yarn Carriers ribbon appears.
- 29
- Open the dialog box via Show Yarn Carriers.
- 30
- If necessary, make further settings for allocating yarn carriers.
- 31
- Start the
 Technical
Processing:
Technical
Processing:
Show the Processed Fabric View.
 - 32
- Generate
 Sintral.
 - 33
- Start the
 Sintral Check.
 - 34
-
 Extract the knitting program.
 - A program for the knitting machine will be created: CMS530W.Pattern-19.zip.
- Load knitting program into the machine.
 : The extracted file CMS530W.Pattern-19.zip can be loaded onto the machine with an USB stick or via Ethernet.