Step by Step to 'Pattern-12'
- A pattern project with one pattern and the desired settings is created.
- 1
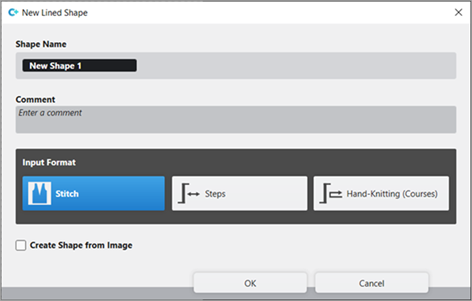
- To create a project-related lined shape, select the
 Cortes tab in the tool window.
 - 2
- Open the context menu with RMB and select Crear nuevo corte con el tamaño M... .
- The Nuevo corte de líneas tool window is opened.
|
| |||
|
Nombre del corte |
Name for the shape element | ||
|
Comentario |
Information about the shape | ||
|
| |||
|
Input Format | |||
|
Malla |
Entry in the table of the lined shape
| ||
|
Pasos |
Entry in the table of the lined shape
| ||
|
Tisaje a mano (vueltas) |
Entry in the table of the lined shape
| ||
|
Rules for widening with hand knitting | |||
|
|
Knitting before widening following the start | ||
|
|
Widening before knitting following the start (default setting) | ||
|
Crear corte a partir de imagen |
|
No images will be used | |
|
|
Use image as template | ||


- 3
- Make the desired entries:
- Nombre del corte : Any
- Formato de entrada : Stitch
- 4
- Confirm with the OK key.
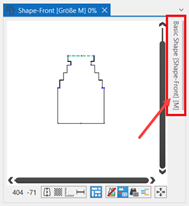
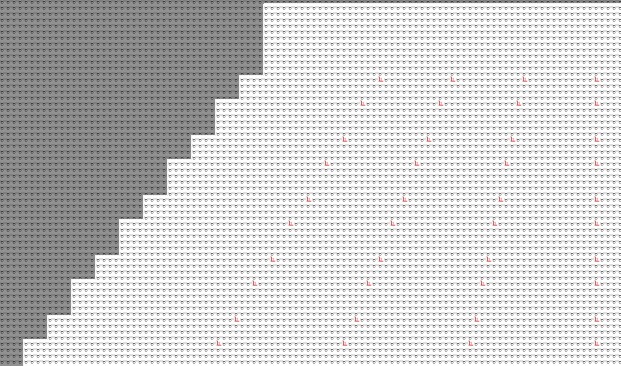
- The new lined shape (basic shape) is graphically displayed in the Cortes tab and in a new document window
 as rectangle.
 : Default attributes are used for the shape edges of the lined shape.
Menu Archivo -> Opciones -> Corte de líneas -> Opciones para nuevo corte de líneas
- 5
- Open the docked line table by LMB in the document window.
- or -
Use the graphic displayed in the document window. - The table Corte de líneas with the values of the rectangular shape appears.
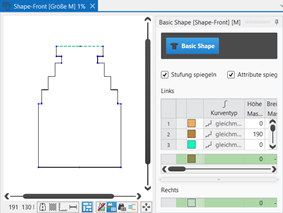
: The method (table or graphic) to create a project-related lined shape is freely eligible, since the views are always updated simultaneously.
- 6
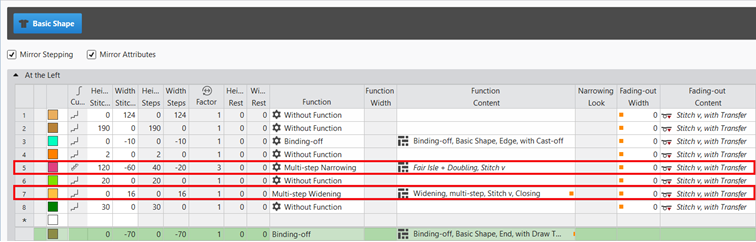
- Insert new shape lines in the table and enter the desired values for the basic shape.
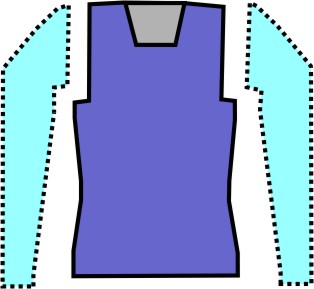
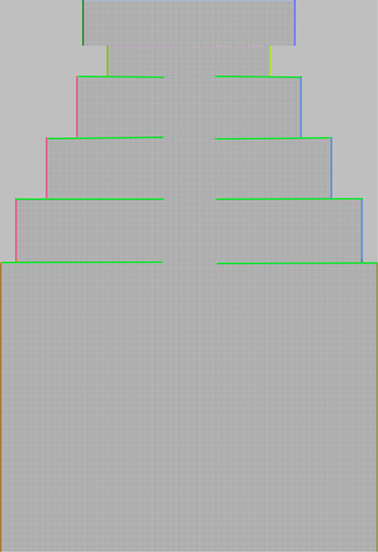
Example: Lined shape for Pattern-12
|
Basic Shape: Front | |
|
| |
|
Row 5 |
Steps for 'Multi-step Narrowing' (Fair Isle)
|
|
Row 7 |
Stepping for Multi-step Widening
|
|
End line |
End line of the basic shape (green)
|
Rules for creating a shape for the knitting mode SJ:
Example Front:
|
Shape Attributes |
Rules / possible settings |
|---|---|
|
Knitting Mode: |
Single Jersey |
|
Step width of widening |
1 needle (stitch) per knitting row |
|
Step height of widening |
As desired |
|
Quantity of rows without shape modification |
As desired |
|
Step width when narrowing |
1 - 3 needles (stitches) |
|
Step height when narrowing |
As desired |
|
Fading-out Width |
As desired |
|
Knitting mode for fading-out |
Malla delante con transferencia |
|
Binding-off width: |
Stepping > 3 stitches |
|
Binding-off methods |
Binding-off, Structure, Single Jersey Remallado, Estructura, de una fontura
|
|
| ||||
|
1 |
| |||
|
2 |
|
Reflejar escalonamiento |
Creating a symmetric shape of shape element
| |
|
|
Reflejar atributos |
Attribute changes carried out in the line table at the left and right. | ||
|
|
Do not mirror attributes |
Attribute changes are carried out in the line table at the left or at the right. | ||
|
|
Do not mirror stepping |
Creating an asymmetric shape / shape element
| ||
|
3 |
|
Mostrar todas las propiedades | ||
|
|
Mostrar sub-líneas | |||
|
|
Ocultar sub-líneas | |||
|
4 |
Display color for main lines and sublines of a selected line in the | |||
|
5 |
|
Tipo de curva |
| |
|
6 |
Columns for entering the values for the lines of the lined shape in the input format
| |||
|
7 |
Columns for the input of line attributes
| |||
|
8 |
Specification for working with PTS (NPJ) for one line (shape edge)
| |||


 factor, height of rest and width of rest is calculated.
Insert shape line in a shape element:
: The shape lines are inserted symmetrically with both methods by default.
- In the Line Table:
- Entry of a positive value: Widening and upwards
- Entry of a negative value: Narrowing and down
- Enter the desired values in the last table line with the * symbol. When confirming the input with the Enter key a new table line is inserted.
- Select a row -> open the context menu with RMB -> select Agregar línea principal.
- Select a row -> open the context menu with RMB -> select Agregar línea encima.
- or -
Select Agregar línea posterior.
: Only in the line table it is possible to create an asymmetrical line shape by deactivating  Reflejar escalonamiento.
- In the document window
- Position the cursor on a line of the displayed graphic -> open the context menu with RMB and select -> Insertar línea de corte .
Changing line properties of a shape line
- Global project-related setting of the line properties via
 Configuración / Todos los cortes tab
 - In the shape regarding a shape line
- In the Line Table
- In the document window
Changing Line Properties:
- In the Line Table
- Direct change of a line property in the corresponding column of the table
- Select a line in the table, open the tool window with the
 Propiedades de línea button and make the desired entries.
 - In the document window
- Position the cursor on a line of the displayed graphic, select the context menu Propiedades de línea and make the desired entries in the tool window.
|
|
1 |
Modification of the curve type | |
|
2 |
Modification of the function of a shape line
| ||
|
3 |
Modifications for the shape line with the Menguar function | ||
|
4 |
Modifications of the Ocultar attribute for a shape line | ||
|
5 |
Specification for a shape line for working with PTS in the shape edge | ||
|
6 |
Display of the markings that are assigned to a shape line. | ||
|
Aplicar marcas a línea reflejada |
Applies the line-bound markings of the selected line to the line on the opposite.
| ||
Changing curve type:
- In the Line Table
- In the
 Tipo de curva column open the context menu with the RMB and select the desired curve type.
 - Select the line, open the Propiedades de línea with the Propiedades de línea button and select the desired curve type at Secuencia de escalonamientos.
- In the document window
- Position the cursor on a line of the displayed graphic -> open the context menu with RMB and select -> Adaptar secuencia de escalonamientos....

- Select the desired Secuencia de escalonamientos in the selection menu.
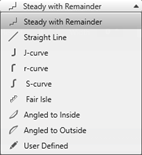
- When selecting the curve type
 uniformemente con el resto via·Adaptar escalonamiento, specify the desired values for and of the steps.
 -
: The window for entering specifications is displayed according to the selected curve type.
- Transfer the entry to the shape line with the Recalcular button.
-
: The shape line is displayed in the graphic and in the line table as well.
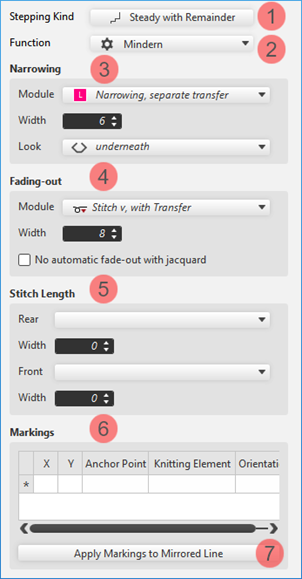
- 7
- Allocate the desired attributes to the new shape lines:
- Function: Function content + Function width
- Fade-out: Fade-out content + Fade-out width
- Line 3:
- Function: Binding-off (at the external edge of the shape)
- Function content: desired bind-off method
|
Binding-off of the external edges of the shape |
|
The shape lines for binding-off at the external edge of the shape are at the same height in the line table.
|
- Line 5:
- In column Curva: Select
 Fair Isle stepping kind.
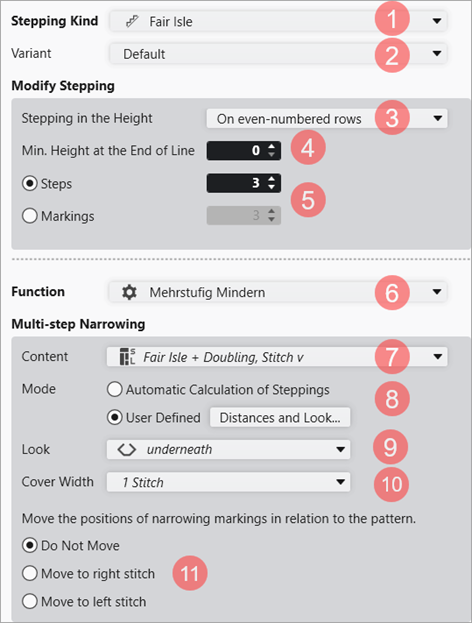
 - Function: 'Multi-step Narrowing'
-
Function content: Fair Isle + Doubling, malla v: The narrowing markings are calculated automatically and displayed in the pending shape of the
 Muestra de diseño.
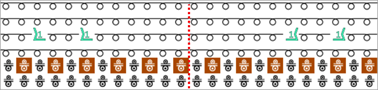
|
Options with the Fair Isle curve type Fair Isle | |||||
|
| |||||
|
| |||||
|
1 |
Secuencia de escalonamientos |
Selecting the desired curve type
| |||
|
2 |
Variante |
Options of processing Fair Isle (multi-step narrowing) | |||
|
Estándar |
Display of the lined shape in the rasterized view | ||||
|
Trapecio |
Display of the pending lined shape in the basic pattern | ||||
|
Display of the lined shape in the rasterized view | |||||
|
Diente de sierra |
Display of the pending lined shape in the basic pattern | ||||
|
Display of the lined shape in the rasterized view | |||||
|
Pliegue |
Display of the pending lined shape in the basic pattern | ||||
|
Modify Stepping | |||||
|
| |||||
|
3 |
Escalonamiento de altura |
Specification of the row in which the narrowing should be carried out. | |||
|
4 |
Mínima altura al final de la línea |
Quantity of rows at the end of the line (remaining height)
| |||
|
5 |
Specification to calculate the shape line with Fair Isle stepping kind | ||||
|
|
Pasos |
Quantity of steps to calculate the narrowing | |||
|
|
Marcas |
Quantity of markings per step (narrowing)
| |||
|
6 |
Función |
Specifies the directory of the Knit Explorer to be used for the function (type) of shape lines | |||
|
Multi-step Narrowing | |||||
|
7 |
Contenido |
Selection of the desired module for Menguar, en varios pasos from Knit Explorer | |||
|
8 |
Modo |
Selection of the calculation mode for the steps of Fair Isle | |||
|
|
Cálculo automático de los pasos based on the settings. | ||||
|
|
Personalizado -> Open the table by the Distancias y óptica... button in order to change the narrowings manually. | ||||
|
9 |
Aspecto |
Selecting the desired look of narrowing Default Setting:
| |||
|
10 |
Anchura de superposición: |
Specification of how many stitches should cover each other Default Setting:
| |||
|
11 |
Move the position of the narrowing marking in relation to the pattern | ||||
|
|
No desplazar |
Position of the narrowing marking is calculated and freely placed. | |||
|
|
Desplazar a la malla delante |
Position of the narrowing marking is calculated and placed on Malla delante only. | |||
|
|
Desplazar a la malla atrás |
Position of the narrowing marking is calculated and placed on Malla atrás only. | |||
- Line 7:
- Function: Aumentar en varios pasos
-
Function content: Aumentar, en varios pasos, Malla v, Tapar
: The widening markings are calculated automatically and displayed in the pending shape of the Muestra de diseño.

- End line of basic shape:
- Function: Remallar
- Function content: Remallado, Corte básico, Fin, con hilo de separación
- 8
- Open the graphic of the basic shape in the xx document window.
- 9
- Click the
 Edición del corte button under Parámetro in the Sectores de tisaje ribbon.
 - The Sectores de tisaje tool window appears.
|
| ||
|
1 |
Colors |
Display color of the knitting range in the lined shape |
|
2 |
Descripción |
Definition of a knitting range |
|
3 |
|
Allocation of: |
|
4 |
Elemento de relleno |
Selection of a knitting element / needle action / structure / pattern element to fill the knitting range |
|
5 |
Cantidad |
Height of the knitting range by stitch rows |
|
6 |
|
Display of the total height by stitches |
|
7 |
|
Display of the total height by cm
|
|
8 |
|
Assignment of a stitch density from the stitch density tool window |
|
9 |
Color Arrangement |
Assignment of Color Arrangements |
|
10 |
|
Assignment of a stitch length for the front needle bed |
|
|
Assignation of a stitch length for the rear needle bed | |
|
|
Assignment of a take-down value | |
|
|
Assignment of a auxiliary take-down value | |
|
|
Assignment of a machine speed | |
|
11 |
List of the shapes (fabric pieces), where the selected knitting range is in use.
| |


 button.
- 10
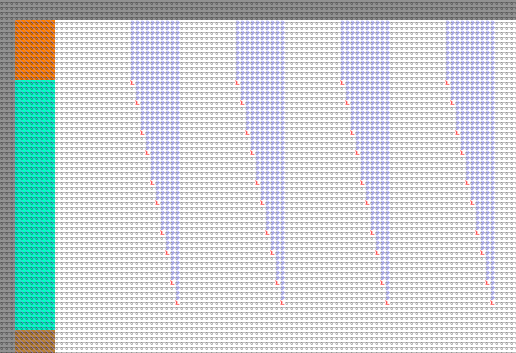
- Create the desired knitting range in the Sectores de tisaje tool window.
- Example:
- Description: Collar
- Filling Element: 2x2 Rib
- Number: 28 (rows high)
-
 +
+  columns: Allocate new stitch lengths
- 11
- Select the desired shape point by the LMB to which you want to assign the knitting range.
- 12
- Call up the Asignar un sector de tisaje context menu.
- List of the knitting ranges appears to select one.
- 13
- Select the desired knitting range.
- The knitting range appears in the assigned color at the the shape line point of the lined shape.
- 14
- Move the inserted knitting range by 2 pattern rows to the top.: The position of the widening markings should be in a SJ pattern row.
Enter the created knitting ranges into the shape and position it:
- Shape is created as lined shape.
- The knitting ranges are available in the Sectores de tisaje tool window.
- Lined shape is opened in the xx document window.
- 1
- Select the desired shape point by the LMB to which you want to assign the knitting range.
- 2
- Open the context menu and select Asignar un sector de tisaje.
- List of the knitting ranges appears to select one.
Multiple selection is possible. - 3
- Select the desired knitting range.
- The knitting range appears in the assigned color at the the shape line point of the lined shape.
|
|
Enable the view of the knitting ranges in the |
|
|
Disable the view of the knitting ranges in the |
|
|
Display of the knitting ranges in the |

- 4
- Position the inserted knitting range.
|
| ||
|
1 |
Selecting knitting ranges to replace the inserted knitting range. | |
|
2 |
Specify the Distancia in Mallas in relation to the shape line point | |
|
3 |
Insertar sector de tisaje hacia abajo | |
|
|
Knitting range will be inserted above the shape line point | |
|
|
Knitting range will be inserted below the shape line point | |

- 15
- In the Cortes tool window select the created shape with LMB.
- 16
- Open the context menu -> Posicionar corte -> select Pattern name.
- The shape is floating in the selected basic pattern.: Very helpful here to position the Jacquard pattern element correctly in relation to the base pattern and shape.
- 17
- Open Knit Explorer.
- 18
- Open the Partes de muestra -> Partes de muestra, todas las agujas -> Partes de muestra, Jacquard directory in the Depósito de elementos de tisaje.
- 19
- Open the Partes de muestra tool window.
- 20
- Copy the Jacquard PM 19 pattern element from the Knit Explorer into the pattern project.
Example: H 39 x W 32
- 21
- Modify the height of the pattern element in order to draw the pattern element into the the stepping of Fair Isle (height).
|
Original Pattern Element |
Modified Pattern Element |
|
|
|
|
H 39 x W 32 |
H 36 x W 32 |
- 22
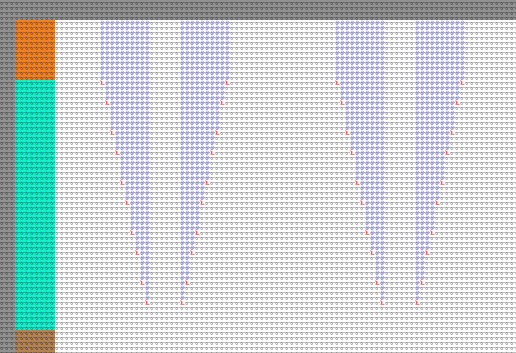
- Draw the pattern element using any 2 yarn colors from the center of the basic pattern to the left and right in relation to the Fair Isle shape lines in the basic pattern.
|
Pro Step:
|
|
- 23
- Select the rows of the Jacquard areas additively via the Pasada de muestra control column by the CTRL key.
- 24
- Positioning the cursor in the pattern area.
- 25
- Call-up the Selección / Crear Jacquard... context menu.
- The Generar Jacquard [Nueva muestra] dialog box appears.
Description to the dialog box
|
| |||
|
1 |
Display of the active document window | ||
|
2 |
Orden de los colores y longitud de mallas | ||
|
|
Display or edit box for the stitch length per color / rear system
| ||
|
|
Display of the used colors in the selection in the color sequence from the left | ||
|
|
Display or edit box for the stitch length per color / front system
| ||
|
Segundo orden de los colores | |||
|
|
|
Default setting | |
|
|
Definition of the color sequence for the second pattern row is possible.
| ||
|
3 |
Módulo Jacquard | ||
|
|
Displays the selected Jacquard module.
| ||
|
Display of the path of the selected directory in the Knit Explorer | |||
|
Selection list | |||
|
| |||
|
4 |
Colores |
Selection list for the knitting sequence of the colors
| |
|
5 |
Longitud de malla |
Selection list for the stitch length
| |
|
6 |
Anverso de imagen |
Selecting the desired face of picture of Jacquard
| |
|
Revés de Jacquard | |||
|
7 |
más angosto en |
Specification in case of Jacquard with yarn bridges, by how many needles the back side is to be narrower then the face of picture | |
|
8 |
mover horizontalmente en |
Specification in needles for shifting the Jacquard horizontally | |
|
9 |
Generar Jacquard |
The changes made in the dialog box will be applied to the pattern. | |
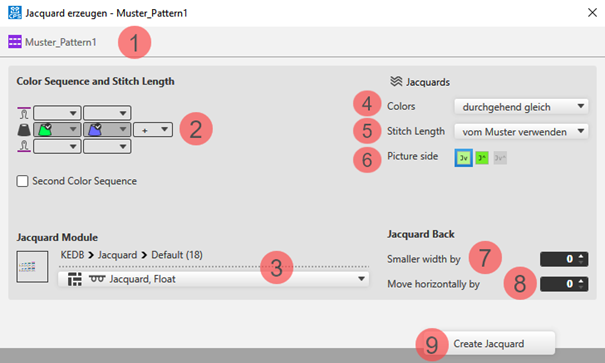


 for selecting the desired Jacquard module in the specified directory
Changing the default settings for Block Jacquard:
: A module for net pick-up and net ending are assigned by default to each area with Block Jacquard in the Proyecto de muestra.
Possibilities for changing the module allocation:
- In Configuración -> Jacquard tab -> Block-Jacquard section: Changes will apply to all patterns of the Proyecto de muestra .
- Select
 Jacquards in the ribbon.: Individual changes regarding the desired Jacquard area
 - Select the context menu -> Abrir Jacquards...
: Individual changes regarding the desired Jacquard area
- 26
- Make the desired presets in the Generar Jacquard [Nueva muestra] dialog box.
- Colors: Continuously
- Stitch length: Used by the module
- Jacquard Module: Jacquard, tubular cruzado, anverso Jv, J^, Jv^
- 27
- Apply the settings to the pattern with the Generar Jacquard button.
- 28
- Continue:
Create the next row selection for a new Jacquard area.
- or –
Exit working in the dialog box by Cerrar. - Jacquard is displayed with the correspondent symbol in the pattern and is listed in the Jacquards tool window for another editing.
- 29
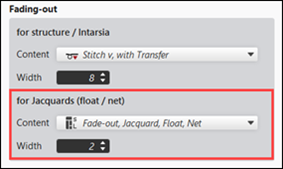
- Allocate the following attributes to the shape line 5 of the Fair Isle curve type in the line table:
- Fade-out width: Set value to 0, since the different Jacquard areas are not to be hidden with Malla v, con transferencia.
- Fade-out content: Stitch v, with transfer (will not be used)
: To fade-out with patterns with Jacquards, a corresponding Ocultar, Jacquard, Hilo flotante, Red module is used.
- 30
- In the document window, select the desired shape line 5 with the graphic shape presentation.
- 31
- Position cursor on the selected shape line.
- 32
- Select LMB -> Propiedades de línea context menu.
- 33
- The Propiedades de línea tool window is opened for the selected shape line.
- 34
- Make the following entries under the para Jacquards (flotante / red) section:
-
Content: Select Ocultar, Jacquard, Hilo flotante, Red Fade-out Module.: The fade-out module knits only at the front.
- Width: specify the desired fade-out width.
-
Default Setting: 2 Needles wide
Attention : The fade-out width is also executed in the rows of the net pick-up and the net ending.
- 35
- Close the tool window.
- The fade-out module appears in the Muestra de diseño document window.
- 36
- If necessary, position the shape in the document window with the
 button.
 - 37
- Check , attributes of the shape lines and, if desired, make corrections.
- 38
- Changing markings of shape lines with the functions:
- Function Menguado en varios pasos‘ (Fair-Isle): Modify the position of the narrowing marking
- Function Aumentar en varios pasos: Modify the position of the widening marking
The following function was allocated to a shape line when creating the shape:
- Menguado en varios pasos
- Aumentar en varios pasos
The markings are automatically calculated based on the settings (values) in the line table, displayed in the Distancias de la línea table and entered into the shape as shape markings.
Options to modify the narrowing and widening markings:
- In the table: Change the values and apply them to the shape
- In the pending shape: Re-position the markings manually
Modify the Markings for Narrowing in the Table:
- A shape with shape lines of the Menguado en varios pasos (Fair-Isle) function is created.
- The shape leis pending in the Muestra de diseño
- The document window with graphic of the shape is open.
- 1
- Position cursor on the shape line e.g. no. 5 (multi-step narrowing).
- 2
- Open the context menu with RMB and select Propiedades de línea.
- The Propiedades de línea tool window is opened.
|
Options with the Fair Isle curve type Fair Isle | |||||
|
| |||||
|
| |||||
|
1 |
Secuencia de escalonamientos |
Selecting the desired curve type
| |||
|
2 |
Variante |
Options of processing Fair Isle (multi-step narrowing) | |||
|
Estándar |
Display of the lined shape in the rasterized view | ||||
|
Trapecio |
Display of the pending lined shape in the basic pattern | ||||
|
Display of the lined shape in the rasterized view | |||||
|
Diente de sierra |
Display of the pending lined shape in the basic pattern | ||||
|
Display of the lined shape in the rasterized view | |||||
|
Pliegue |
Display of the pending lined shape in the basic pattern | ||||
|
Modify Stepping | |||||
|
| |||||
|
3 |
Escalonamiento de altura |
Specification of the row in which the narrowing should be carried out. | |||
|
4 |
Mínima altura al final de la línea |
Quantity of rows at the end of the line (remaining height)
| |||
|
5 |
Specification to calculate the shape line with Fair Isle stepping kind | ||||
|
|
Pasos |
Quantity of steps to calculate the narrowing | |||
|
|
Marcas |
Quantity of markings per step (narrowing)
| |||
|
6 |
Función |
Specifies the directory of the Knit Explorer to be used for the function (type) of shape lines | |||
|
Multi-step Narrowing | |||||
|
7 |
Contenido |
Selection of the desired module for Menguar, en varios pasos from Knit Explorer | |||
|
8 |
Modo |
Selection of the calculation mode for the steps of Fair Isle | |||
|
|
Cálculo automático de los pasos based on the settings. | ||||
|
|
Personalizado -> Distancias y óptica... Button to change the narrowings manually in the Distancias de la línea dialog box. | ||||
|
9 |
Aspecto |
Selecting the desired look of narrowing Default Setting:
| |||
|
10 |
Anchura de superposición: |
Specification of how many stitches should cover each other Default Setting:
| |||
|
11 |
Move the position of the narrowing marking in relation to the pattern | ||||
|
|
No desplazar |
Position of the narrowing marking is calculated and freely placed. | |||
|
|
Desplazar a la malla delante |
Position of the narrowing marking is calculated and placed on Malla delante only. | |||
|
|
Desplazar a la malla atrás |
Position of the narrowing marking is calculated and placed on Malla atrás only. | |||
- 1
- Select the
 Personalizado mode in the tool window under Menguado en varios pasos.
 - 2
- Open the table with Distancias y óptica... .
- The Distancias de la línea dialog box appears.
|
| ||
|
| ||
|
Preset | ||
|
1 |
Aspecto |
List box to select the method of narrowing |
|
2 |
Anchura de superposición: |
List box to specify the quantity of stitches to cover each other |
|
3 |
Inicializar posiciones de todos los pasos |
Applies the changes of look and of the cover width |
|
| ||
|
4 |
Líneas izquierdas |
Table with narrowing markings and their positions |
|
Label indicating the size |
Size of the selected shape | |
|
Número de pasos |
Total number of steps of the selected shape line | |
|
Distancias necesarias |
Quantity of stitches (step width) that should be narrowed | |
|
| ||
|
5 |
Líneas derechas |
Table with narrowing markings and their positions |
|
Label indicating the size |
Size of the selected shape | |
|
Número de pasos |
Total number of steps of the selected shape line | |
|
Distancias necesarias |
Quantity of stitches (step width) that should be narrowed | |
|
| ||
|
6 |
Arrow keys
|
To copy the manually changed values of the table from Líneas izquierdas column to the Líneas derechas column or vice versa.
|


- 1
- Make a different selection in the dialog box below Especificaciones.
- or -
Change the values for both shape lines (left and right) manually in the table. - 2
- Close the dialog box with the OK button.
- The narrowing markings are applied to the shape and displayed.
: Using the same procedure, the widening markings in the Distancias... table can also be changed.
Modify Shape Markings of Pending Shape Manually:
: The user himself is responsible for the correct result!
- A shape with shape lines of the Menguado en varios pasos (Fair-Isle) function is created.
- The shape leis pending in the Muestra de diseño
- 1
- Select
 Capa de refinamiento in the Cursor Attributes + Editing Layers tool windows.
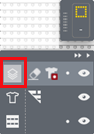
- 2
- Select the
 Transparencia del corte flotante icon to delete the narrowing markings.
 - 3
- Delete the desired markings in the shape.
- 4
- Set the cursor on a narrowing marking and pick this attribute with the F8 key in order to re-position it.
- or -
Select the Fair Isle + Doubling, malla v technical module in the Módulos tab. - 5
- Insert markings manually at the new positions.: Watch out:
The quantity of narrowing markings must correspond to the narrowing steps (width)! Otherwise the stitches cannot be transferred.
: The changes within the Capa de refinamiento cannot be saved.
Meaning, the pending shape must not be removed from the design pattern.
- 6
- In order to save the changes, set the cursor in the pending shape and call-up Convertir corte a forma rasterizada of the context menu.
- The shape appears as Raster Shape.: Modification within the Capa de refinamiento will be discarded when converting.
- 7
- Then call-up Generar nuevo corte de la forma rasterizada... context menu again.
- The created lined shape is displayed in the Cortes tab.
: Using the same procedure, the widening markings of the pending shape can be changed manually as well.
- 39
- Click the
 Inicio button under Vista previa in the Guiahilos ribbon.
 - The document window is opened as view and the Guiahilos ribbon appears.
- 40
- Open the dialog box via
 Mostrar guiahilos.
 - 41
- If necessary, make the desired settings for allocating yarn carriers.
- 42
- Start the
 Procesamiento
técnico:
Procesamiento
técnico: Show symbol view after technical processing.
 - 43
- Generate
 Sintral.
 - 44
- Start the
 Control Sintral.
 - 45
-
 Extraer the knitting program.
 - A program for the knitting machine will be created: CMS530.Pattern-12.zip.
- Load knitting program into the machine.
 : The extracted file CMS530.Pattern-12.zip can be loaded onto the machine with an USB stick or via Ethernet.