Color Arrangements for Your Own Jacquard Backs
The color arrangement in a jacquard pattern area can determine the following:
- The Jacquard back
- The color sequence
Examples of Color Arrangements for Jacquard backs
- Jacquard back with float (CA1-Privat)
Knitting rear stitch and casting-off - Jacquard back with float (CA2-Privat)
Knit rear stitch and transfer to the front
Create the Color Arrangement CA1-Private and CA2-Private:
- 'CA_Jacquards' pattern project is created.
- CA_Jacquards-Privat design pattern exists.
- 1
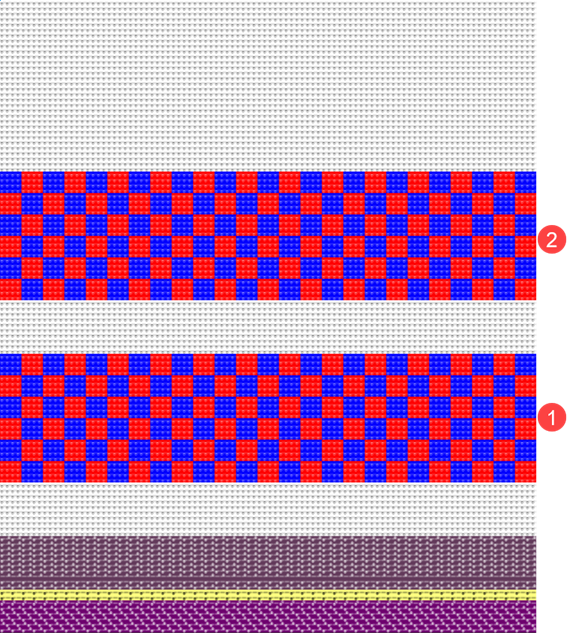
- Draw pattern areas (1) and (2) into the
 Muestra de diseño.
 : Colors from the Colores de hilo table were used to draw the basic pattern.
|
| |
|
1 |
CA1-Private Pattern area of 2-color Jacquard Backing: |
|
2 |
CA2-Privat Pattern area of 2-color Jacquard Backing: Malla ^ con transferencia hacia delante |
- 2
- Select the first 2 pattern rows of area (1) in the Pasada de muestra control column.
- 3
- Position the cursor in the pattern area.
- 4
- Call-up the context menu -> Selección
/
 Generar Color Arrangement...
.
Generar Color Arrangement...
.
- or -
Click directly the button in the ribbon. - The Color Arrangement Editor with the original standard knitting process of the 2 selected pattern rows is opened.
|
Color Arrangement for area 1+2 |
|
|
- 5
- Select
 Mover drawing tool.
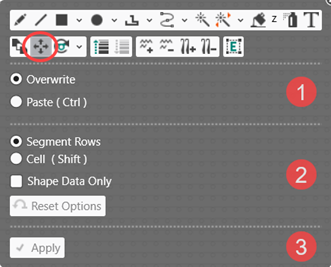
 - 6
- Define the desired function in the ribbon
- or -
Open the pop-up window with CTRL + SPACEBAR. - The pop-up window appears.
- 7
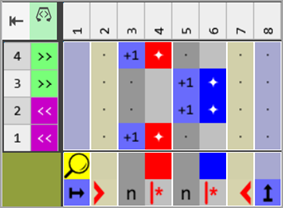
- With the Pasada de segmento selection in the Sobrescribir mode, move the entries in the processing area into the desired position.
- 8
- Add the missing colors #3 and #7 each to both color segments in the processing area.
- 9
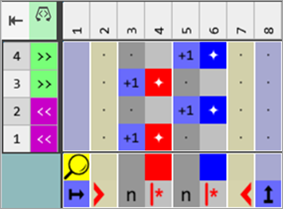
- Set the missing or incorrect entries for the Números de referencia:
-
For Reference Rows:
 Mantener número de pasadas de referencia
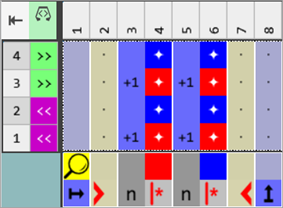
- 10
- Position the cursor on the column selection bar.
- 11
- Select the color column in the color segment of the yarn color #7 (red) with LMB.
- 12
- Open the context menu with RMB.
- The context menu appears.
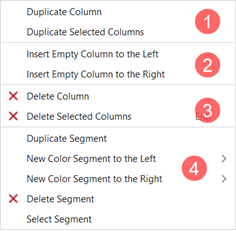
|
1 |
Duplicar columna |
Copy content of the selected column | |
|
Duplicar columnas seleccionadas |
Copy content of the selected column(s)
| ||
|
2 |
Insertar columna vacía a la izquierda |
Insertion of columns to the left of the selected column | |
|
Insertar columna vacía a la derecha |
Insertion of columns to the right of the selected column | ||
|
3 |
|
Eliminar columna |
Without selection delete a column |
|
|
Eliminar columnas seleccionadas |
With selection delete a column
| |

|
4 |
Options to work with color segments | |||
|
Duplicar segmento |
| |||
|
Nuevo segmento de color a la izq. |
>> |
Quantity of color segments to be inserted (1-10) to the left in relation to the selection | ||
|
Nuevo segmento de color a la der. |
>> |
Quantity of color segments to be inserted (1-10) to the right in relation to the selection | ||
|
|
Eliminar segmento |
| ||
|
Seleccionar segmento |
The color segment at the cursor position is selected | |||
- 13
- Duplicate the desired number of columns for the yarn color #7, e.g. 5 column.: The number of columns depends on the cycle of the desired Jacquard back.
- 14
- Select the color column in the color segment of the yarn color #3 (blue).
- 15
- Open the context menu with RMB.
- The context menu appears.
- 16
- Duplicate the desired number of columns for the yarn color #3, e.g. 5 column.: The number of columns depends on the cycle of the desired Jacquard back.
- 17
- Draw the desired Jacquard front and back with needle actions into the 'processing area' of both yarn colors.
-
Malla delante con transferencia

-
Malla delante

-
Hilo flotante con transferencia hacia delante

- 18
- Select the technical rows (2) and (4) additively in the CA editor.
- 19
- Select the drawing tool
 Pegar.
 - The Insertar selección tool window is opened.
- 20
- Make the following selection:
-
 vacío
vacío - With Cantidad: Enter the value 1
- 21
- Enter the empty rows via the arrow up key.
- 22
- Close the tool window with X.
- One empty row is inserted at the selected positions.
- 23
- Set the missing reference numbers for the newly inserted empty rows:
-
For Additional Rows:
 Mantener número de pasadas de referencia
|
Content of additional rows |
Properties and Behavior |
|---|---|
|
With yarn color or yarn carrier color |
You have to draw-in a knitting needle action if you enter additional rows with Yarn Color or Yarn Carrier Color into a color column. |
|
Without yarn color or yarn carrier color |
You have to draw in a Transfer, Cast-off or Loop sinking needle action (not knitting) if you enter additional rows without Yarn Color or Yarn Carrier Color into a color column. |
|
Behavior:
| |
- 24
- Draw the desired needle action into the empty rows:
- For casting-off:
-
 Desprender ^
 -
 Desprender atrás sin resolver mallas
 - For transferring:
-
 Transferencia hacia delante
- 25
- If necessary, allocate a different stitch length to the
 Longitud de malla anterior (NPv) /
  Longitud de malla posterior (NP^) control columns of the CA.
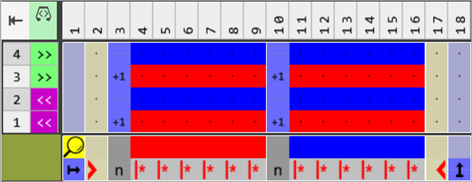
|
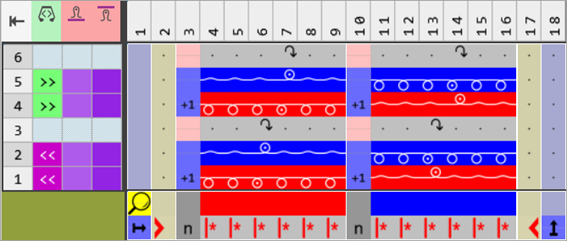
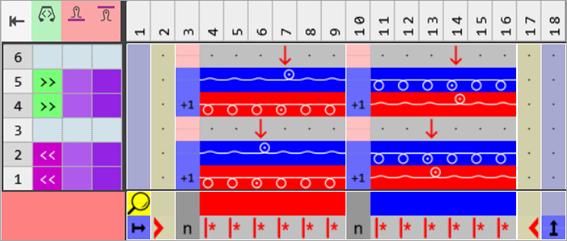
CA1-Private: With Cast-off |
|
|
|
|
|
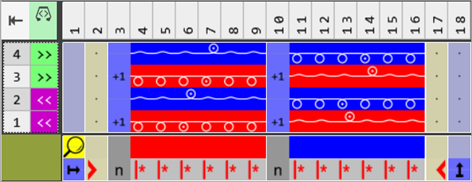
CA2-Private: With Transfer |
|
|
- 26
- Check the generated Color Arrangement on correct entries with the
 Verificar button.: The knitting procedure cannot be checked!
 - 27
- If necessary, in case of a Color Arrangement already used in the design pattern, apply the changes to the basic pattern with the
 Aplicar button.
- or -
Close the tool window with .
. - 28
- Close the prompt with the desired button:
-
Save: Color Arrangement is saved locally in the
 CA tool window.
 - Reject: The changes will not be saved.
-
Copy: The changed Color Arrangement is saved as copy in the CA tool window.
- 29
- Enter the generated Color Arrangement via the
 control column into the desired rows of the design pattern.
 - 30
- Start the
 Technical Processing.
 - The Color Arrangement is expanded by the technical processing.
- 31
- Generate
 Sintral.
 - 32
- Start the
 Control Sintral.
 - 33
-
 Extraer the knitting program.
 - 34
- Load knitting program into the machine.