Further possibilities for the processing of Intarsia patterns over corresponding control columns
Pattern related settings in the following control columns:
-
 Escalonamiento de guiahilos (YD / YDI) control column:
 - Automatic staggering at the fabric selvedge YDopt
 : Default setting in the control column.
 - Manual staggering at the fabric selvedge YD / YDI
Working with YDopt (default setting):
The technical processing determines optimized parking positions at the fabric selvedge. Frequently used yarn carriers are positioned as close as possible to the fabric selvedge less used somewhat distant.
- 1
- In the ribbon over
 Configuración open the dialog box.
 - 2
- Select the Optimización tab.
- 3
- Make the desired settings under Distancia de guiahilos al borde del tejido (YD):
- Distancia primer guiahilos [1/16“]
- Distancia de la escalonamiento [1/16“]
|
Optimizar YD por pasada (YDopt) |
|
Automatic yarn carrier staggering is activated.
| |
|
|
Automatic yarn carrier staggering is disabled. Yarn carriers are manually staggered according to the specifications in the | ||
|
Distancia primer guiahilos [1/16“] |
|
Distance of the first stopped yarn carrier from fabric selvedge Default value: 1.0 Value range 0 - 20 [1/16 inch] | |
|
Distancia de la escalonamiento [1/16“] |
|
Distance of the following stopped yarn carriers Default value: 6.0 Value range 1-20 [1/16 inch] | |


Working with YD / YDI in the control column:
- Pattern is displayed as
 design pattern.
 - In the Configuración dialog box / Optimización tab,
 Optimizar YD por pasada (YDopt) is disabled.
 - The Escalonamiento de guiahilos (YD / YDI) control column is displayed.
- Default Setting: Use of values from the YD table
- 1
- Place the cursor in the control column.
- 2
- Open the context menu with RMB.
- The context menu is displayed.
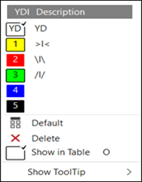
|
|
YD |
Standard entry in the control column:
| |
|
YDI |
Indirect tables for the yarn carrier staggering process YDI
| ||
|
|
Default |
Reset entry to the default entry
| |
|
|
Eliminar |
Delete entry (Don't care)
| |
|
|
Mostrar en tabla |
The position of the cursor in the control column determines in the context menu which table entry is selected and displayed in the table. | |
|
| |||


- 3
- Select the desired YDI Index from the context menu.
- 4
- Enter the selection from the control column in the desired pattern areas.
- 5
-
 Start the Technical Processing
 - 6
- Then open the symbol view after technical processing with the
 button.
 - 7
- Select
 Mostrar guiahilos in the status bar.
- The yarn carrier staggering and yarn carrier paths are displayed
Create private YDI table:
- Pattern is displayed as design pattern.
- In the Configuración dialog box / Optimización tab, Optimizar YD por pasada (YDopt) is disabled.
- 8
- Place the cursor in the control column.
- 9
- Open the context menu with RMB.
- The context menu is displayed.
- 10
- Select Mostrar en tabla in the context menu.
- Setup Data dialog box,
 Guiahilos section is opened.
|
| ||
|
1 |
|
Tab in the
|
|
2 |
YDI 4 + YDI 5 |
Table entries without specifications for yarn carrier staggering
|
|
3 |
* |
Over marked rows (*) it is possible to insert new rows in the table, to define further private yarn carrier staggerings. |
|
4 |
Slider
|
Input options for values for the yarn carrier staggering |
- 11
- Use an existing entry.
- or -
Create a new entry in the table. - 12
- Set the values for the yarn carrier staggering in the graphic using the sliders or the edit box.
- 13
- Close the dialog box.
- Entries are saved and can be entered into the control column.
-
Corrección de guiahilos (YC/YCI) control column:
- Yarn carrier correction for yarn carriers in the fabric YC: Default Setting: Entry YC in the control column in the entire pattern.
This YC entry contains a table with all the yarn carriers used in the pattern without a correction value. - Manual yarn carrier correction in the fabric YCI
Working with YC / YCI in the control column:
- Pattern is displayed as design pattern.
- The Corrección de guiahilos (YC/YCI) control column is displayed.
- Default Setting: Use of values from the YC table
- 1
- Place the cursor in the control column.
- 2
- Open the context menu with RMB.
- The context menu is displayed.
|
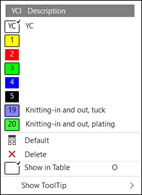
|
YC |
Standard entry in the control column:
| |
|
YCI |
Indirect tables for the yarn carrier correction YCI
| ||
|
|
Default |
Reset entry to the default entry
| |
|
|
Eliminar |
Delete entry (Don't care)
| |
|
|
Mostrar en tabla |
The position of the cursor in the control column determines in the context menu which table entry is selected and displayed in the table. | |
|
| |||
- 3
- Select the desired YCI Index from the context menu.
- 4
- Enter the selection from the control column in the desired pattern areas.
- 5
-
Start the Technical Processing
- 6
- Then open the symbol view after technical processing with the button.
- 7
- Select Mostrar guiahilos in the status bar.
- The yarn carrier staggering and yarn carrier paths with yarn carrier corrections are displayed
Create private YCI table:
- Pattern is displayed as design pattern.
- 8
- Place the cursor in the control column.
- 9
- Open the context menu with RMB.
- The context menu is displayed.
- 10
- Select Mostrar en tabla in the context menu.
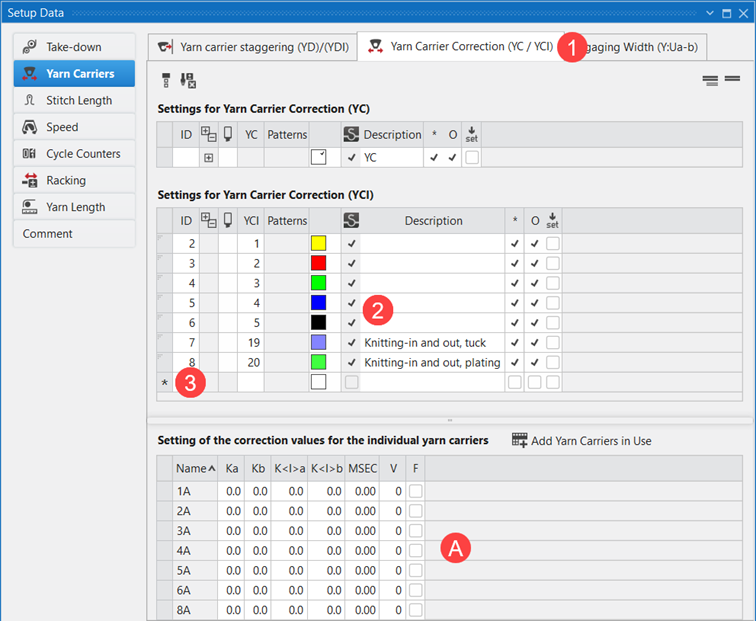
- Setup Data dialog box, Guiahilos section is opened.
|
| ||
|
1 |
|
Tab in the
|
|
2 |
YCI 1 - YCI 5 |
Table entries without specifications for yarn carrier corrections
|
|
3 |
* |
Over marked rows (*) it is possible to insert new rows in the table, to define further private yarn carrier corrections. |
|
4 |
|
Input options for values for the yarn carrier corrections |
|
A |
Contents of the selected table entry YC / YCI |
|
- 11
- Use an existing entry.
- or -
Create a new entry in the table. - 12
- Set the values for the yarn carrier staggering in the graphic using the sliders or the edit box.
- 13
- Close the dialog box.
- Entries are saved and can be entered into the control column.
-
 Ajustes predeterminados de guiahilos control column:
 -
 Bascular : all yarn carriers of a technical row are swiveled
 -
 No bascular : all yarn carriers of a technical row are not swiveled
 -
 Ligamento de intarsia control column:
 -
 Ligamento de intarsia ON : Intarsia binding is entered in the technical row for all color areas (standard)
 -
 Ligamento de intarsia OFF : Intarsia binding is not entered in the technical row for all color areas
 -
 Pasada de salida control column:
 -
Pasada de salida : all yarn carriers of a technical row are knitted-out (standard)
-
Sin salir tejiendo : all yarn carriers of a technical row are not knitted-out.: The yarn carriers stop in the fabric! The yarn carriers are knitted-out with the YG-Home function at the end of the fabric.