What was new in CREATE PLUS V2.8
Release V2.8 09/2024
Versión del archivo: 16 (V2.8)
Compatible with:
- EKC 3.1
- CKC 2.1
- OKC 6.6
Borde de forma and Marcas de forma Docked to the Pattern
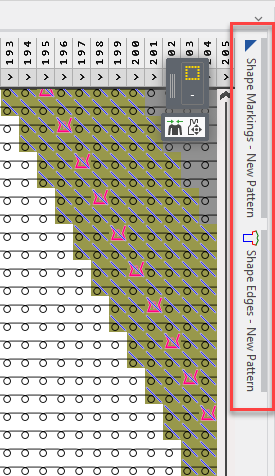
The Borde de forma and Marcas de forma tool windows are always docked to document window of the pattern.
View options of the tool windows:
- Fold or unfold at the edge
- Pull to an edge
- Unpin from edge and position it as desired
- Open it with the O key at the desired cursor position at the corresponding shape edge or shape marking entry within the pattern
You call-up both the tool windows as well in the context menu of the pattern and in the Inicio ribbon / Ventana de herramientas ribbon group.
Replace Exceeding Modules
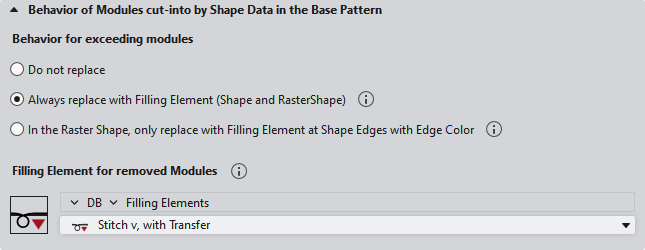
Settings in Configuración dialog box / Datos del corte tab
You make the following settings on the Datos del corte tab:
Comportamiento de módulos seccionados
| The exceeding modules will not be replaced. |
| The exceeding modules will always be replaced by the selected filling element.
|
| The exceeding modules will be replaced in the raster-shape only at shape edges with edge color.
|

 The result is visible in the raster-shape only after expanding the pattern.
Elemento de relleno para módulos eliminados
- Select the path of the desired module.
- Select the module of this path.
Only select modules of size 1x1
With bigger modules you will get a warning.
Only the first stitch of the first row of the module will be inserted repeatedly.
 The Ocultar módulos seccionados function is no longer available in the context menu of the pattern layer.
Stepping Kind Escalonamiento predeterminado
Up to now only available for Corte de dimensiones.
Now, in the Corte de líneas as well.
 :
:
- With a preset stepping, it is not always possible to reach any desired target point!
Example:
- If only even-numbered steps have been specified, no target point can be reached at an odd-numbered position.
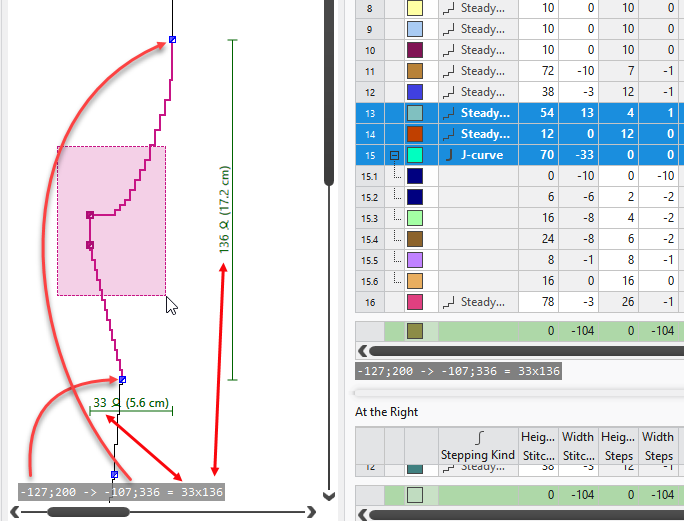
Therefore, the line table contains the following information for a preset stepping:
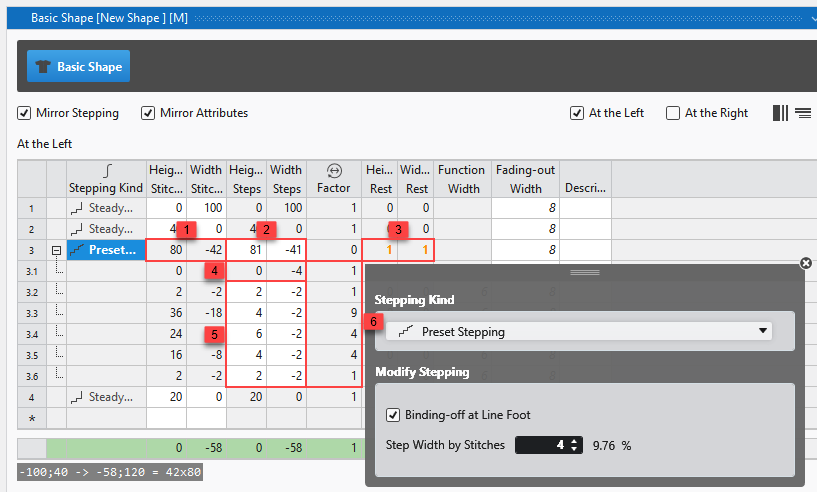
1 | Actual height and width of the line
|
2 | Desired height and width of the line in total
|
3 | Deviation of the calculated target point in height and width The deviation of the actually reached target point from the desired target point is displayed in red. |
4 | Bind-off Step The width of the bind-off step is specified via the line properties. The total bind-off width is calculated and determined by the factor. |
5 | Preset Stepping The preset stepping is specified by the user. |
6 | Factor of the stepping The factor for each step is calculated so that the desired overall height and width of the line is achieved as precisely as possible. |
Deviating target point of a line
If the desired target point of a line is not reached in the lined shape, both points are displayed separately.
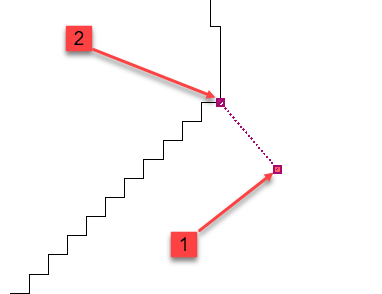
1 | Desired Target Point |
2 | Actually Achieved Target Point |
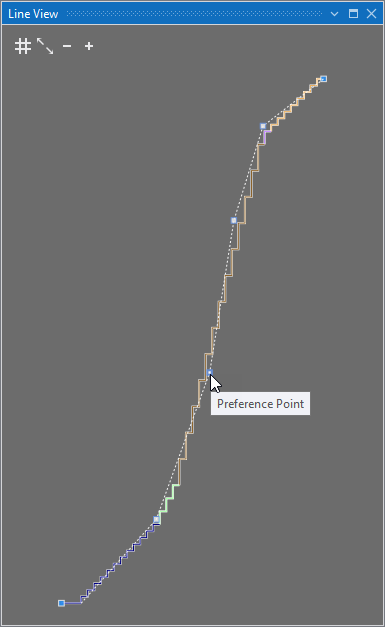
Line View
In addition to the stepping line, a dashed line appears.
- You can set preference points on the line and remove them via the context menu.
- Agregar punto de preferencia
- Eliminar punto de preferencia
- The stepping line adapts to this curve as closely as possible, according to the preset stepping.
- You can move the preference points as desired.
This means, you can form the line as desired according to the preset stepping.
Display of Line Dimensions
If one or more lines are selected in a lined shape, the following information about this selection is displayed.
- Coordinates of the start point
- Coordinates of the endpoint
- Absolute width and height
 The start and endpoints correspond to the first and last points of the selected lines of the shape.
This information appears at the lower left of the views.
- Line Table
- Lined Shape Editor
- Lined Shape Layer
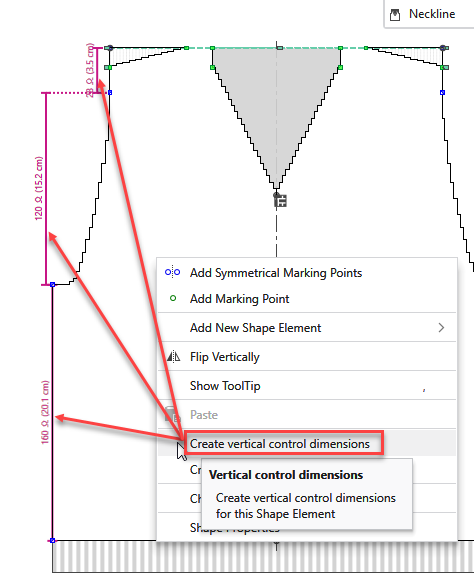
Function to Create Control Dimensions in Lined Shapes
Functions in the context menu of Corte básico or Elemento de corte of a lined shape:
- Crear dimensionamientos de control vertical
- Crea los dimensionamientos de control vertical para este elemento de corte.
- Crear dimensionamientos de control horizontal
- Crea los dimensionamientos de control horizontal para este elemento de corte.
- Eliminar dimensionamientos de control
- Elimina todos los dimensionamientos de control.
Open Knitting Elements in a document window with different tabs
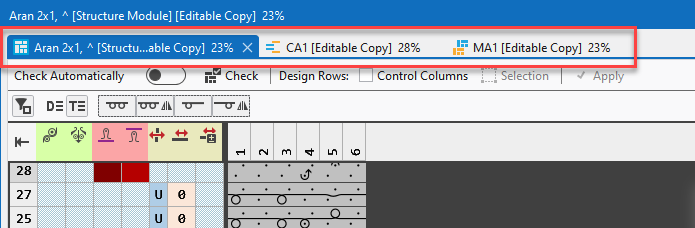
With the O key, you can open all knitting elements which are positioned at the current cursor position.
- All the Knitting Elements will appear in one single document window with different tabs.
- All the following Knitting Elements you will open with O key will appear in a different tab of the same document window.
Extensions of Pattern Element Editor
The external pattern element editor is extended with the following functions:
- Portapapeles ribbon group is added to the Inicio ribbon.
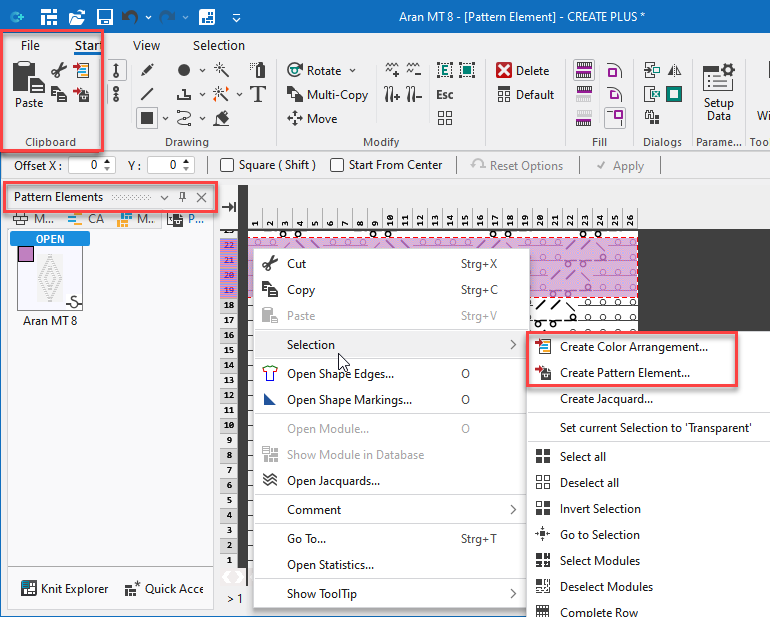
- Generar Color Arrangement... context menu is available on row selections of pattern elements.
- Crear parte de muestra... context menu is available on selections within pattern elements.
- Partes de muestratool window is available.
Pattern Elements are only allowed in the Design View
Up to now:
- You could copy a selection of the Vista de símbolo después de procesamiento and add it to the Partes de muestra tool window.
New:
- As the copy of a selection of the Vista de símbolo después de procesamiento is not a pattern element, this selection cannot be pasted into the Partes de muestra tool window.
Reworked Nuevo elemento de tisaje Dialog Box
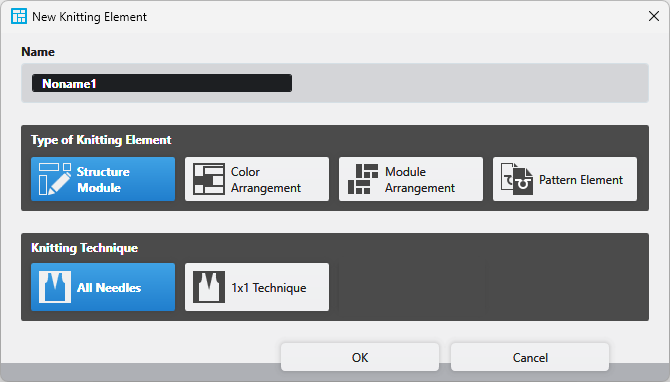
The selection at Tipo de elemento de tisaje of the Nuevo elemento de tisaje dialog box is restricted to following options:
- Módulo de estructura
- Color Arrangement
- Module Arrangement
- Parte de muestra
The Nuevo elemento de tisaje function is removed from the context menu of the Windows taskbar.
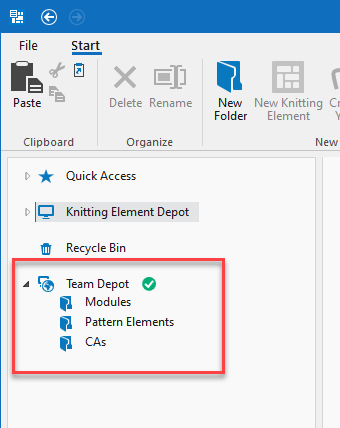
Depósito Team in Knit Explorer
In the Knit Explorer, you can set up a shared folder on the local network or in the cloud to manage the knitting elements.
Different users can access this folder and thus use common knitting elements.
- Select a common folder in the Opciones / Configuración del proyecto / Ubicación dialog box:
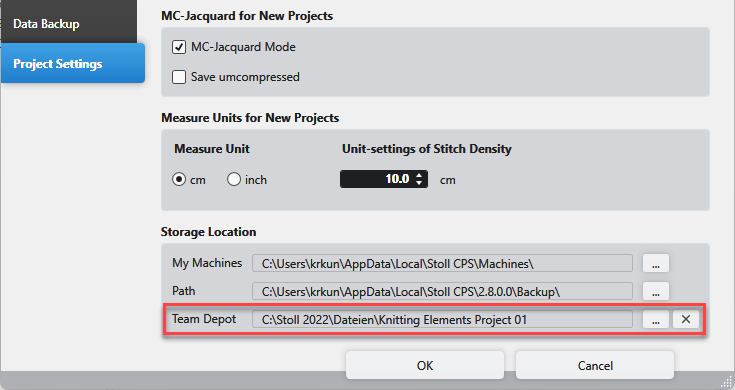
- The Depósito Team entry appears in the Knit Explorer.
- Save and Manage Knitting Elements Centrally Under this Path
- Add Subfolders
- Green checkmark: Folder is synchronized
 - NO SINCRÓNICO - :
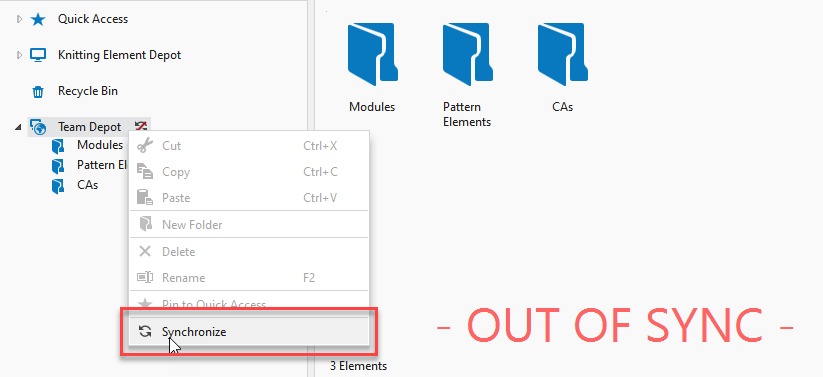
- You can synchronize the Team Depot via the context menu of the folder.
 Sincronizar
Optimized Options for Adaptar variador en carrera tejiendo en una sola fontura
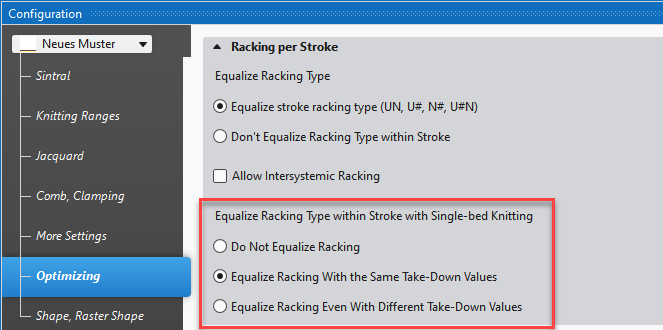
In the Configuración dialog box / Optimización tab, the Adaptar variador en carrera tejiendo en una sola fontura option could previously only be activated or disabled.
New Options:
- No ajustar variador
The racking of single-bed knitting rows will not be changed. - Ajustar variador en caso de mismos valores de estiraje
In case of identical take-down values, the racking of transfer rows will be applied to a neighboring single-bed knitting row if this results in a shorter running time. - Ajustar variador a pesar de diferentes valores de estiraje
Even in case of different take-down values of both rows, the racking of transfer rows will be applied to the neighboring single-bed knitting row.
The take-down value of the knitting row will be applied to the transfer row.
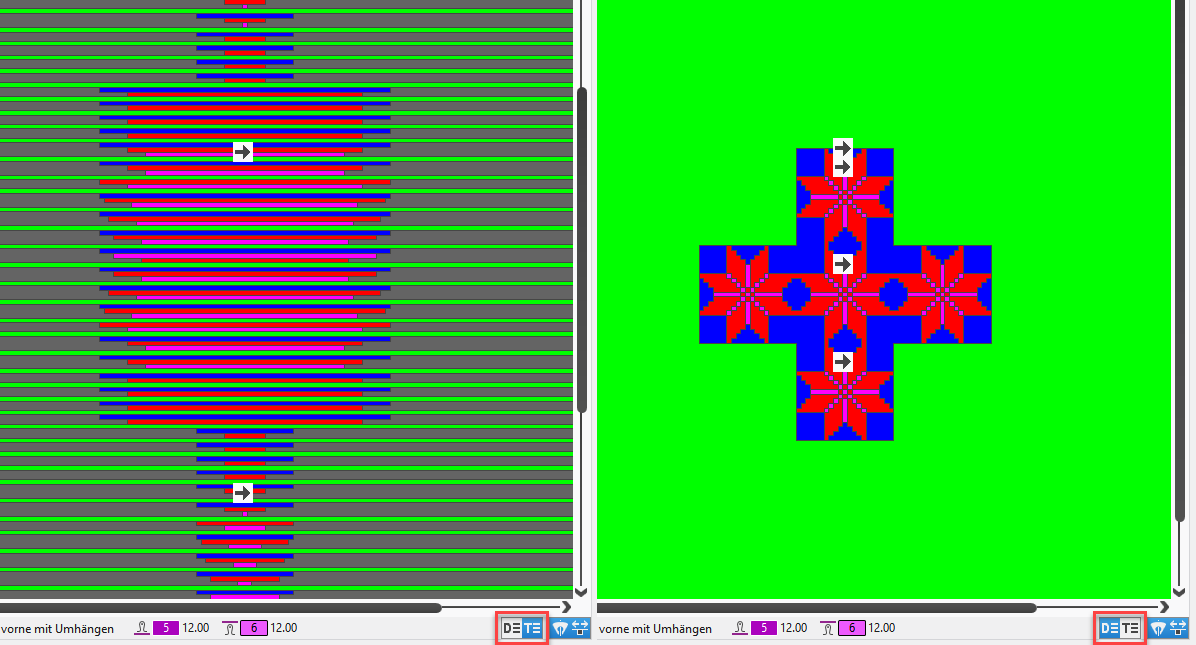
Presentation of Pattern Rows in the Yarn Carrier View
You can switch the yarn carrier view to the technical row presentation or pattern row presentation.
- With it, you can recognize the motive in the pattern row presentation of the yarn carrier view.
- You can switch the display in the status bar at the bottom right.
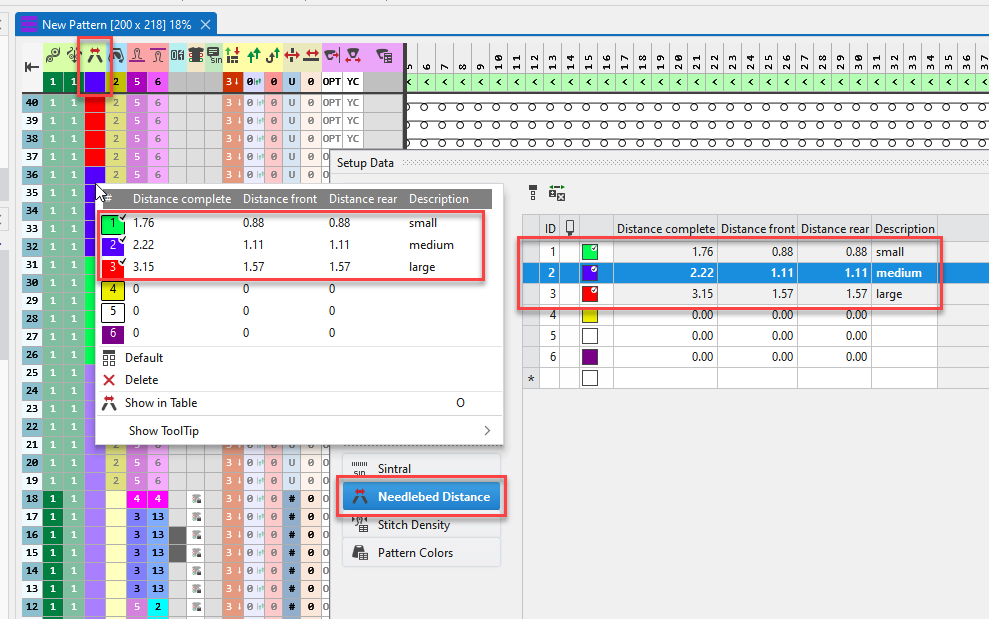
Adjust the Distancia entre fonturas of ADF Flex
Row by row, you can adjust the Distancia entre fonturas as required by different knitting situation.
- New Distancia entre fonturas tab of the Parámetros de muestra dialog box
- Apply the entries of this tab via the Distancia entre fonturas control column into the pattern.
- The adjustment values is carried out in the carriage return.
The first three entries are part of Distancia entre fonturas tab by default. These cannot be deleted or edited.
- Small
Approximately the same distance as the standard machine. - Medium
Approximately the same distance as the multi gauge machine. - Large
Approximately the same distance as the k&w machine.
New Reporte de muestra
You can open the Reporte de muestra dialog box in the Vista ribbon.
In this dialog box, you make all the settings to create the Pattern Report.
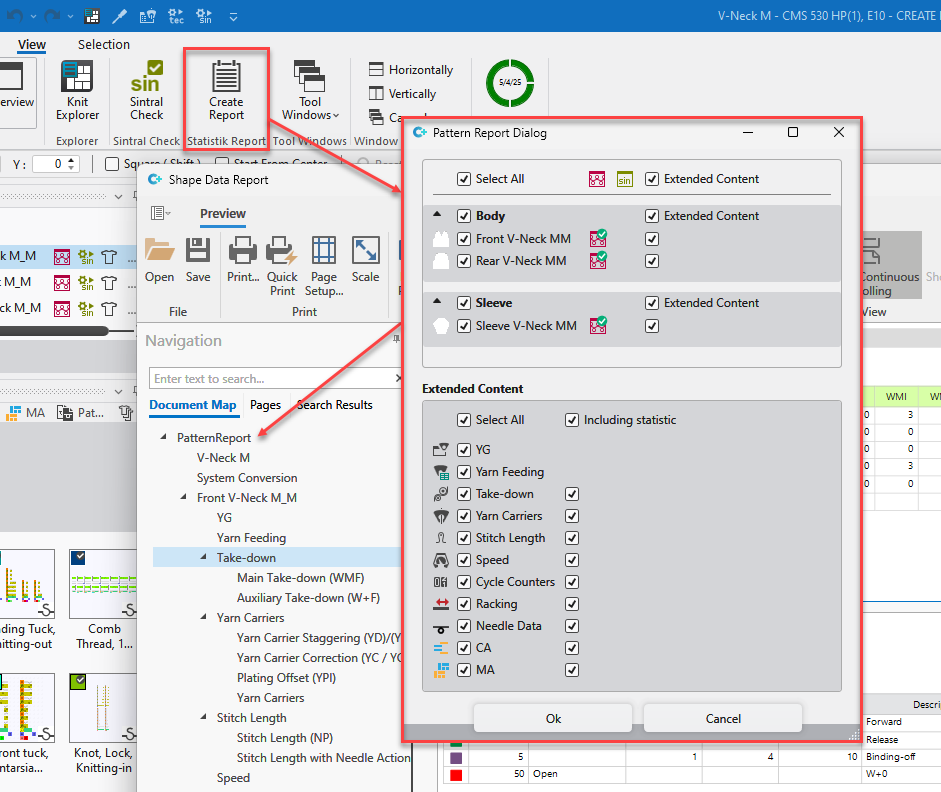
Select the patterns in the upper part of the dialog box.
- The report can be created after Procesamiento técnico only.
You cannot select patterns which are not yet technically processed in this dialog box. - The patterns will be displayed the same way as in the Muestra tool window.
Select the desired data for the Pattern Report in the lower part of the dialog box.
- Select the Parámetros de muestra .
- Specify for the selected Parámetros de muestra to display the Estadística data as well.
Automatic Saving
 Opciones dialog box / Copia de seguridad de datos
section
Opciones dialog box / Copia de seguridad de datos
section
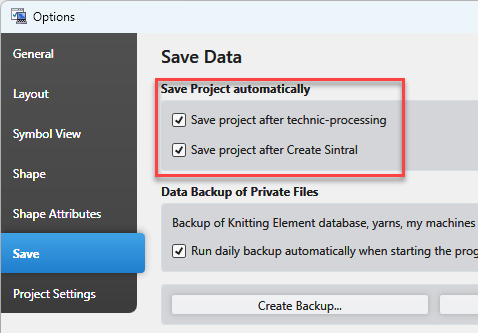
Make the following settings in the Guardar proyecto automáticamente. section:
-
 Guardar proyecto después de procesamiento técnico
The total project will be saved after Technical Processing. -
Guardar proyecto después de crear Sintral
The total project will be saved after Create Sintral.
Automatic Saving with Multiple Processing
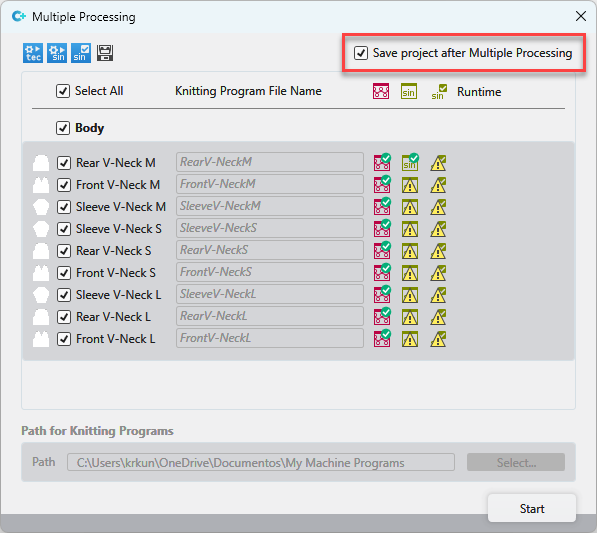
Function of the Procesamiento múltiple dialog box:
-
Guardar proyecto después de la procesamiento múltiple
The total project will be saved after each Multiple Processing despite the settings in the dialog box.
Canceling the Multiple Processing will prevent saving the project.
Working with Jacquard Symbols
Now, you can use Jacquard symbols within new pattern projects.
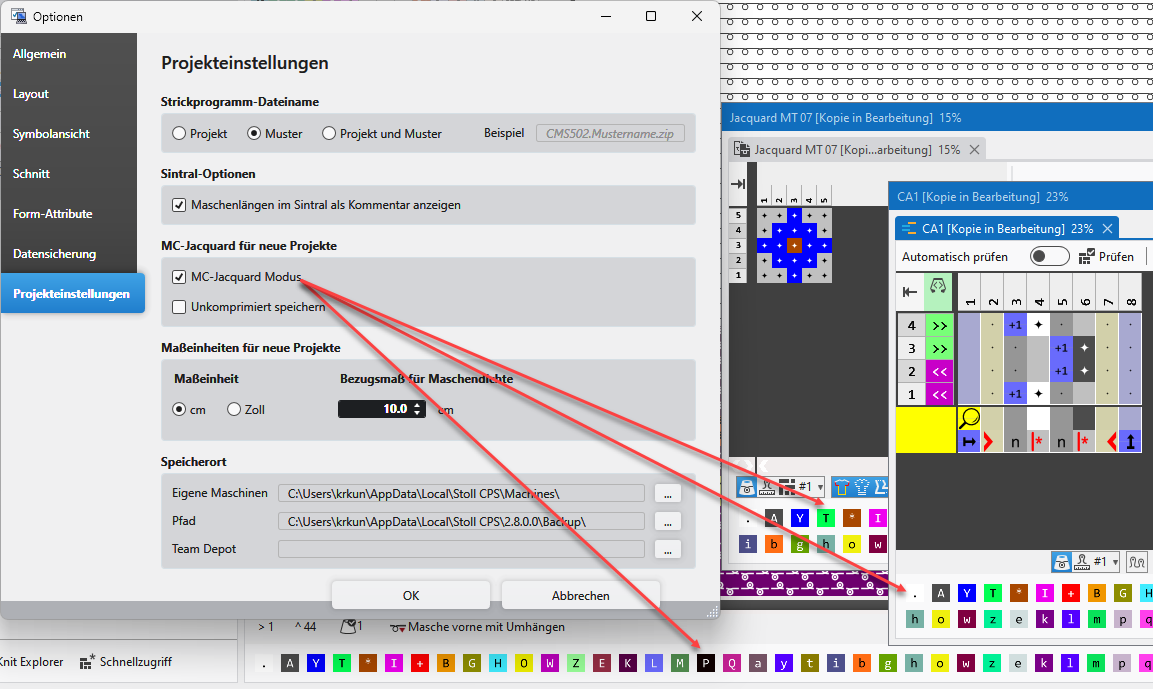
Settings for new projects in Opciones / Configuración del proyecto / MC jacquard para nuevos proyectos
You can draw with Jacquard symbols into the following areas:
- Design View of the Pattern
- Pattern Element
- CA
Only in the searching row
Watch out following:
- The Jacquard symbols will appear below the status bar of the document windows.
- Jacquard symbols have to be converted to needle actions in the pattern by a CA.
If not, an error message appears with Expandir or Procesamiento técnico - Export a pattern as MC Jacquard.
Function of the context menu on the pattern in the Pattern tool window.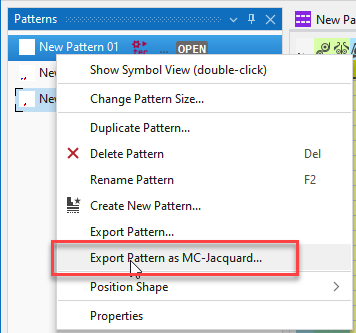
- Import a MC Jacquard into a pattern project.
The function is available via Archivo / Importar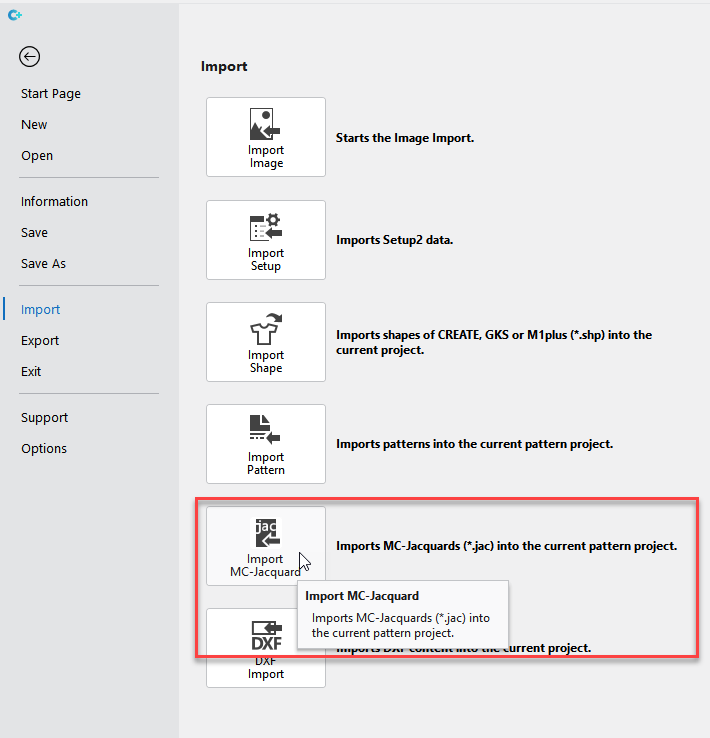
- Crear MC jacquard... from selection.
The function is available in the context menu on the selection within the pattern.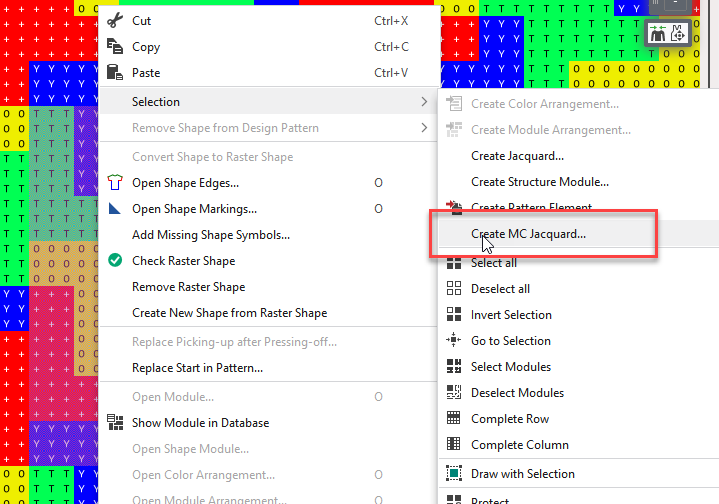
New functions of the Knit Explorer
Following new functions available in the Arranque ribbon:
| Importa MC jacquard (*.jac) como parte de muestra. |
| Imports any desired folder tree.
|

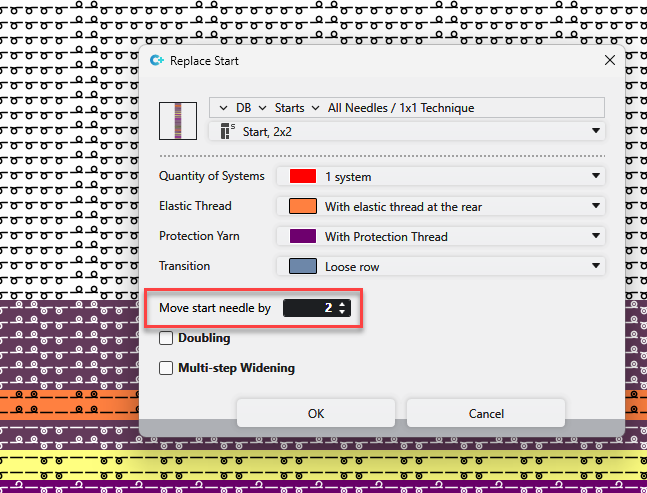
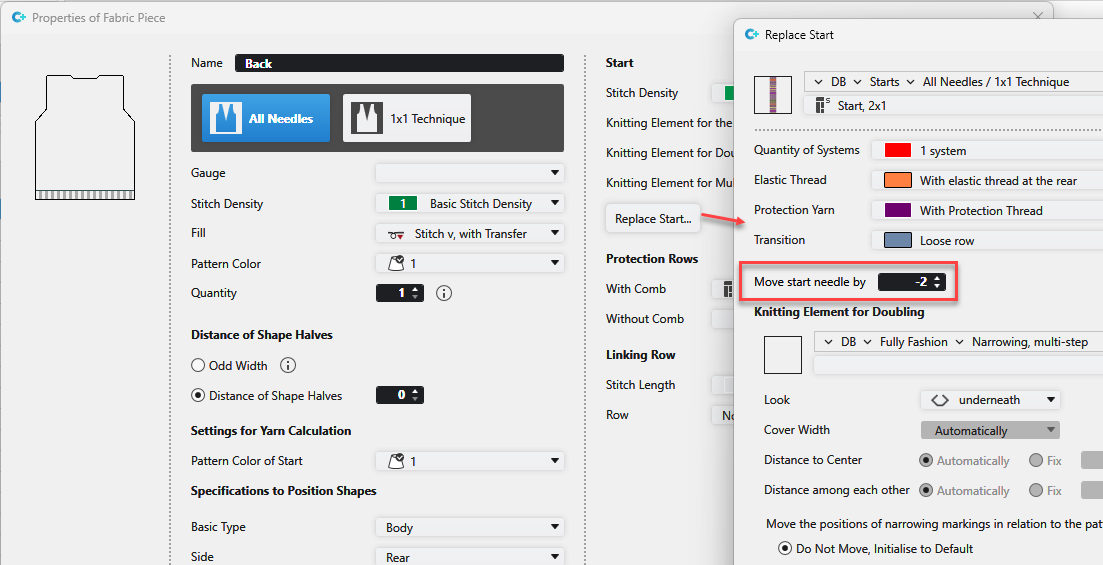
Move Starts Horizontally
- Via the Sustituir comienzos dialog box
- In the Pattern
- In the Lined Shape
- In the Dimensioned Shape
- Positive value of the edit box moves the start to the right.
Negative values to the left.
In the Pattern
Reemplazar comienzo en la muestra... context menu / Sustituir comienzos dialog box
In the Lined Shape
Propiedades de corte / Sustituir comienzos dialog box

In the Dimensioned Shape
Propiedades de pieza de tisaje / Sustituir comienzos dialog box
New functions of the Text drawing tool

Font Size | Enter the font size. |
Ángulo (grados) | Rotate the text by the specified angle. |
Max. Width | Enter the maximum width of the text. |
Max. Height | Enter the maximum height of the text. |
Preview | Shows a thumbnail of the text according to specified settings. |
Create Pattern Element | Creates a pattern element with the text and saves it to the Pattern Element tool window.
|
 Cursor attributes selected together with the text are applied to the pattern element.
Enhanced Options for Protection Rows
Configuración dialog box / Sectores de tisaje tab
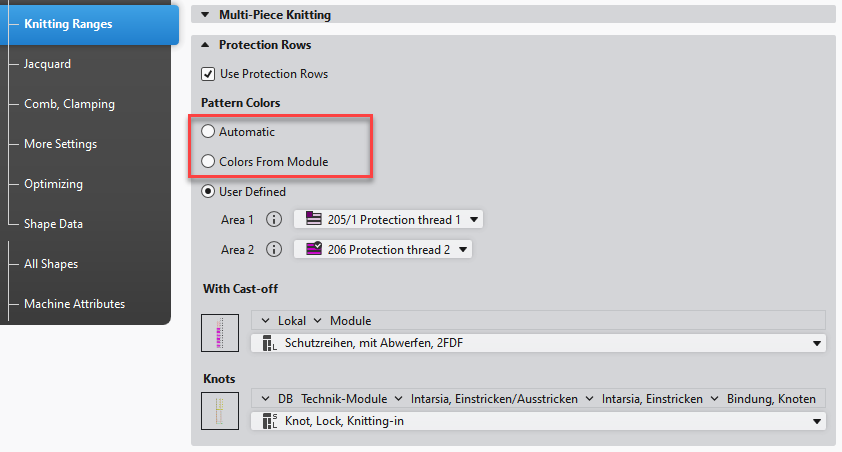
New Options
New options for protection rows in Configuración / Sectores de tisaje:
- Automático
Usando el color de muestra de la última pasada de mallas - Utilizar los colores de muestra del módulo
The pattern color of the module is used in the protection rows.
New Modules
4 new modules for protection rows in the module database
- Safety rows with cast off, 1 YC, knitting ranges in sequence, YC from the left
- Both sides will be knit one after the other by the same yarn carrier.
- The protection rows starts on the left side.
- Safety rows with cast off, 1 YC, knitting ranges in sequence, YC from the right
- Both sides will be knit one after the other by the same yarn carrier.
- The protection rows starts on the right side.
- Protection rows with Cast-off, 1 YC, Pass over neckline
- Both sides will be knit by 1 yarn carrier.
- The neckline will be passed-over by 1x1.
- Safety rows with cast off, 2 YC
- The protection rows are knit by 2 yarn carrier.
- Notice:
For this, Utilizar los colores de muestra del módulo must be active.
Enhanced functions of Technical Processing and Create Sintral
Expanders are added to the Technical Processing and Create Sintral functions of the Start ribbon.
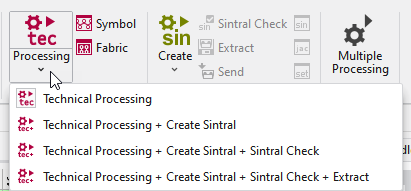
Select the desired function in the expander of technical processing:
- Technical Processing
- Technical Processing and Create Sintral
- Technical Processing, Create Sintral and Sintral Check
- Technical Processing, Create Sintral, Sintral Check and Extract
Select the desired function in the expander of Create Sintral:
- Generate Sintral
- Create Sintral and Sintral Check
- Create Sintral, Sintral Check and Extract
The selection of functions is displayed and retained under the icon. If you click the icon again, the last selection will be executed.

Para ello, véase también
- All Videos About V2.8
- All Videos About V2.8
- All Videos About V2.8
- All Videos About V2.8
- All Videos About V2.8
- All Videos About V2.8
- All Videos About V2.8
- All Videos About V2.8
- All Videos About V2.8
- All Videos About V2.8
- All Videos About V2.8
- All Videos About V2.8
- All Videos About V2.8
- All Videos About V2.8
- Type of Knitting Element
- All Videos About V2.8