Step by Step to 'Pattern-6'
Selective Plating
Several yarn carriers are used within on area with selective plating. Meaning all yarn carriers has to be placed optimally to knitting rows during knitting. This requests a border processing / correction of the motif.
- A pattern project with one pattern and the desired settings is created.
- 1
- To draw select any desired drawing tool under the Dibujar group.
- 2
- In the Colores de muestra tool window, select the desired pattern colors from the Colores de hilo color palette to draw the motif:
- 3
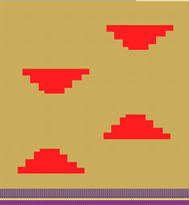
- Draw the desired motif in the
 Muestra de diseño.
- 4
- Open the Colores de vanisado dialog box with
 in the Colores de muestra tool window.
 - 5
- Paste the used yarn colors into row P1:
#23 (blue) into column A
#31 (yellow) for 'selektive plating' into column B
 : The yarn color used as the basic color (#31) must be the following yarn guide with plating offset (YPI) #2.
- 6
- Open the Plating Offset (YPI) table and assign the desired values.
Result: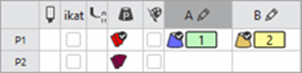
- 7
- Draw the plating color P1 into the design pattern.
- 8
- Open the selection list in the ribbon under Dialogs with
 .
.
- or -
Open the context menu of the Design Pattern. - 9
-
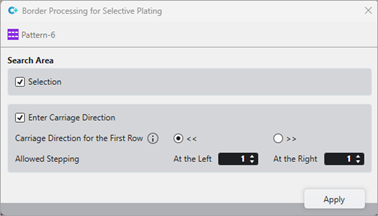
Select
 Procesamiento de bordes para vanisado selectivo.
 - The dialog box is opened.
|
| ||||
|
| ||||
|
Search Area | ||||
|
|
|
In complete pattern |
Edit the border processing of the areas within the whole pattern. | |
|
|
Within the selected area |
Edit the border processing of the areas within the selection. | ||
|
| ||||
|
|
Carriage direction for first row | |||
|
|
Carriage direction for the first row in the area of selective plating to the left | |||
|
|
Carriage direction for the first row in the area of selective plating to the right | |||
|
|
Switching carriage directions for the left and right border will be inserted into the pattern. | |||
|
Allowed Stepping | ||||
|
|
Border processing left |
Preset of allowed stepping by needles at the left border | ||
|
|
Border processing right |
Preset of allowed stepping by needles at the right border | ||
|
| ||||
|
1 |
Allowed stepping of one needle | |||
|
2 |
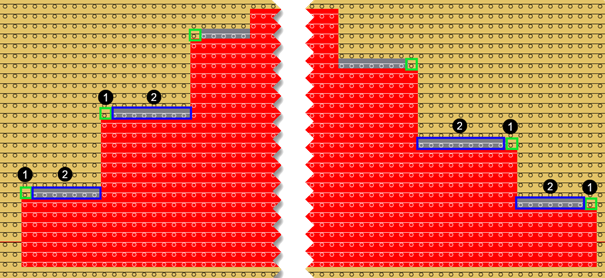
Border correction with an automatically created plating color
| |||
|
Rules of Border Processing For a correct processing of the selvedge correction, ensure:
| ||||
|
You have to process the border in the design pattern Attention: The border processing cannot be undone after technical processing of the pattern | ||||


 : Multiple selection is possible.
 <<
<<


 !
!
- 10
- Make the desired settings in the
 Guiahilos tool window.
- Pasada de entrada
- Pasada de salida
- Procesamiento de bordes etc.
- 11
- Carry out all the steps of processing.
 : The extracted file "ADF530-32W.Pattern-6.zip" can be loaded onto the machine with an USB stick or via Ethernet.