Step by Step to 'Pattern-14'
- A pattern project with one pattern and the desired settings is created.
- 1
- Open the tool window Couleurs de vanisage with
 in the Couleurs de dessin tool window.
 - 2
- Create a plating color in line P1 of the Couleurs de vanisage tool window:
- In column A:
- Yarn Color #3
- The
 symbol via the
  selection menu for the weft yarn carrier
 - In column B:
- Yarn color e.g. #1
- In column C:
- Additional yarn color e.g. #2
- 3
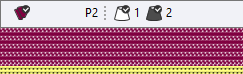
- Create the plating color for the start in line P2.
|
|

- 4
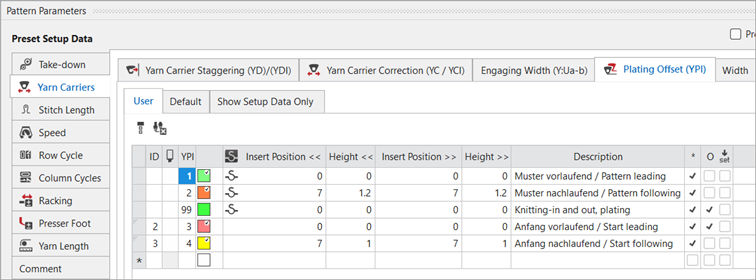
- Select the desired YPI indices from the Décalage de vanisage (YPI) table and allocate them.
|
|
- 5
- In the Rangée du dessin control column, select the first 2 pattern rows.
- 6
- Call up the context menu and select Sélection
/
 Créer un Color Arrangement...
.
Créer un Color Arrangement...
. - The Color Arrangement editor appears with the default CA.
- 7
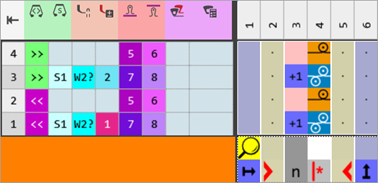
- Make the desired changes in the Color Arrangement:
- In the processing area:
- Draw needle action Maille avant - Maille arrière. together with the plating color P1 into existing rows.
- Add additional rows for half Milano and draw-in the Maille arrière needle action with any desired yarn color.
- Modifications in Control Columns:
- Control column
 Direction du chariot
 - Control column
 Système
 - Control column
 Presse W
 - Control column
 Correction de presse
 - Allocate a new stitch length index to the DJ row via the
 Longueur de la maille avant (NPv) control column.
 - Allocate a new stitch length index to the DJ row via the
 Longueur de la maille arrière (NP^) control column.
|
Color Arrangement CA1 |
|
|
- 8
- Check the generated Color Arrangement on correct entries with the
 Vérifier button.
 : The knitting procedure cannot be checked!
 - 9
- Enter the created Color Arrangement via the control column
 into the remaining pattern rows of the design pattern.: If necessary, knit-off 2 pattern rows at end with yarn color #1.
 - 10
- Open the Start, Tubular (modified) knitting element.
- 11
- Draw the plating color P2 into the knitting rows.
- 12
- If necessary, make the desired settings in the
 Guide-fil tool window.
 - 13
- If desired, make the desired presets in the following control columns:
- Stitch Length (NP)
- Tirage principal (WMF)
- Vitesse (MSEC)
- 14
- Carry out all the steps of processing.
 : The extracted file "ADF530-32W.Pattern-14.zip" can be loaded onto the machine with an USB stick or via Ethernet.