How to Create Control Dimensionings
Control Dimensioning
- Between two desired points a control dimensioning can be inserted with horizontal and vertical orientation.
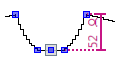
- Horizontal control dimensionings show the number of wales between the points.

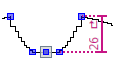
- Vertical control dimensionings show the number of stitch rows between the points.
- Vertical control dimensionings show the number of courses between the points.
 What's About Hand Knitting?
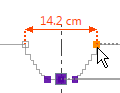
 - The control dimensionings serve for controlling the dimensional accuracy of the fabric.
- The distance between two shape points is to be checked.
- The dimensioned shape is opened in the Dimensioning View
 .
.
- 1
- Open the context menu for the desired shape point.

- 2
- Click
 .
.
For vertical control dimensionings you select the context menu  .
.
- A red arrow appears.
The startpoint lies at the clicked shape point and the arrow head is attached to the cursor.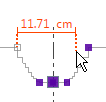
- 3
- Click on the target shape point.
- The control dimensioning appears.
Next to the control dimensioning appear the stitch number and the stitch symbol.
A control dimensioning is defined between two shape points, between two marking points or between a shape and a marking point.
 Options of the Dimensioning View
How to call up the context menus