What's new in CREATE PLUS?

https://software.stoll.com/createplus/software_updates/index.html
Release V2.10 07/2025
Versione file: 18 (V2.10)
Compatible with:
- EKC 3.1
- CKC 2.1
- OKC 6.6
Exporting Directories of the Knit Explorer
You will find the  Export Folder Structure function in the Directory group of the Avvio ribbon.
Effect:
- Exports the selected directory of the Knit Explorer.
- Exports all the subdirectories with all the contained knitting elements.
- Directories (group)
Import Controllo Sintral
You can import saved Controllo Sintral data (*.simx) as a pattern.
As a new Pattern Project:
- 157
- In the Backstage view or the start window, call up the Apri function and select the Controllo Sintral file type (*.simx).
- 158
- Enter the file path and select the corresponding file.
- A new pattern project will be created and the Controllo Sintral will get open as a new pattern.
Or as a new pattern within an existing project:
- 159
- In the Pattern tool window of a project, call-up the Importa disegno function of the context menu.
- 160
- Select file type Controllo Sintral (*.simx), enter the path and select the corresponding file.
- The Controllo Sintral will be created in the pattern project as a new pattern.
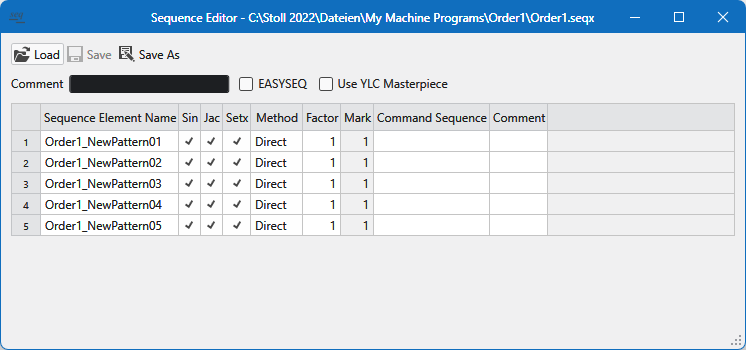
Reworked Sequence Editor
- You can call-up
 Sequence Editor on the Start Window.
 - The presentation of the editor has been improved.
- Features and settings of the editor have been retained.
Enhanced Drawing Tool Line
Two new options for the Linea drawing tool:
- Even With Remainder
- Personalizzato
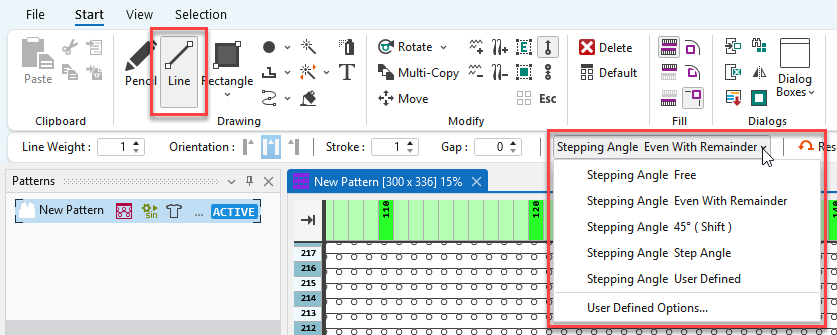
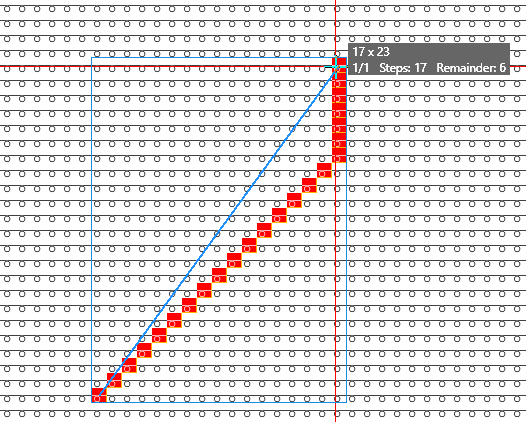
Even With Remainder
The line is drawn with an even slope and the rest is filled-in straight up to the endpoint.
Personalizzato
Options of the User Defined Stepping Angle pop-up window:
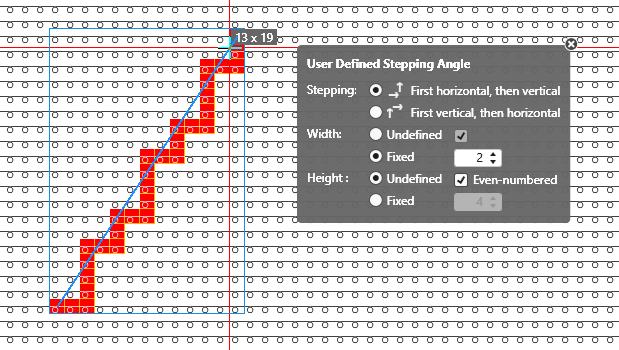
Stepping: | Specify the sequence of steppings. |
| Execute stepping first horizontally, then vertically. |
| Execute stepping first vertically, then horizontally. |
Larghezza: | Set the width of the steps. |
| Passi di qualsiasi larghezza |
| Larghezza passi con numero pari di colonne dei punti maglia |
| Passi con larghezza specificata |
Altezza: | Set the height of the steps. |
| Passi di qualsiasi altezza |
| Altezza passi con numero pari di ranghi di lavoro |
| Passi con altezza specificata |


You can combine yarn carriers even in rows with a CA.
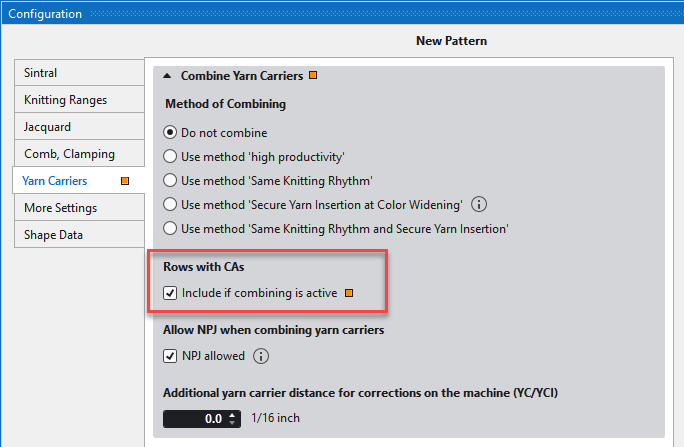
If the Include if combining is active function is enabled in the Rows With CAs section, combining then also has an effect on rows in which CAs are defined.
Combining Yarn Carriers of Selected Rows via the Control Column
You can enter the Raggruppa guidafili or Non raggruppare guidafili option into the Assegnazioni guidafilo control column.
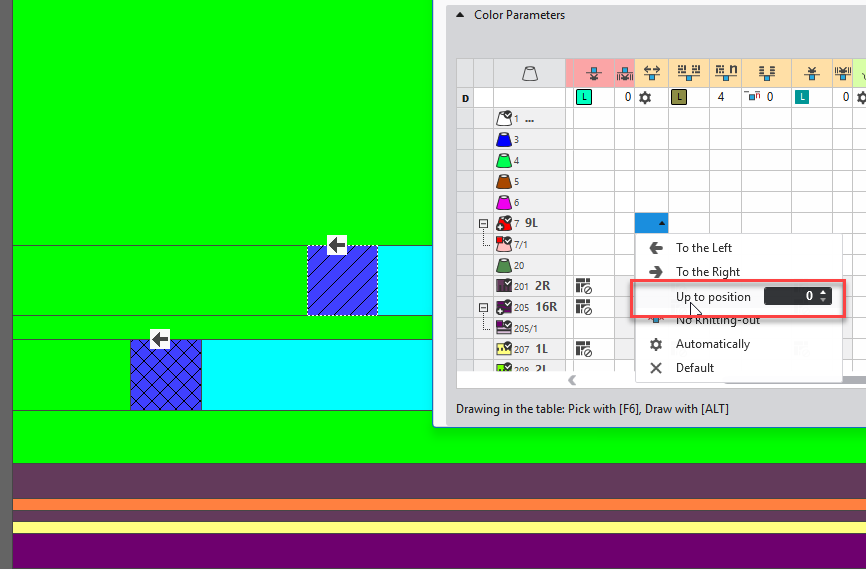
Knitting-out the Yarn Carrier up to Position Reworked
You can specify a knitting-out position of a yarn carrier in color parameters table.
Previously, this position referred to the symbol view after processing.
Now, this position referrers to Design View and you can specify it directly without preceding technical processing.
Presser Foot Type 10A
- W machines of gauge E10.2 k&w
- For use in double jersey knitting areas without effective take-down
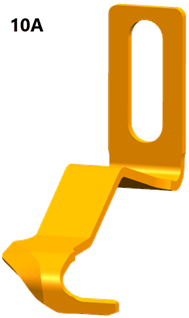
- Deflecting curve on the left-hand side
- Long foot on the right-hand side
- ID 4200306849, Typ 010
- Configuration at the W machine (EKC V3.1)
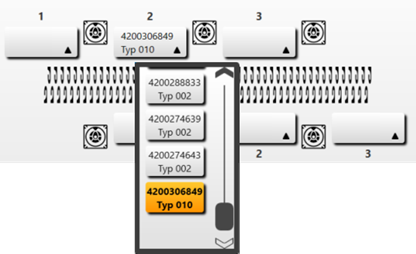
- Settings on the CREATE
- Scheda Pressa
- of Machine Properties
- of Machine Attributes
- Control column Pressa (ADF-W, CMS-W)
Filtering of Pattern Parameters Revised
You can apply the filtering of the pattern parameters to the whole Project or the active pattern in the Vista menu bar or in the Parametri del disegno tool window.
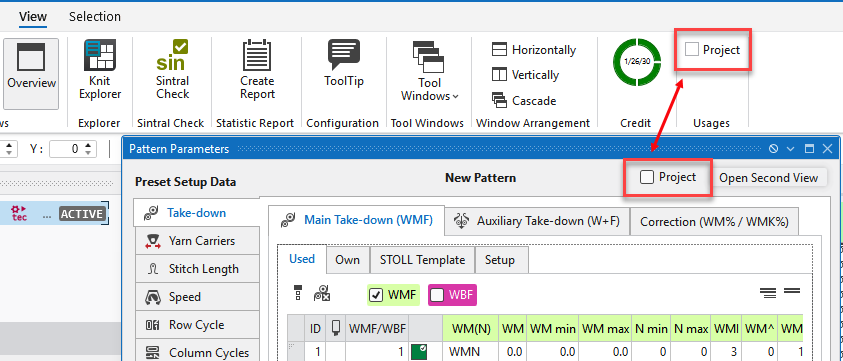
Scope of Usage
This setting applies to the following areas:
- Entries shown in the Utilizzato tab of the Parametri del disegno tool window
- Entries available in all the selection menus with pattern parameters
- Entries available in the context menu of the control columns
Effect
-
 Project
The entries are filtered according to the whole project.
The following entries are displayed: - All entries that are present in the patterns, in the knitting elements or in other settings of the project.
- All Sintral entries that are present in this project.
- All entries that belong to the favorites.
- All entries that are applied to the Setup.
-
 Project
The entries are filtered according to the active pattern.
The following entries are displayed: - All entries used in this pattern.
- All Sintral entries used in this pattern.
- All entries that belong to the favorites.
- All entries that are applied to the Setup.
- If a knitting element is open and active, the entries of the knitting element are displayed together with the entries of the active pattern.
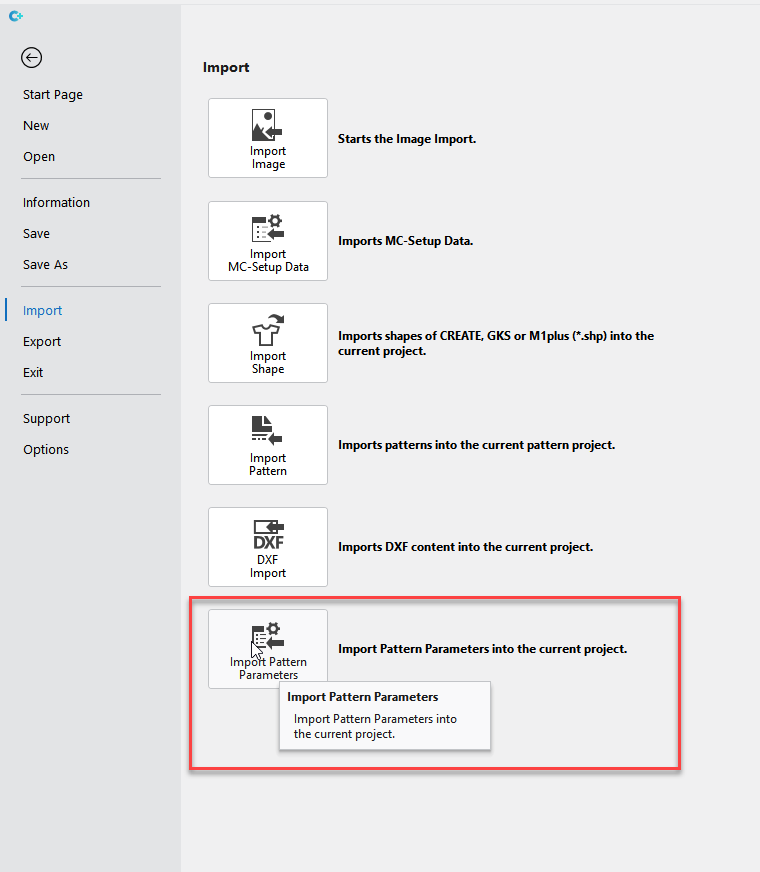
Import Pattern Parameter Template into Pattern Project
Now, you can import pattern parameter templates into an existing pattern project.
- You can open the Import Pattern Parameters function of the backstage view.
- Select the desired pattern parameter template and import it into the current pattern project.
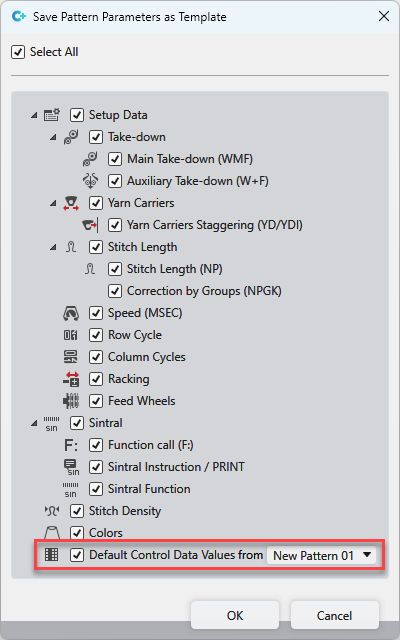
Default Setting for Control Columns within Pattern Parameters Templates
You can save the default settings of the column header of the control columns as well into the Pattern Parameters Template.
- The Salva i dati Setup come modello selection dialog appears in order to export a pattern parameters template.
- Enable the Default Values of Control Columns check box of this dialog box.
- Select the pattern from which the control column data is to be transferred.
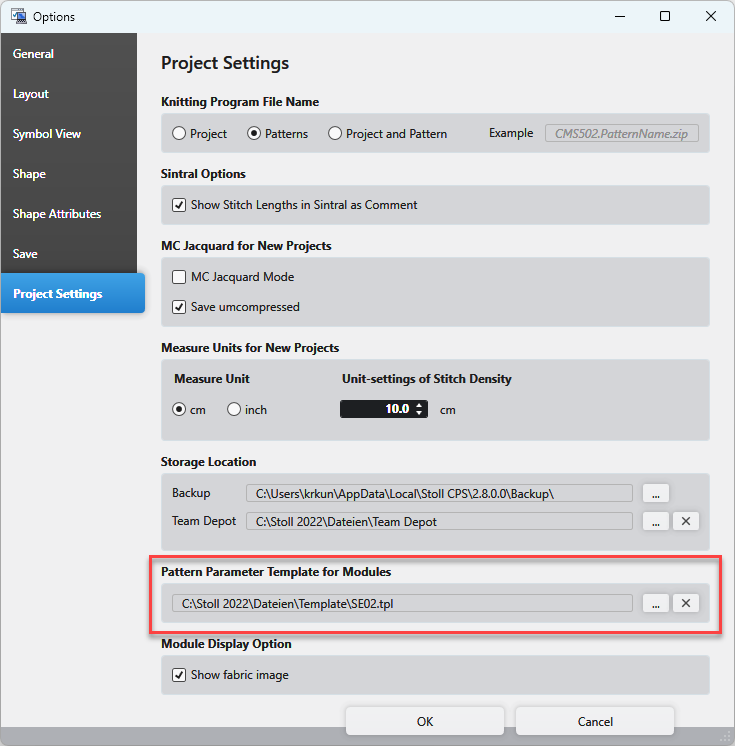
Pattern Parameters Template for Knitting Elements of the Knit Explorer
You can apply a pattern parameters template to knitting elements when you open or create them in the Knit Explorer.
- 161
- Open the Opzioni dialog box of the Backstage View.
- 162
- Load the desired template in the Pattern Parameter Template for Modules section of the Impostazioni progetto tab.
- This template is also loaded when you open or create a structure module, CA, MA or pattern element.
If a knitting element is open, you can also import any pattern parameter template.
- 163
- Click the Import Pattern Parameters function on the Importa section of the backstage view.
- 164
- Select the desired template.
- The pattern parameters template will be loaded into the knitting element.
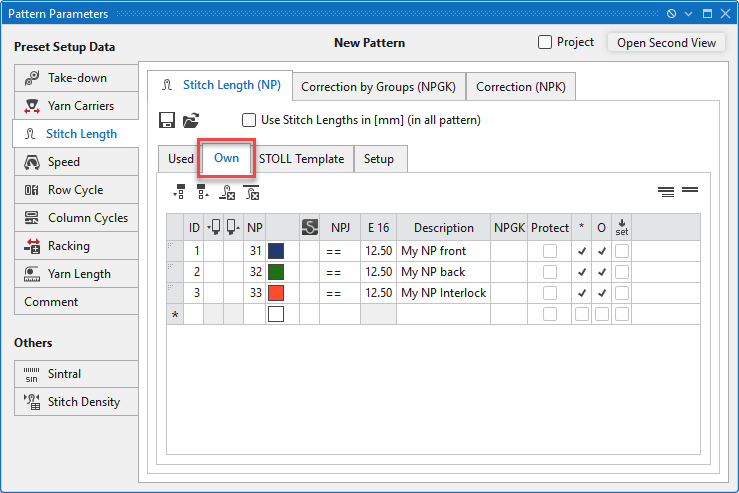
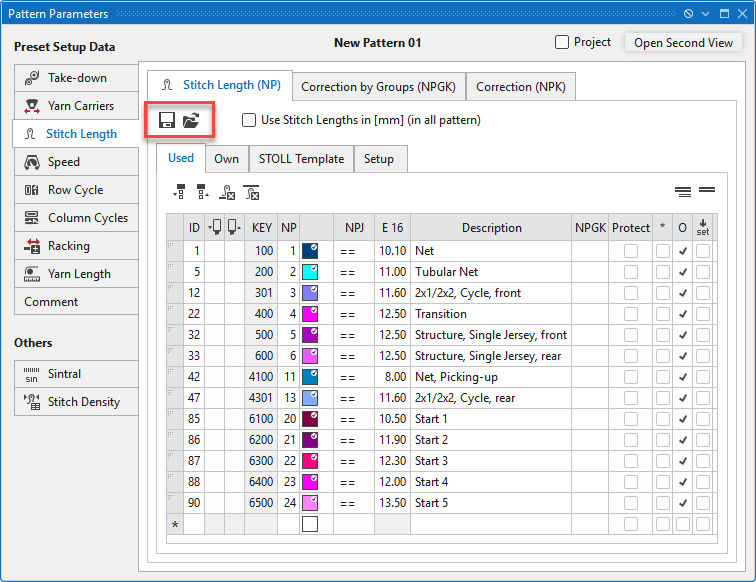
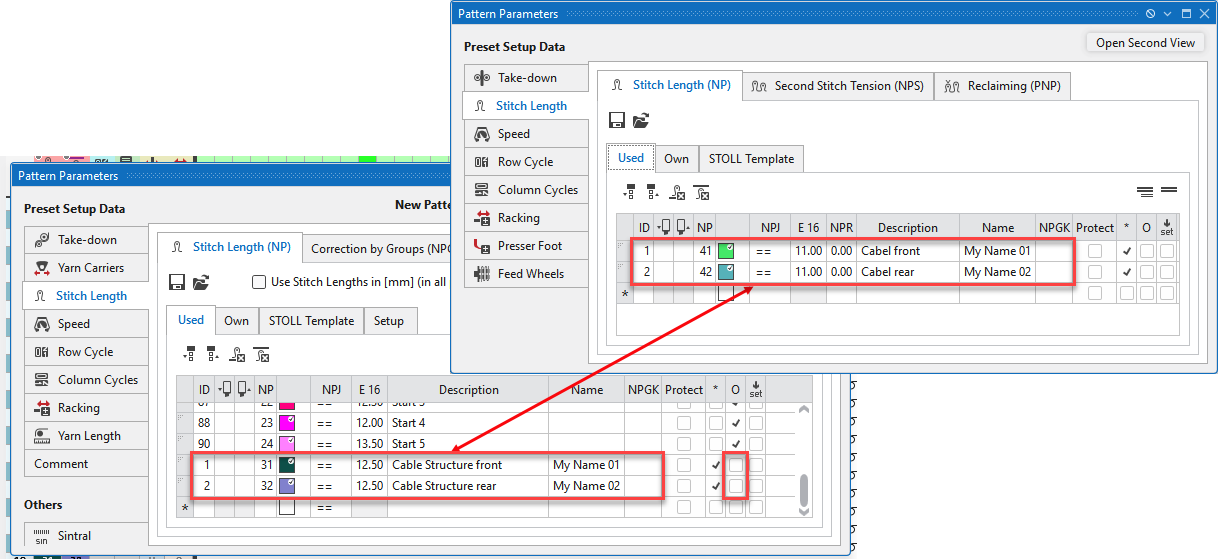
Additional identifier for the entries in the tables of pattern parameters
Almost all pattern parameters table have the new Nome column.
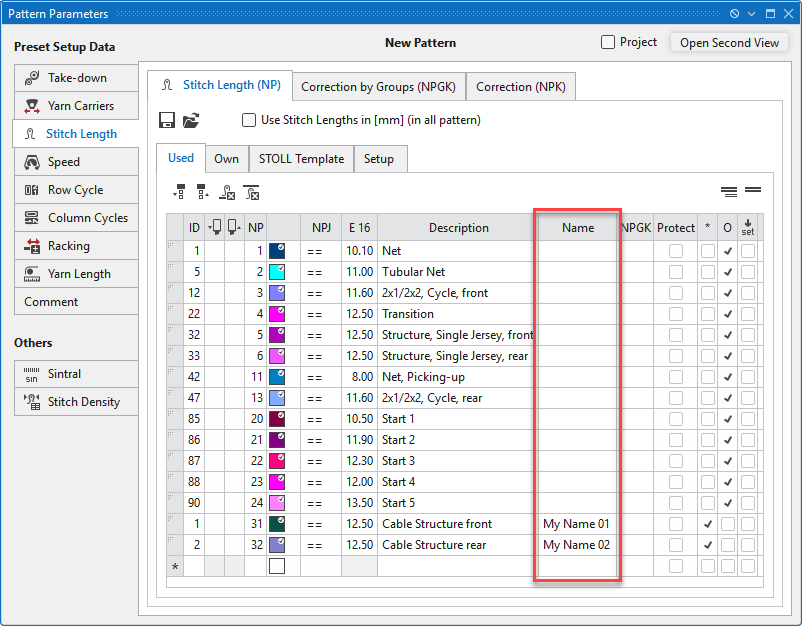
- This identifier enables the entry to be uniquely identified.
- This identifier cannot be entered more than once in a table.
- Entries from different tables can have identical identifiers.
Behavior:
- Requirements
- A module, pattern element or shape with an entry that can be identified by an identifier was loaded into a pattern.
- The pattern contains entries with identical identifiers.
- The O column determines the effect
- If the check mark is set in the O column for entries in the pattern:
- The entry from the module, pattern element or shape overwrites the corresponding entry in the pattern.
-

- If the check mark is not set in the O column for entries in the pattern:
- The entry of the pattern is retained.
- The entry from the module, pattern element or shape is ignored.
Knitting Elements - Elimina voci non utilizzate Was Reworked
Elimina voci non utilizzate function in the context menu of the tool windows Moduli, CA, MA and Parti di disegno.
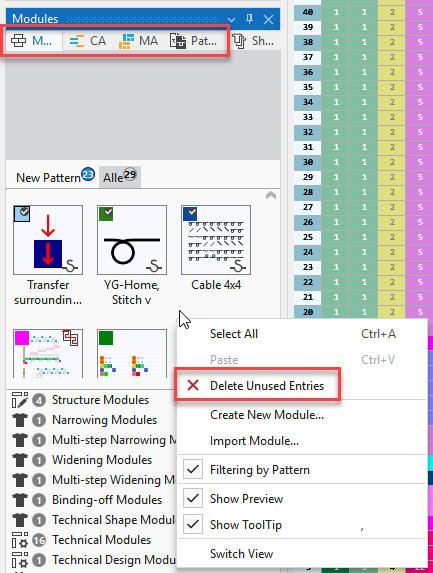
- Up to now
- Function affects all 4 tool windows in common.
- Now
- Function is limited to the respective tool window.
- Only the unused entries of the active tool window are deleted.
Recognition Images for Modules
- An image file can be assigned to each module in its properties for better visualization.
- This image is displayed wherever the module can be selected.
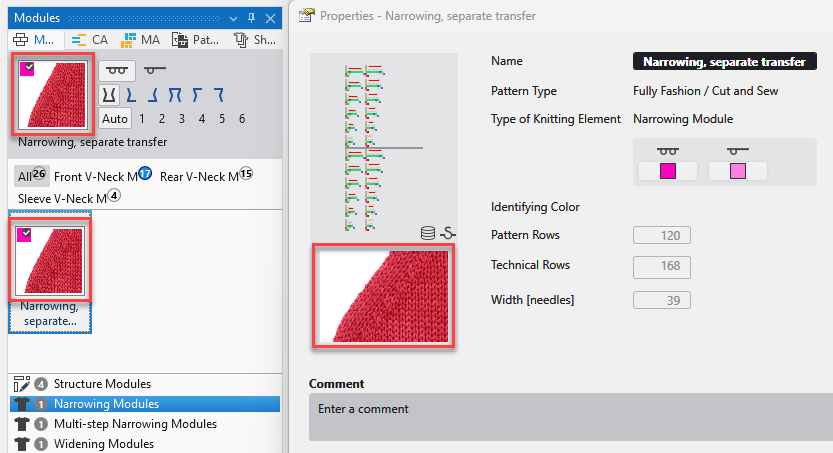
- The image is displayed as a tooltip in the selection menus.
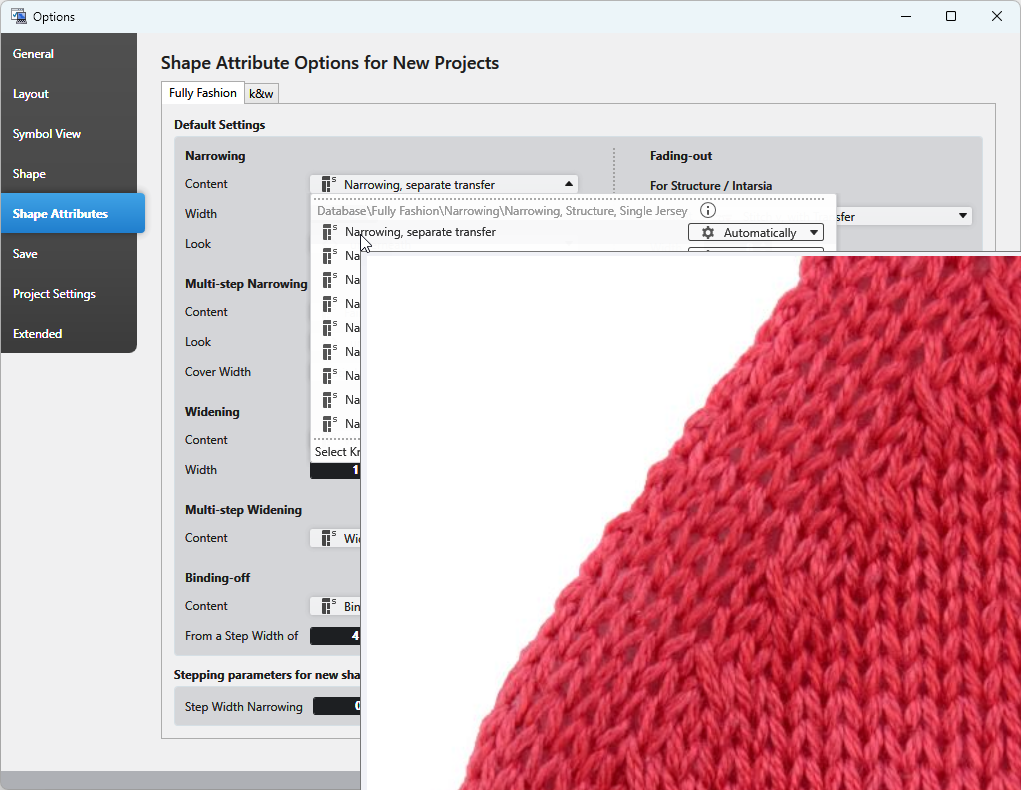
You make the settings for the module display in the Impostazioni progetto tab of the Opzioni dialog box: Show Fabric Image
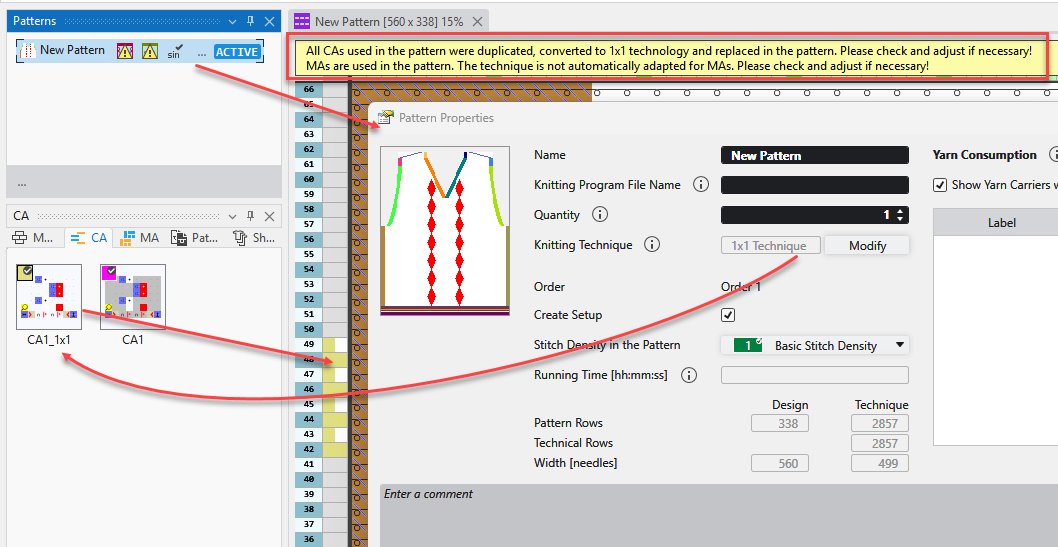
Changing the knitting technique in the pattern automatically replaces the CAs.
- 165
- Change the knitting technique in the Proprietà del disegno dialog box of a pattern.
(Tecnica 1x1 <->Tutti gli aghi ).
- All CAs used in the pattern are duplicated, adapted to the new knitting technique and replaced in the pattern.
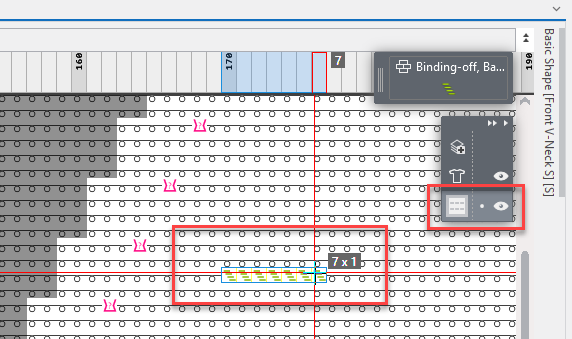
Delayed Casting-off with Binding-off Modules
With binding-off modules, it may be necessary to insert the final binding-off with a spacing into the pattern.
In the binding-off module, the final binding-off rows are therefore marked with the # symbol in the row definition column.
The properties of the module contain this function:
Delayed Cast-off
Cast-off After Pattern Rows 
If the function is active, the drop rows marked with # are entered into the pattern with the specified offset.

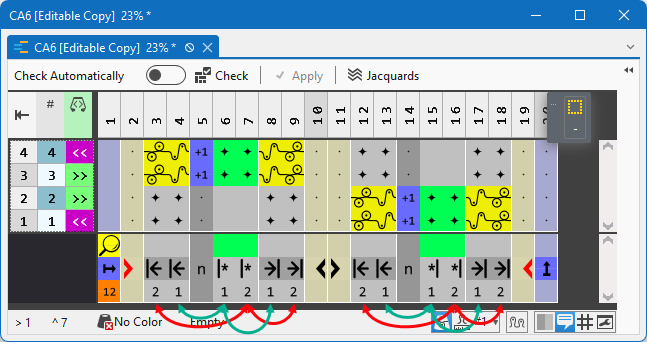
Alternative Shape Edge or Color Field Edge in CA
- In the color segment, mark the columns of the repeating area with numbers.
- Draw different border areas to the left and right of the repeating area and mark them with the respective numbers.
- The numbers of the edge columns of the repeat area in the pattern define the shape edge areas or color field areas to be used for the left and right.
- If the left edge column of the inserted repeat area in the pattern is marked with the number 1, then the left edge area marked with the number 1 is inserted to the left of it.
Marked green in the example image - If the right edge column of the inserted repeat area in the pattern is marked with the number 2, then the right edge area marked with the number 2 is inserted to the right of it.
Marked red in the example image

The same applies to the shape edge:
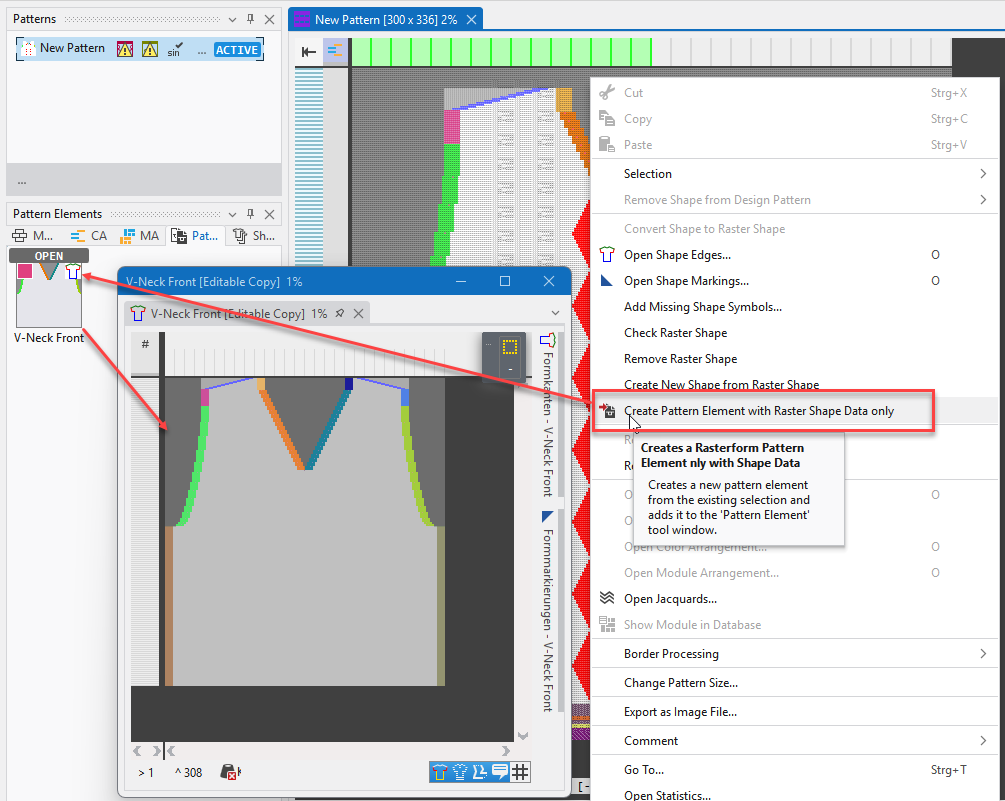
Raster-Shape as Pattern Element
You can create and handle raster-shapes as a pattern element.
- Select an area of the pattern with raster-shape.
- Call up Create Pattern Element with Raster Shape Data only function of the context menu.
- Or create it without selection from the entire design.
- The pattern element only consists of shape edges, shape markings and shape symbols.
All the other data will be ignored. - You can draw with these three only.
- Marking

With it, raster shapes can be saved, edited and applied to any pattern quickly and easily.
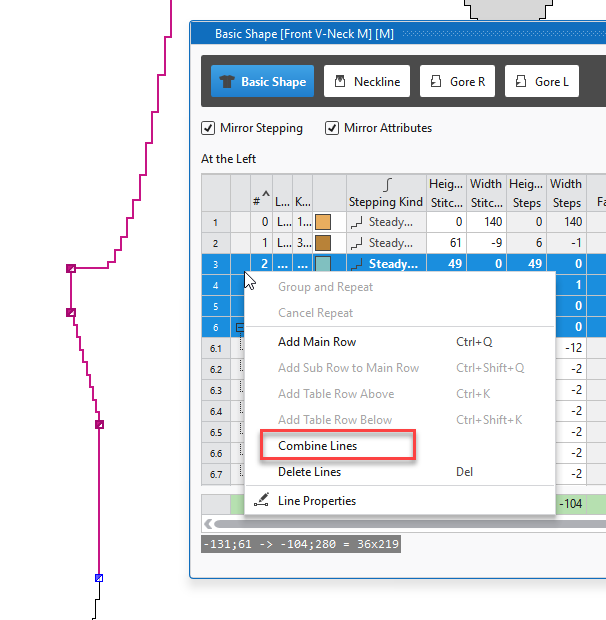
Combining Main Shape Lines
In a lined shape with input format stitches or steps, several contiguous main lines can be combined into one main line.
- 166
- Select several connected lines in the lined shape view.
- 167
- Click the Combine Shape Lines function of the context menu.
- The lines are combined into a user-defined line.
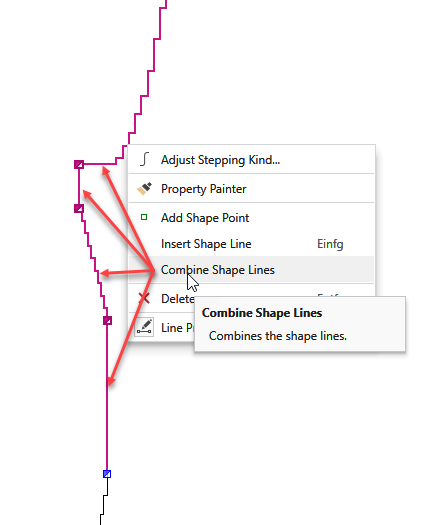
 Definito dall'utente Curve Type
 You can select and combine the lines in line table as well.
Combine Shape Lines function of the context menu
Create Shape From Image
- 168
- Activate the
 Crea taglio da immagine option in the Nuovo progetto per taglio lineare or Nuovo taglio lineare dialog box.
 - 169
- Load the desired image with Carica l'immagine....
- 170
- Click the desired color of the image with the cursor.
- The color appears under Colors for Outside Shape.
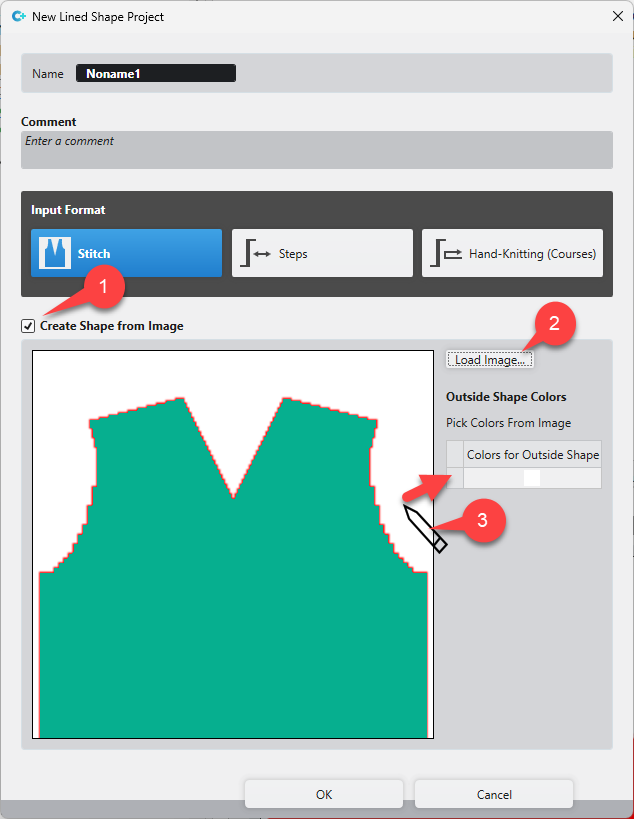
- 171
- If desired, click more colors.
- 172
- Close the dialog box with OK.
New lined shape project (dialog box)
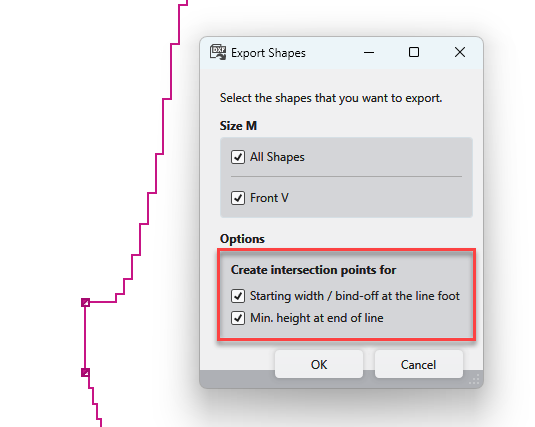
DXF Export Reworked
The Lined Shape Editor provides the Esporta come file DXF function.
This saves the selected lined shape as a DXF file.
This function was reworked.
When exporting, new shape points can be created in the following dialog for the start width and the minimum height at the end of the line.
As a result, the DXF shape is created true to size according to the lined shape.
You can find the news of the previous releases in the Guida CREATE (F1) help.
Informazioni che proseguono
- All Videos About V2.10
- Importing Knitting Elements of M1plus into CREATE
- What was new in CREATE PLUS V2.9
- What was new in CREATE PLUS V2.8
- What was new in CREATE PLUS V2.7
- What was new in CREATE PLUS V2.6
- What was new in CREATE PLUS V2.5
- What was new in CREATE PLUS V2.4
- What was new in CREATE PLUS V2.3
- What was new in CREATE PLUS V2.2
- What was new in CREATE PLUS V2.0 and V2.1