Step by Step to 'Pattern-18'
- The pattern project Pattern-17 is open.
- 1
- Save the pattern under a new name, e.g 'Pattern-18'
- 2
- To draw select any desired drawing tool under the Disegna group.
- 3
- In the Colori del disegno tool window, select the desired pattern colors of the basic pattern from the Colori del filato color palette (e.g. yarn colors # 3 and # 6) to create the pattern element for the border at the left and right.
- 4
- Draw the left / right border into
 Disegno design.
|
Border at the left |
Border at the right |
|
|
|


- 5
- Select the area for the pattern element Border at the left.
- 6
- Open the context menu with RMB and select Selezione -> Crea parte di disegno... .
- Pattern element will be saved locally as
 Parti di disegno.
 - 7
- Select the pattern element for drawing.
- 8
- Draw in the pattern element starting from the third pattern row of the Disegno design up to the end of the basic pattern at the left border.
 : Keep a desired quantity of rows without pattern element (e.g. SJ with yarn color #6) at the end of the basic pattern.
 - 9
- Select the area for the pattern element Border at the right.
- 10
- Open the context menu with RMB and select Selezione -> Crea parte di disegno... .
- Pattern element will be saved locally as Parti di disegno.
- 11
- Select the pattern element for drawing.
- 12
- Draw in the pattern element starting from the third pattern row of the Disegno design up to the end of the basic pattern at the right border.: Keep a desired quantity of rows without pattern element (e.g. yarn color #6 SJ) at the end of the basic pattern.
- 13
- Select the desired total height of pattern rows for CA#1 (e.g. 114 row) in the Rango del disegno control column.
- 14
- Position the cursor in the pattern area.
- 15
- Call up the context menu and select Selezione
/
 Crea Color Arrangement...
.
Crea Color Arrangement...
.
- or -
Click directly the button in the ribbon. - The Color Arrangement Editor appears with the original standard knitting process of the 2 pattern rows.
|
Original for Color Arrangement |
|
|
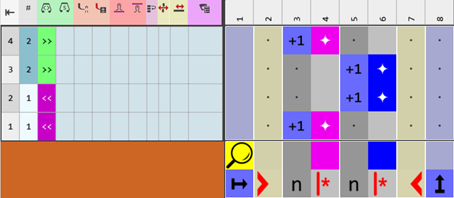
- 16
- Insert the necessary quantity of rows into the executing area.
- 17
- Draw-in the needle actions for transferring and weft yarn into the color segments of yarn color #3 (blue).
-
 Filo di trama / trasporto in avanti con filo flottante :
Combination of weft yarn carrier Qw in front of the system with subsequent transfer in the following system
- 18
- Check and correct the entries in the Numeri di riferimento column.
- 19
- Make entries to the following control columns:
-
 Pressa W :
 - Activate weft yarn presser foot in the technical row 'enclose the weft yarn by knitting'
- Define the type of weft yarn presser foot
: The  Seleziona macchina dialog box graphically displays the position and the set type of weft yarn presser foot.
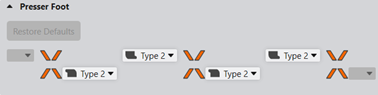
The following link opens the corresponding chapter of the online help:
: Use the Back button of the browser to go back chapter by chapter.
-
 Correzione pressa :
 - If necessary, set a different ESCI index for each of both the carriage directions in those technical rows in which the weft yarn presser foot is active.: A placeholder entry in the pattern makes working on the machine easier.
The following link opens the corresponding chapter of the online help:
: Use the Back button of the browser to go back chapter by chapter.
-
 Ordinamento di ranghi tecnici :
 - Into the technical row with the weft yarn:
 Rango di inserimento del filo di trama
 - Into the technical row to enclose the weft yarn by knitting
 Rango di accerchiamento del filo di trama
The following link opens the corresponding chapter of the online help:
: Use the Back button of the browser to go back chapter by chapter.
|
Color Arrangement CA #1 |
|
|
|
|
|
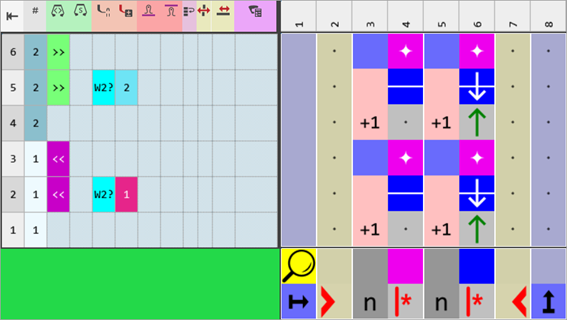
Alternative CA#2 |
|
|
|
Usage of the following needle actions
|

- 20
- Check the generated Color Arrangement on correct entries with the
 Controlla button.: The knitting procedure cannot be checked!
 - 21
- If necessary, in case of a Color Arrangement already used in the design pattern, apply the changes to the basic pattern with the
 Applica button.
- or -
Close the tool window with button.
 - 22
- Close the prompt with the desired button:
-
Save: Color Arrangement is saved locally in the
 CA tool window.
 - Reject: The changes will not be saved.
-
Copy: The changed Color Arrangement is saved as copy in the CA tool window.
- 23
- Enter the generated Color Arrangement CA#1 via the
 control column into the desired rows of the design pattern.
 - 24
- Click the
 Avvio button under Anteprima in the Guidafili ribbon.
 - The document window is opened as view and the Guidafili ribbon appears.
- 25
- Open the dialog box via
 Mostra guidafilo.
 - 26
- Select the yarn carrier with yarn color #3.
- 27
- Select in the dialog box under Tipo the
 Filo di trama Qw type of yarn carrier.
 - The yarn carrier will be marked with the
 icon.
icon. - 28
- If necessary or desired, make further settings for allocating yarn carriers.
- 29
- Start the
 Elaborazione
tecnica:
Elaborazione
tecnica:
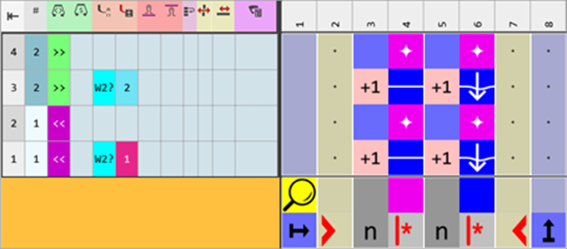
Show the Vista telo dopo tecnica.
|
Fabric View CA#1 + CA#2 |
|
|
- 30
- Generate
 Sintral.
 - 31
- Start the
 Controllo Sintral.
 - 32
-
 Estrazione the knitting program.
 - A program for the knitting machine will be created: CMS530W.Pattern-18.zip.
- Load knitting program into the machine.
 : The extracted file CMS530W.Pattern-18.zip can be loaded onto the machine with an USB stick or via Ethernet.