Step by Step to Pattern-2
- A pattern project with one pattern and the desired settings is created.
- 1
- Select an existing Aran pattern element in Knit Explorer to draw.
- or -
Generate a private Aran diamond as a pattern element.
- Selection of the needed Aran structure modules via:
-
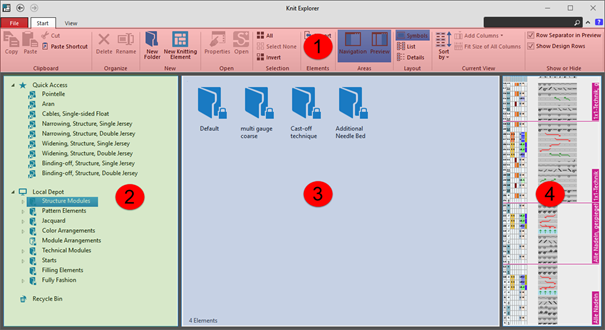
 Knit Explorer
 -
 Acesso rápido
 : The desired folder has to be added in Knit Explorer to the folder Acesso rápido.
Knit Explorer
Knit Explorer
- Managing all STOLL knitting elements
- Pattern Elements
- All types of knitting elements
-
 STOLL knitting elements are write protected
 - Managing self created pattern elements and knitting elements
|
| |||
|
1 |
Ribbon |
Arquivo |
|
|
Início |
Functions for working in the | ||
|
Vista |
Possible settings for the Knit Explorer view | ||
|
2 |
Painel de navegação |
Acesso rápido |
Managing linked directories for a faster access |
|
Depósito de elementos de tricotagem |
Managing all knitting elements / modules
| ||
|
3 |
Display of the content of a selected folder | ||
|
4 |
Preview of a selected knitting element / module | ||
Marking of directories
-

Directory without property -

Directory without content -

Write-protected directory -
STOLL knitting elements are write protected
-

Linked directory
Managing the Knitting Elements and Different Types of Knitting Elements
Managing the knitting elements in the Knit Explorer
You will find the different types of knitting elements in the following directories: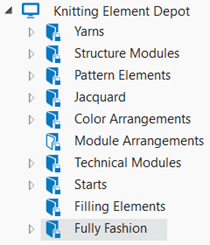
-

This write-protected directories contains all the knitting elements from STOLL with their corresponding properties for each type of knitting element. - For a better structuring there are sub-directories assigned to the directories.
Types of knitting elements
- Pattern Elements
- Módulo de estrutura
- All structures with / without transfer rows
- Knitting element with connecting points
- Color Arrangement
- Module Arrangement
- Módulo de Jacquard
- Módulo técnico
- Módulo técnico de desenho
- Módulo de minguado
- Módulo de minguado em vários passos
- Módulo de aumento
- Módulo de aumento em vários passos
- Módulo de remate
- Começo
- 2
- Drawing of an Aran diamond with the drawing tools.
- Select group Alterar, function
 Multi-Copy.: For easier, faster handling of the drawing tools, open the pop-up window with CTRL + Space bar.
- 3
- Filling of the interior of the Aran diamond with Pattern element / Structure module Ponto arroz with the following drawing tools and settings:
-
 Varinha de condão with corresponding settings in the group Preencher :
 -
 Ourela livre
 -
 Ourela exacta
 -
 Sobrepor ourela
 -
 Preencher linha
 : The result when filling the Aran diamond depends on whether a pattern element or a structure module is used.
The use of a pattern element is recommended.
- 4
- Select the created Aran diamond.
- 5
- Press the keys CTRL + C.
- A temporary pattern element is assigned to the cursor.
- 6
- Draw basic pattern with the temporary pattern element.
- Create the selection as a temporary pattern element with CTRL + C.: Pattern element is not saved and can be deleted from the cursor with the ESC button.
- Context menu -> Seleção
-> Criar parte de amostra...
: Pattern element will be saved as
 Partes de amostra and with the project.
 - Context menu -> Seleção
-> Criar módulo de estrutura...
: Structure module will be saved as
 Módulos and with the project.
 : Attention:
The behavior of the pattern element and module is different when working with shapes.
Recommendation:
Create the basic pattern only with pattern elements when working with shapes.
- 7
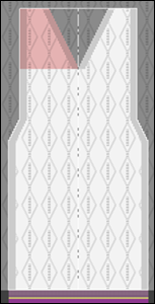
- Import and position the existing shape Front with V-neck.
: If the basic pattern is too small for the positioning of the shape, then the size of the basic pattern will be automatically adjusted to the size of the shape.
: This adjustment always takes place with Malha à frente com transferência .
- 8
- Open the shape with the
 Tabela de linhas button.
 - 9
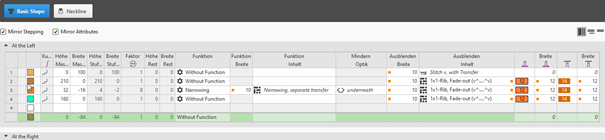
- Make the desired changes in the basic shape and neckline:
: These changes are directly visible in the document window  Amostra de desenho with positioned shape.
Narrowing:
- Function width
- 10 needles (stitches)
Fade-out:
- Fade-out width:
- 10 needles (stitches)
- Fade-out content:
- Shape edges in the basic shape: Knitting Element Canelado 1x1, Ocultar (v^....^v)
- Shape edges neckline. Knitting Element Canelado 1x1, Ocultar (v^....^v)
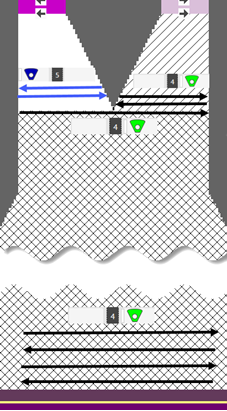
|
|
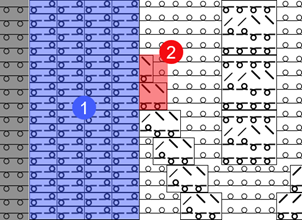
1 |
After cutting out the shape, the fading-out is inserted, where knitting elements are 'cut-into'. |
|
2 |
Cut into knitting elements are displayed.
| |
|
| ||
|
|
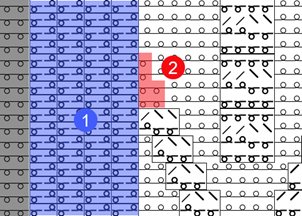
1 |
After cutting out the shape, the fading-out is inserted, where knitting elements are 'cut-into'. |
|
2 |
Cut into knitting elements are not displayed and are replaced by default with Front Stitch with Transfer.
| |


Power Tension Setting (NPJ) at the shape edge:
-
 +
+  :
:
Allocation of the desired stitch length indexes for stitch length at the front / rear -
Width + Width :
Quantity of stitches for PTS (NPJ): 12 needles (stitches)
: Power Tension Setting (NPJ) is needed at the shape edge, to adjust the quality of the stitch lengths between the different structures Aran diamond and the 1x1 Rib at the shape edge.
In the document window Amostra de desenho switch the view to  Graduação à frente e atrás na área de agulhas.
- Shape generation in the current pattern project
- Tab Cortes -> Context menu Criar novo corte em tamanho M...
- Shape generation with
 Novo projecto corte de linhas
|
Basic Shape |
|
|
|
|
|
Neckline |
|
|
|
|

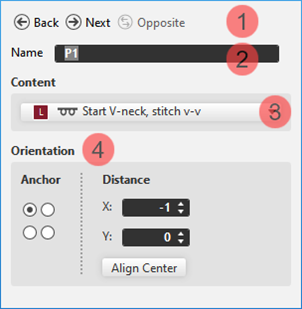
Displaying and changing marking point properties:
- In the document window
- Position the cursor on a marking point in the displayed graphic -> open the context menu with RMB and select ->
 Propriedades de ponto de marcação and make the desired entries in the tool window.
 - With the Propriedades de ponto de marcação button in the ribbon, open the tool window and make the desired entries.
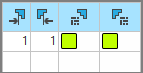
|
|
1 |
Buttons for switching between the created marking points | |
|
2 |
Name of the selected marking point
| ||
|
3 |
Used knitting element as marking | ||
|
4 |
Positioning of the knitting element at the marking point | ||
|
Âncora |
Corresponds to the reference point in a knitting element
| ||
|
Distância |
Offset in x direction and y direction for positioning the assigned knitting element regarding the marking point depending on the set anchor point | ||
|
Centralizar |
Centers the assigned knitting element at the anchor point | ||
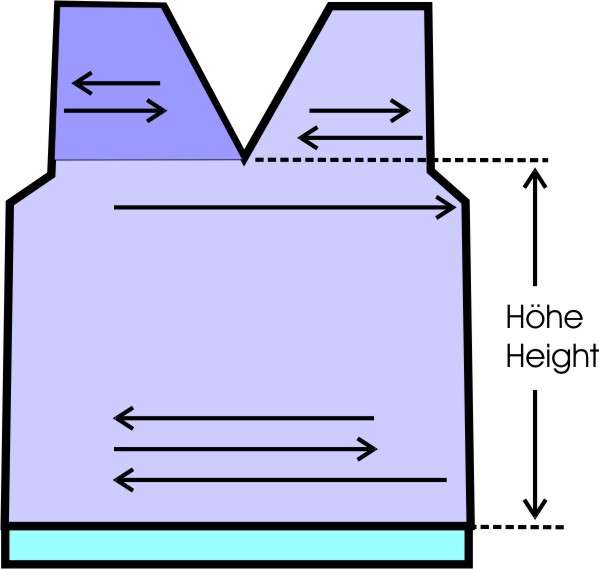
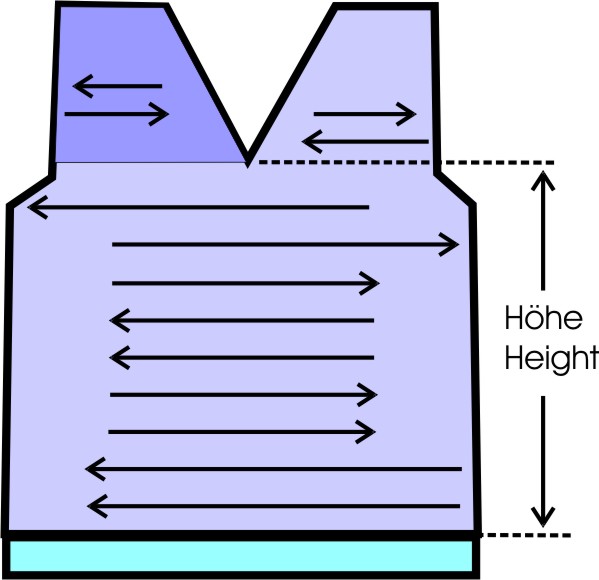
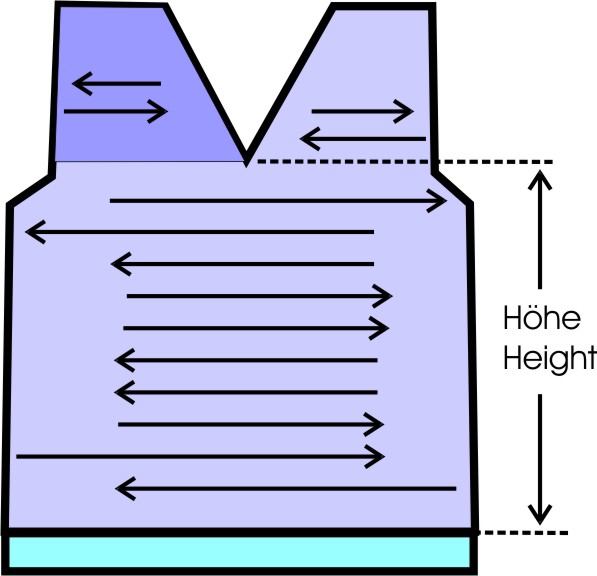
Quantity of yarn carriers for shapes with neckline:
The row number after the start up to the beginning of the neck has to be aligned to the number of yarn carriers in use to achieve a correct knitting sequence.
|
Graphic presentation |
Quantity of yarn carriers up to neckline |
Height up to neckline |
|---|---|---|
|
|
One yarn carrier |
Even-numbered |
|
|
Two yarn carriers in the same home position |
odd |
|
|
Two yarn carriers in different home position |
Even-numbered |
|
| ||
- 10
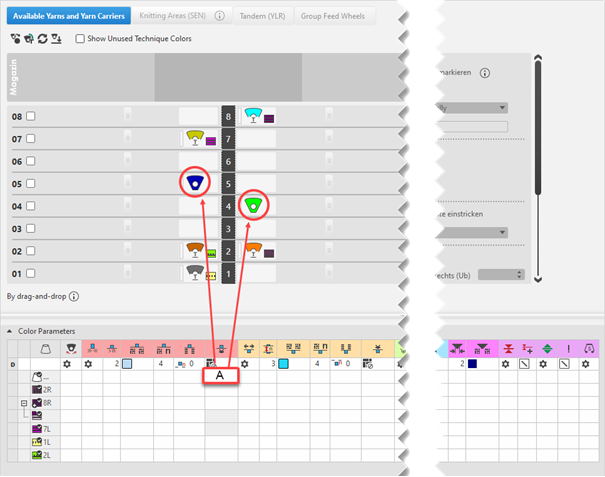
- Working in the dialog box
 Guia-fios ->
  Exibir guia-fios
- Fios e guia-fios disponíveis Tab
- Combine Yarn Carriers
- If desired, allocate the yarn carriers to the yarn carrier rails manually
- Parâmetros de cor Table
- Allocate the Fio flutuante, bloquear, ourela do tecido module as attribute to the yarn carrier of the left shoulder
Open the Yarn Carrier document window:
: The motive is created in the Amostra de desenho.
- Click the
 Guia-fios button under Pré-visualização in the Início ribbon.
 - The document window is opened as view and the Guia-fios ribbon appears.
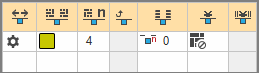
- Make the desired settings for the view of Yarn Carriers the status bar:
|
Cores de guia-fios como fundo | ||
|
|
Switching the view between the different pattern colors
| |
|
| ||
|
Exibir Sair tecendo | ||
|
|
inactive |
Knitting-out of the yarn carriers is not displayed in the graphic. |
|
Active |
Knitting-out of the yarn carriers is displayed in the graphic.
| |


Table Parâmetros de cor
You can make the desired presettings for the colors used in the pattern (color areas) within the Parâmetros de cor table.
Open the Parâmetros de cor table:
- With the Yarn Carriers button open the document window (Pattern name) in the ribbon.
- Open the dialog box via Exibir guia-fios.

For each color in the pattern color tables used in the design pattern, a color area is created in the color parameter table.
This means that you can make presettings only once for this color area.
For pattern related, different changes of a color area sub-colors must be created. You have to draw them manually in the design pattern at the point to be changed.
Then, other specifications can be set in the color parameter table. - Make the desired presettings for the corresponding color:
- Knitting-in and out
- Change the starting direction of a color (yarn carrier)
- Knot or binding at start or end of a color
- Border Processing
- etc.
- Apply the modifications of the Color Parameter table to the pattern:
Editar group -> Aceitar
- or -
Editar group -> Aplicar e fechar
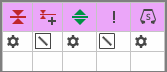
Functions of the Editar ribbon
|
|
Sincronizar |
Aplica as alterações a partir da amostra de desenho para a vista de guia-fios aberta e sincroniza ambas vistas para o atual estado de amostra. |
|
|
Aceitar |
Aplica as alterações para guia-fios à amostra de desenho. Outras alterações (por exemplo, o parâmetro de cor) tem efeito imediatamente. |
|
|
Aplicar e fechar |
Aplica as alterações para guia-fios à amostra de desenho e fecha a vista. Outras alterações (por exemplo, o parâmetro de cor) tem efeito imediatamente. |
|
|
Cancelar |
Rejeita as alterações e fecha a vista de guia-fios. Close with Cancelar if you only opened the Yarn Carrier view for control. |


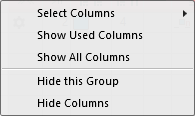
Adjust the display of the columns in the Parâmetros de cor table:
- Move the cursor to the first row of the table header.
- Open the context menu with RMB.
|
| |
|
Selecionar colunas |
Adding or closing the desired columns in the selection list. |
|
Exibir colunas utilizadas |
Display of the columns used in the pattern |
|
Exibir todas as colunas |
Display all of the columns |
|
| |
|
Ocultar este grupo |
Hide all columns allocated to a group (color coded) |
|
Ocultar esta coluna |
Hide the individual column at cursor position |
Structure and column headers of the Parâmetros de cor table:
Group 1: General / Table header:
-
1st row:
All the symbols identifying the table columns -
2nd row D
Default settings for the respective column
Settings from the STOLL file - cannot be modified at the moment
Default settings are applied from a STOLL file and cannot be modified at the moment.
These are automatically applied to all colors without specifications.
|
| ||
|
Group 1: General | ||
|
| ||
|
1. Column |
Entry D for the definition of the 2nd row of the table | |
|
2. Column |
Display for available sub-colors | |
|
|
Cor |
Display of all the colors used in a project
|
|
|
Guia-fios tece uma cor de sistemas múltiplas |
Specifications with multi-system knitting |
|
|
Guia-fios tece uma cor de vanizagem |
Specifications with plating |
|
|
Bascular |
Settings for the swivelling of intarsia yarn carriers or of autarkic yarn carriers |
|
|
Quantity of pattern rows for knitting-out, SEN edge and clamping
|
Specify the maximum distance between the color fields of the yarn carrier.
Clamp Yarn Carrier |


|
Group 2: Knitting-in | ||
|
| ||
|
|
Direção de início |
Specification of the knitting direction for the first row of a color (color area) |
|
|
Número de colunas sem Entrar tecendo |
Quantity of columns (wales) without knitting-in module |
|
|
Módulo para entrar tecendo |
Specification of the knitting mode for knitting-in
|
|
|
Largura de repetição para entrar tecendo |
Presetting of the module width in total for the knitting mode of feeding-in the yarn carrier
|
|
|
Deslocamento de fileiras para desprender |
Column appears automatically if a module for knitting-in with casting-off is used |
|
|
Fileiras de offset para entrar tecendo |
Knitting-in of the yarn carrier by x rows before the beginning of the color area
|
|
|
Nó / Conexão no início |
Presetting a module for knot / binding at start of a color area without knitting-in.
|
|
|
Offset de coluna para entrar tecendo com nó |
Move the position of a knot (module) by x columns to the left or right.
|


The direction of knitting-in of a yarn carrier is always carried out from last position.
|
Group 3: Knitting-out | ||
|
| ||
|
|
Direção de saída da tricotagem |
Preset of the direction for knitting-out of the yarn carrier at the end of a color area |
|
|
Módulo para sair tecendo |
Preset of the knitting mode (module) for knitting-out
|
|
|
Largura de repetição para sair tecendo |
Presetting of the module width in total for the knitting mode of feeding-in the yarn carrier
|
|
|
Deslocamento de fileiras para desprender |
Column appears automatically if a module for knitting-out with casting-off is used |
|
|
Offset de fileira para sair tecendo |
Knitting-out of the yarn carrier by x rows after the end of the color area
|
|
|
Nó / Conexão no final |
Presetting a module for knot / binding at end of a color area without knitting-out.
|
|
|
Offset de coluna para sair tecendo com nó |
Move the position of a knot (module) by x columns to the left or right.
|


|
Group 4 : Intarsia Binding | ||
|
| ||
|
|
Conexão intarsia à esquerda |
Presetting of a binding or no binding at the left border of the color area |
|
|
Conexão intarsia à direita |
Presetting of a binding or no binding at the right border of the color area |
|
|
Direção da conexão intarsia à esquerda |
Specification for inserting the Binding module at the left border of the color area depending on the carriage direction
|
|
|
Direção da conexão intarsia à direita |
Specification for inserting the module Binding at the right border of the color are depending on the carriage direction
|
|
|
Módulo para conexão intarsia à esquerda |
Presetting of the knitting mode for binding at the left border of the color area |
|
|
Módulo para conexão intarsia à direita |
Presetting of the knitting mode for binding at the right border of the color area |


|
Group 5: Border Processing | ||
|
| ||
|
|
Escalonamento permitido sem processamento de ourelas, lado esquerdo |
Maximum number of needles when widening at the left border of the color area without automatic border processing.
|
|
|
Escalonamento permitido sem processamento de ourelas, lado direito |
Maximum number of needles when widening at the right border of the color area without automatic border processing.
|
|
|
Módulo para processamento de ourelas à esquerda |
Presetting of the knitting mode for the border processing (feeding) in case of large widenings (stepping) of the color area
|
|
|
Módulo para processamento de ourelas à direita |
Presetting of the knitting mode for the border processing (feeding) in case of large widenings (stepping) of the color area
|


|
Group 6: Multi Gauge | ||
|
| ||
|
|
Escalonamento permitido das fileiras multi gauge |
Allowed number of needles when widening at the left and right border of the color area without automatic border processing.
|
|
|
Módulo para processamento de ourelas, transição mg grosso para mg fino |
Presetting of the knitting mode for the border processing (feeding) in case of large widenings (stepping) of the color area and as transition
|


|
Group 7: Miscellaneous | ||
|
| ||
|
|
Pinçar |
Presetting for the yarn carrier, when it is to be clamped after knitting its color area. |
|
|
Pinçamento com retraso |
|
|
|
Abrir pinça |
|
|
|
Ourela SEN |
Specifications for positioning the yarn carrier during the knitting
|
|
|
Sistema (independente da direção) |
Selection of a knitting system for the selected color area
|
|
Group 8 | ||
|
Descrição |
Nota para a utilização da entrada.
Aqui você pode entrar um texto. | |


Standard behavior by the yarn carrier allocation
|
|
On the left side (shoulder) an additional yarn carrier is required for the yarn color #1 in shapes with neckline (shape element outside shape). It will be knitted-in from left by default at the start of the shoulder.
|
|
| |
|
| |
:
If there is the necessity to allocate other attributes to the yarn carrier of the left shoulder, there has to be another yarn color or a sub-color of the main color available in the table Parâmetros de cor.
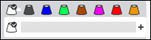
Creating Sub-colors within the Different Tables of Pattern Colors
Possible in the following tables:
- Cores de fio
- Cores de depósito
- Cores técnicas
- Cores de guia-fios
: You can create sub-colors in each of these tables in the same way.
Creating Sub-colors:
: Be sure to create the sub-color for a main color used in the pattern only, as no additional yarn carrier should be added to the pattern.
With the help of the sub-color, you can allocate others attributes to a yarn carrier.
- Position the cursor to the
 main color in use (e.g. yarn color #1) in the tool window Pattern Colors / Cores de fio.
 - The
 icon appears beside the symbol.
 - Click the icon.
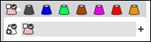
- The input panel for the sub-color appears.
- Click on the
 icon.
icon. - A new empty sub-color will be created and selected.
- If required:
Call up the Alterar valor da cor... context menu in order to change the color.
- or -
Delete the sub-color by Eliminar subcor. - If required, create additional sub-colors for the same main color.
- or –
Switch to another main color in order to add sub-colors. - Select sub-color und draw it into the area of Amostra de desenho for which different specifications are necessary.
- The sub-color will be marked by the
 icon and appears in the color parameter table.
 - Allocate the Fio flutuante, bloquear, ourela do tecido module to the sub-color 1/1.
|
Modified Design Pattern |
Yarn Carrier View |
|
|
|
|
| |
|
| |

- 11
-
 Start Technical Processing:
-
 Show symbol view after technical processing.
- 12
- Generate
 Sintral.
 - 13
-
 Start Sintral Check
 - 14
-
 Extract knitting program.
 - A program for the knitting machine will be created: CMS530.Pattern-2.zip.
- 15
- Load knitting program into the machine.
: The extracted file CMS530W.Pattern-2.zip can be loaded onto the machine with an USB stick or via Ethernet.