Step by Step to 'Pattern-1'
- A pattern project with one pattern and the desired settings is created.
- 1
- To draw select any desired drawing tool under the Desenhar group.
- 2
- In the Cores da amostra tool window, select the desired pattern colors from the Cores de fio color palette to draw the motif:
- Cores de fio:
-
 : The yarn carriers are not automatically placed on the yarn carrier rails.
The yarn carrier home position is determined in the Processamento técnico.
: The color areas are less than 1 inch wide.
- 3
- In
 Amostra de desenho draw the desired SJ with pointelle motif.
- With the Malha atrás com transferência needle action
- or -
- With the Petinet, Malha ^ knitting element
: When drawing pay attention to the distances between the color fields.
A distance of ~2.8 inches is necessary, if yarn carriers are combined (double assignment).
|
ADF yarn carrier ('swiveled') |
Min. distance between the color fields |
|
Yarn carriers on different rails |
0.7 Inch |
|
Yarn carriers on the same rail |
~ 2.8 inches (for each yarn carrier 1 inch + 6 nic) |
|
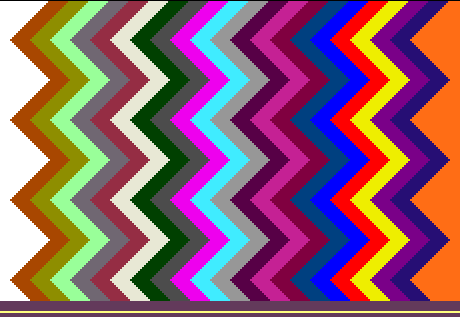
Basic pattern with 22 yarn colors |
|
|
|
|
|
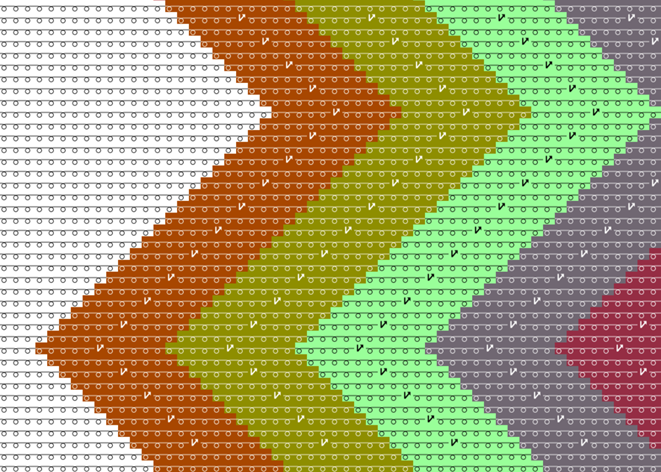
Part of the pattern with the structure for pointelle |
|
Pattern-2A:
Note: The first pattern row is worked with V0 racking where the stitch is knitted at the rear. In the next row with VR1 racking the stitch then is transferred to the front and the pattern row is knitted. |
|
|
|
Pattern-2B:
|
|
|

- 4
- In the Fileira de amostra control column, select the first 2 pattern rows.
- or -
Select the total height of the pattern area for the CA. - 5
- Position the cursor in the pattern area.
- 6
- Call up the context menu and select Seleção
/
 Criar um Color Arrangement...
.
Criar um Color Arrangement...
.
- or -
Click directly the button in the ribbon. - The Color Arrangement Editor with the original 'Default knitting process' of the 2 selected pattern rows is opened.
- 7
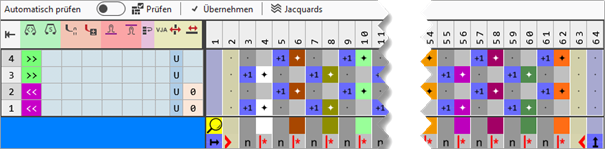
- Make the desired changes in the Color Arrangement.
|
Part of Color Arrangement CA#2A | |
|
| |
|
1 |
Combining the yarn carriers on 2 systems
|
|
2 |
Entry within control columns:
|
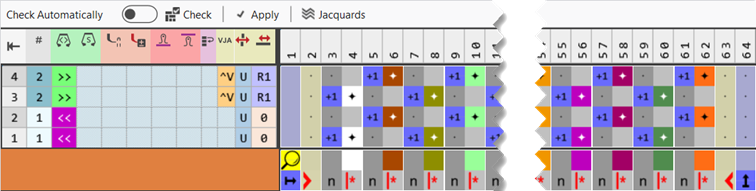


 Racking without Needle Action (^v):
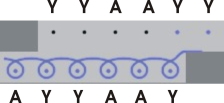

|
Part of Color Arrangement CA#2B | |
|
| |
|
1 |
Combining the yarn carriers on 2 systems
|
|
2 |
Entry within control columns:
|

- 1
- Open the Configuração dialog box -> Optimização tab.
- 2
- Select the
 Equalize Racking Even With Different Take-down Values setting in the Variador por curso selection menu of Ajustar o tipo de variador no curso ao tecer em uma frontura.
- The stitch is transferred by the R1 racking from the knitting element and then knitted.
|
Symbol view after technical processing |
|
|

- 8
- Check the generated Color Arrangement on correct entries with the
 Verificar button.: The knitting procedure cannot be checked!
 - 9
- If necessary, in case of a Color Arrangement already used in the design pattern, apply the changes to the basic pattern with the
 Aceitar button.
- or -
Close the tool window with .
. - 10
- Close the prompt with the desired button:
-
Save: Color Arrangement is saved locally in the
 CA tool window.
 - Reject: The changes will not be saved.
-
Copy: The changed Color Arrangement is saved as copy in the CA tool window.
- 11
- Enter the generated Color Arrangement via the
 control column into the desired rows of the design pattern.
 - 12
- Carry out
 Processamento
técnico if necessary.: After carrying out the Processamento
técnico you are able to view and weigh up the result of the automatic processing, if corrections / optimizations are necessary.
Processamento
técnico if necessary.: After carrying out the Processamento
técnico you are able to view and weigh up the result of the automatic processing, if corrections / optimizations are necessary. - 13
- Back to the Amostra de desenho to make pattern-related changes.
- 14
- Open the Guia-fios tool window for this purpose.
- 15
- In the Parâmetros de cor table make the desired changes in the following groups, if necessary:
- Entrar-sair tecendo
-
 Módulo para entrar tecendo
 -
 Módulo para entrar tecendo
 -
 Módulo para sair tecendo
 -
 Intarsia / Sair tecendo, Conexão nó
 - Conexão intarsia
- Processamento de ourelas
- 16
- If desired, make the desired presets in the following control columns:
- Stitch Length (NP)
- Estirador principal (WMF)
- Velocidade (MSEC)
- 17
-
Start the Processamento
técnico.
With the button, show Symbol view after technical processing.
 - Yarn carriers are knitted-in and out according to the settings and are combined according to the specifications from the CA.
- 18
- Generate
 Sintral.
 - 19
- Start the
 Controle Sintral.
 - 20
-
 Extrair the knitting program.
 - A program for the knitting machine will be created: ADF530-32W.Pattern-2A.zip.
- Load knitting program into the machine.
 : The extracted file "ADF530-32W.Pattern-2A.zip" can be loaded onto the machine with an USB stick or via Ethernet.