Step by Step to 'Pattern-16'
- A pattern project with one pattern and the desired settings is created.
- 1
- To draw select any desired drawing tool under the Desenhar group.
- 2
- In the Cores da amostra tool window, select the desired pattern colors from the Cores de fio color palette to draw the motif:
- 3
- Draw and select the desired motifs for the pattern elements in the
 Amostra de desenho.
 - 4
- Open the context menu -> Seleção ->
 Criar parte de amostra...
.
Criar parte de amostra...
.
|
Pattern Element 1 |
Pattern Element 2 |
|
|
|
|
For drawing the outer contour with any yarn color
|
To fill the outer contour drawn with pattern piece 1.
|


- 5
- Draw the motif using the pattern elements in the Amostra de desenho.
Example: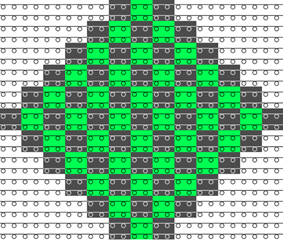
- 6
- Select the height of the motif in the Fileira de amostra control column.
- 7
- Call up the context menu and select Seleção
/
 Criar um Color Arrangement...
.
Criar um Color Arrangement...
. - The Color Arrangement editor appears with the default CA.
- 8
- Make the desired changes in the Color Arrangement:
- In the processing area:
- Add additional rows for the weft yarn and draw in the yarn color used in pattern section 1 with the desired needle actions.
- Insert additional rows for the pattern related transferring and draw-in
 Transferir para trás.
 - Modifications in Control Columns:
- Control column Direção do carro

- Control column Sistema

- Control column Prensador W

- Control column Correção de prensador

 : If necessary, enter index values in order to make any necessary corrections of the presser foot on the machine afterwards.
 - Control column Offset de vanizagem (YPI)

- Control column Predefinições dos guia-fios

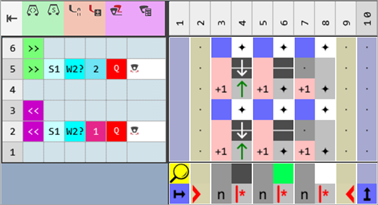
|
Color Arrangement CA1 |
|
|
- 9
- Check the generated Color Arrangement on correct entries with the
 Verificar button.: The knitting procedure cannot be checked!
 - 10
- Open the Configuração dialog box -> Outras configurações tab -> Further section.
- 11
- Enable the
 Ativar processamento fio de trama na ourela
option.
Ativar processamento fio de trama na ourela
option. - The color fields (areas) with weft yarn are adapted throughout the pattern by the technical processing depending on the carriage direction.
The weft yarn will be enclosed by transfer or shortened at the border of the color field.
|
Result without Weft Yarn Border Processing |
|
|
|
|
|
Result with Weft Yarn Border Processing |
|
|
Function of Weft Yarn Border Processing:
For patterns with the machine with presser feet and selective weft yarn, the border of the area for the weft yarn (color field) must be corrected. The border processing (correction) ensures to catch and keep deep the weft yarn by the presser foot in the reversal of the weft yarn carrier. The border processing will be done within the whole pattern.
:
- The border processing depends on the carriage direction.
- No border processing will be entered for weft yarn insertion over the complete pattern width.
Required for Weft Yarn Border Processing:
- The yarn carrier is defined by the
 symbol as a weft yarn carrier.
 - The rows for the weft inlay must have the Weft yarn / Transferring with Float needle action.
- The presser foot must be activated in this row of weft inlay.
- 12
- Make the settings for knitting-in and out the yarn carriers in the
 Guia-fios tool window:
- Pattern-16 with knitting-in and out of basic patterns without structure (SJ)
-
Pattern-16A with knitting-in and out of basic patterns with structure (SJ): Duplicate and modify existing Pattern-16 accordingly.
Knitting-in and out a weft yarn carriers of patterns without structure (SJ):
Front stitch (SJ) only is knitted in the basic pattern next to the area with the selective weft yarn. With it, the weft yarn carrier can be knit out or in easily by the Fio flutuante needle action.
: A weft yarn is knitted-in out out with the Fio flutuante needle action, as a weft yarn usually has a different yarn thickness.
- The basic pattern without structure (SJ) but with the area for selective weft yarn is drawn and the color arrangement is created.
- 1
- Make presettings in the Guia-fios tool window:
- Knitting-in:
- Column
 Módulo para entrar tecendo: Module Fio flutuante, Entrar tecendo
 -
 Nó / Conexão, Entrar tecendo column: Module Conexão de fio flutuante, Entrar tecendo
 - Knitting-out:
-
 Módulo para sair tecendo column: Module Fio flutuante, Sair tecendo
 -
 Nó / Conexão, Sair tecendo column: Module Conexão de fio flutuante, Sair tecendo
- 2
- Close the dialog box.
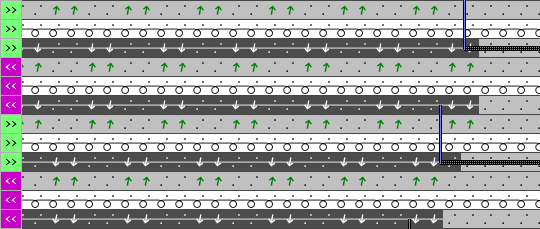
Result after technical processing:

Knitting-in and out a weft yarn carriers of patterns with structure:
A structure (e.g. border) is knitted in the basic pattern next to the area with the selective weft yarn. With it, knitting in or out the weft yarn carrier may make problems. You can fix the problem by locking the weft yarn at the border when knitting in or out.
- Pattern-16 is duplicated.
- The Color Arrangement is created.
- 3
- Draw the 1x1 border at left and right.
- 4
- Modify the pattern rows of knitting-in and knitting-out:
- Yarn color #4 (green) from the pattern border up to the start of the area with selective weft yarn (rear weft yarn)
- Yarn color #2 (black) on the desired quantity of needles (front weft yarn) at the fabric selvedge.
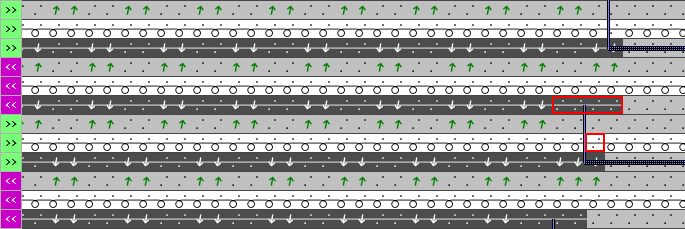
|
At the beginning of the pattern area for knitting-in from the right |
|
|
|
|
|
At the end of the pattern area for knitting-out to the right |
|
|


- 5
- Make presettings in the Guia-fios tool window:
- Knitting-in:
- Column Módulo para entrar tecendo: Module Fio flutuante, Entrar tecendo
-
Nó / Conexão, Entrar tecendo column: Module Conexão de fio flutuante, Entrar tecendo
- Knitting-out:
-
Módulo para sair tecendo column: Module Fio flutuante, Sair tecendo
-
Nó / Conexão, Sair tecendo column: Module Conexão de fio flutuante, Sair tecendo
- 6
- Close the dialog box.
Result after technical processing:

- 13
- If desired, make the desired presets in the following control columns:
- Stitch Length (NP)
- Estirador principal (WMF)
- Velocidade (MSEC)
- 14
- Carry out all the steps of processing.
 : The extracted file "ADF530-32W.Pattern-16.zip" can be loaded onto the machine with an USB stick or via Ethernet.