Step by Step to Pattern-2
- A pattern project with one pattern and the desired settings is created.
- 1
- Select an existing Yürütme pattern element in Knit Explorer to draw.
- or -
Generate a private Aran diamond as a pattern element.
- Selection of the needed Yürütme structure modules via:
-
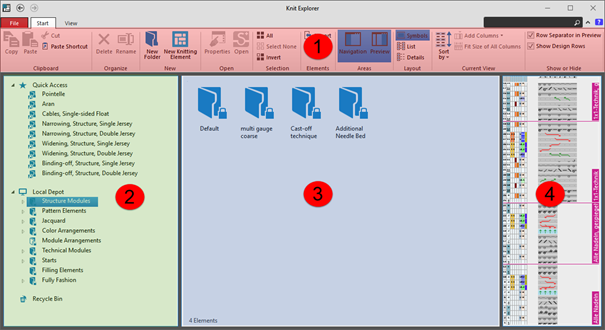
 Knit Explorer
 -
 Hızlı erişim
 : The desired folder has to be added in Knit Explorer to the folder Hızlı erişim.
Knit Explorer
Knit Explorer
- Managing all STOLL knitting elements
- Pattern Elements
- All types of knitting elements
-
 STOLL knitting elements are write protected
 - Managing self created pattern elements and knitting elements
|
| |||
|
1 |
Ribbon |
Dosya |
|
|
Başlat |
Functions for working in the | ||
|
Görünüm |
Possible settings for the Knit Explorer view | ||
|
2 |
Gezinti bölmesi |
Hızlı erişim |
Managing linked directories for a faster access |
|
Örme elemanı deposu |
Managing all knitting elements / modules
| ||
|
3 |
Display of the content of a selected folder | ||
|
4 |
Preview of a selected knitting element / module | ||
Marking of directories
-

Directory without property -

Directory without content -

Write-protected directory -
STOLL knitting elements are write protected
-

Linked directory
Managing the Knitting Elements and Different Types of Knitting Elements
Managing the knitting elements in the Knit Explorer
You will find the different types of knitting elements in the following directories: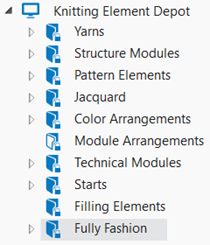
-

This write-protected directories contains all the knitting elements from STOLL with their corresponding properties for each type of knitting element. - For a better structuring there are sub-directories assigned to the directories.
Types of knitting elements
- Desen Parçaları
- Yapı modülü
- All structures with / without transfer rows
- Knitting element with connecting points
- Color Arrangement
- Module Arrangement
- Jakar modülü
- Teknik modül
- Tasarım teknik modülü
- Reglan modülü
- Çok basamaklı reglan modülü
- Artırma modülü
- Çok basamaklı artıma modülü
- Remayöz modülü
- Başlangıç
- 2
- Drawing of an Aran diamond with the drawing tools.
- Select group Değiştir, function
 Çoklu kopya.: For easier, faster handling of the drawing tools, open the pop-up window with CTRL + Space bar.
- 3
- Filling of the interior of the Aran diamond with Pattern element / Structure module Yosun dikiş with the following drawing tools and settings:
-
 Sihirbaz Değneği with corresponding settings in the group Doldur :
 -
 Kenar boş
 -
 Hassas Kenar
 -
 Kenarı ört
 -
 Çizgiyi doldur
 : The result when filling the Aran diamond depends on whether a pattern element or a structure module is used.
The use of a pattern element is recommended.
- 4
- Select the created Aran diamond.
- 5
- Press the keys CTRL + C.
- A temporary pattern element is assigned to the cursor.
- 6
- Draw basic pattern with the temporary pattern element.
- Create the selection as a temporary pattern element with CTRL + C.: Pattern element is not saved and can be deleted from the cursor with the ESC button.
- Context menu -> Seçimden oluştur -> Desen parçası : Pattern element will be saved as
 Desen parçası and with the project.
 - Context menu -> Seçimden oluştur -> Yapı modülü : Structure module will be saved as
 Modüller and with the project.
 : Attention:
The behavior of the pattern element and module is different when working with shapes.
Recommendation:
Create the basic pattern only with pattern elements when working with shapes.
- 7
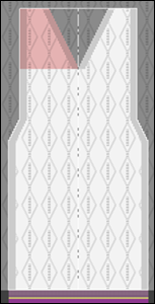
- Import and position the existing shape Front with V-neck.
: If the basic pattern is too small for the positioning of the shape, then the size of the basic pattern will be automatically adjusted to the size of the shape.
: This adjustment always takes place with Aktarmalı ön ilmek .
- 8
- Open the shape with the
 Çizgi tablosu button.
 - 9
- Make the desired changes in the basic shape and neckline:
: These changes are directly visible in the document window  Tasarım deseni with positioned shape.
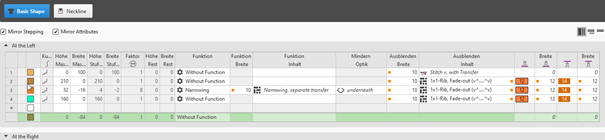
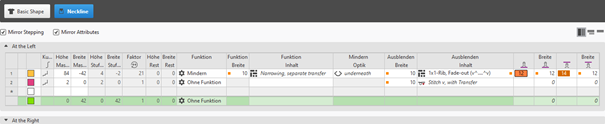
Narrowing:
- Function width
- 10 needles (stitches)
Fade-out:
- Fade-out width:
- 10 needles (stitches)
- Fade-out content:
- Shape edges in the basic shape: Knitting Element 1x1 fitil, kenar düzeltmesi (v^....^v)
- Shape edges neckline. Knitting Element 1x1 fitil, kenar düzeltmesi (v^....^v)
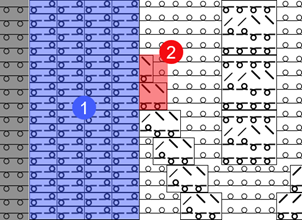
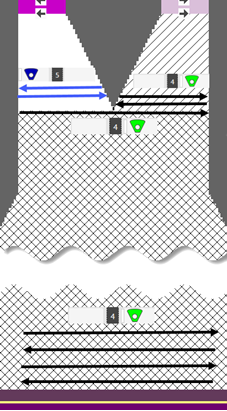
|
|
1 |
After cutting out the shape, the fading-out is inserted, where knitting elements are 'cut-into'. |
|
2 |
Cut into knitting elements are displayed.
| |
|
| ||
|
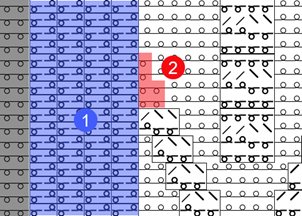
|
1 |
After cutting out the shape, the fading-out is inserted, where knitting elements are 'cut-into'. |
|
2 |
Cut into knitting elements are not displayed and are replaced by default with Front Stitch with Transfer.
| |


Power Tension Setting (NPJ) at the shape edge:
-
 +
+  :
:
Allocation of the desired stitch length indexes for stitch length at the front / rear -
Width + Width :
Quantity of stitches for PTS (NPJ): 12 needles (stitches)
: Power Tension Setting (NPJ) is needed at the shape edge, to adjust the quality of the stitch lengths between the different structures Aran diamond and the 1x1 Rib at the shape edge.
In the document window Tasarım deseni switch the view to  İğne alanında ön ve arka ilmek uzunluğu.
- Shape generation in the current pattern project
- Tab Kesimler -> Context menu M boyutunda yeni kesim oluştur...
- Shape generation with
 Yeni çizgi kesimi projesi
|
Basic Shape |
|
|
|
|
|
Neckline |
|
|
|
|
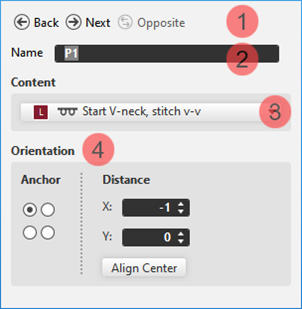
Displaying and changing marking point properties:
- In the document window
- Position the cursor on a marking point in the displayed graphic -> open the context menu with RMB and select ->
 İşaret noktası özellikleri and make the desired entries in the tool window.
 - With the İşaret noktası özellikleri button in the ribbon, open the tool window and make the desired entries.
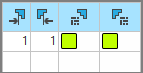
|
|
1 |
Buttons for switching between the created marking points | |
|
2 |
Name of the selected marking point
| ||
|
3 |
Used knitting element as marking | ||
|
4 |
Positioning of the knitting element at the marking point | ||
|
Demir atma |
Corresponds to the reference point in a knitting element
| ||
|
İç boşluk |
Offset in x direction and y direction for positioning the assigned knitting element regarding the marking point depending on the set anchor point | ||
|
Ortala |
Centers the assigned knitting element at the anchor point | ||
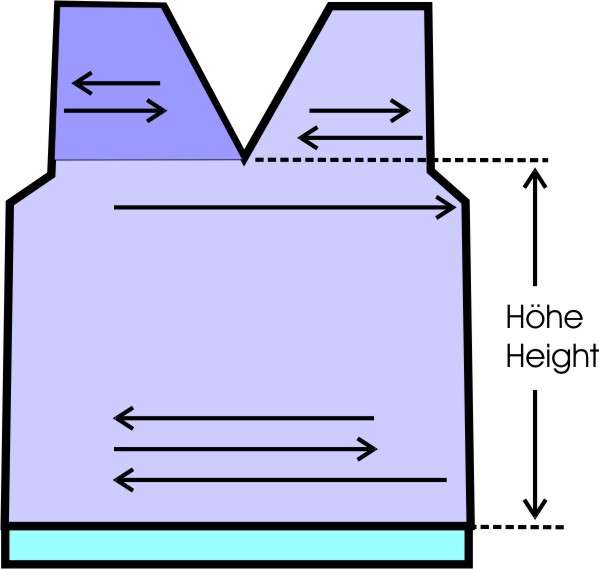
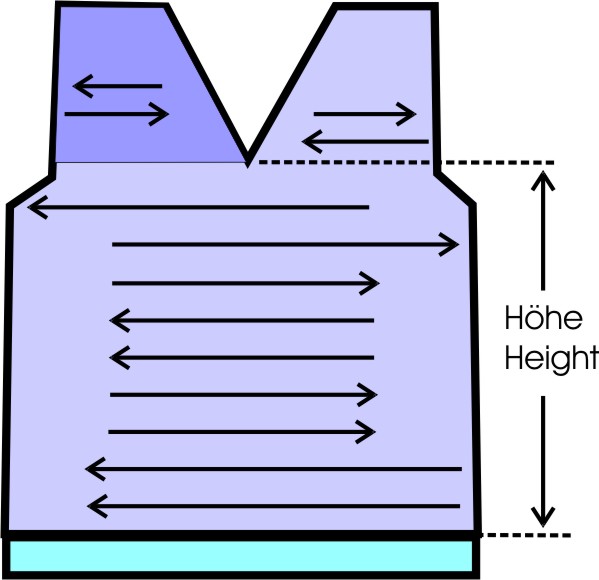
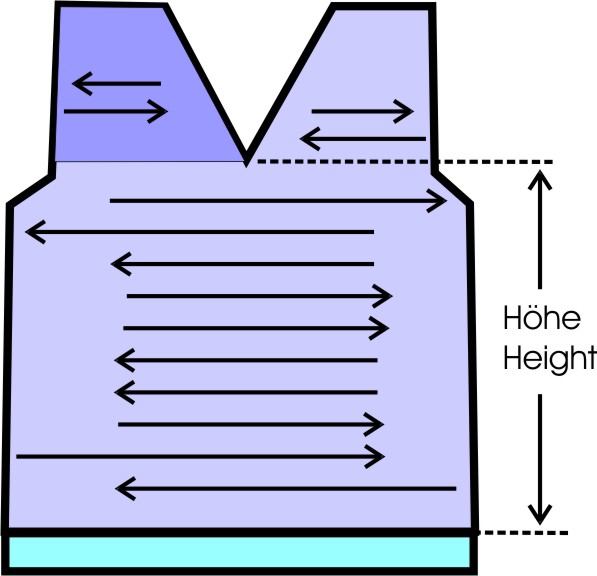
Quantity of yarn carriers for shapes with neckline:
The row number after the start up to the beginning of the neck has to be aligned to the number of yarn carriers in use to achieve a correct knitting sequence.
|
Graphic presentation |
Quantity of yarn carriers up to neckline |
Height up to neckline |
|---|---|---|
|
|
One yarn carrier |
Even-numbered |
|
|
Two yarn carriers in the same home position |
odd |
|
|
Two yarn carriers in different home position |
Even-numbered |
|
| ||
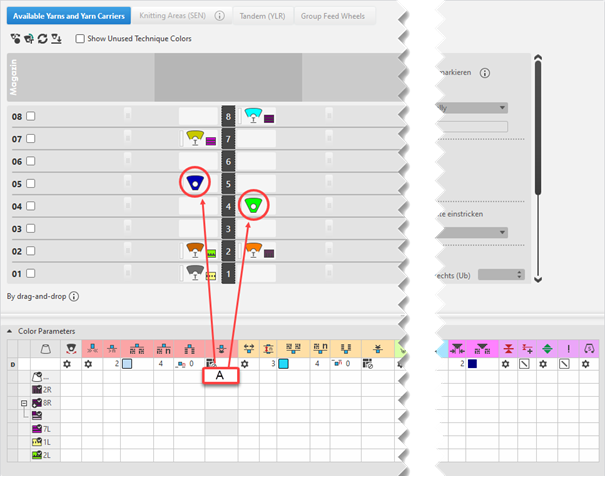
- 10
- Working in the dialog box
 Mekikler ->
  Mekikleri göster
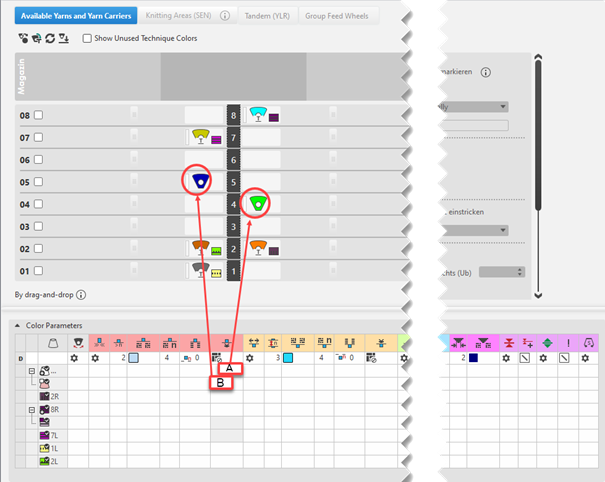
- Mevcut iplikler ve mekikler Tab
- Combine Yarn Carriers
- If desired, allocate the yarn carriers to the yarn carrier rails manually
- Renk parametreleri Table
- Allocate the Atla, kilitle, kumaş kenarı module as attribute to the yarn carrier of the left shoulder
Open the Yarn Carrier document window:
: The motive is created in the Tasarım deseni.
- Click the
 Mekikler button under Önizleme in the Başlat ribbon.
 - The document window is opened as view and the Mekikler ribbon appears.
- Make the desired settings for the view of Yarn Carriers the status bar:
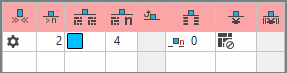
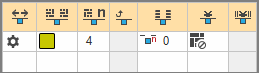
|
Arka plan olarak mekik renkleri | ||
|
|
Switching the view between the different pattern colors
| |
|
| ||
|
Örgü çıkışını göster | ||
|
|
inactive |
Knitting-out of the yarn carriers is not displayed in the graphic. |
|
Active |
Knitting-out of the yarn carriers is displayed in the graphic.
| |


Table Renk parametreleri
You can make the desired presettings for the colors used in the pattern (color areas) within the Renk parametreleri table.
Open the Renk parametreleri table:
- With the Mekikler button open the document window (Pattern name) in the ribbon.
- Open the dialog box via Mekikleri göster.
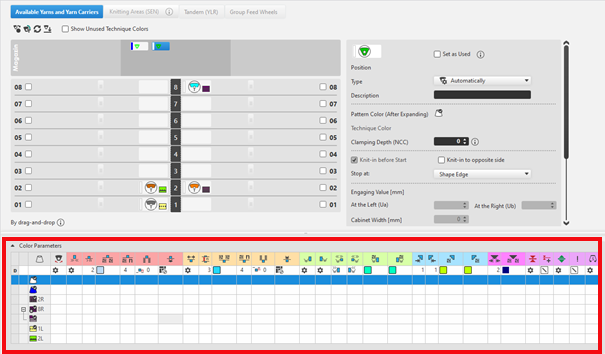
For each color in the pattern color tables used in the design pattern, a color area is created in the color parameter table.
This means that you can make presettings only once for this color area.
For pattern related, different changes of a color area sub-colors must be created. You have to draw them manually in the design pattern at the point to be changed.
Then, other specifications can be set in the color parameter table. - Make the desired presettings for the corresponding color:
- Knitting-in and out
- Change the starting direction of a color (yarn carrier)
- Knot or binding at start or end of a color
- Border Processing
- etc.
- Apply the modifications of the Color Parameter table to the pattern:
Düzenle group -> Uygula
- or -
Düzenle group -> Uygula ve kapat
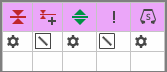
Functions of the Düzenle ribbon
|
|
Senkronizasyon |
Tasarım desenindeki değişiklikleri açık mekik görünümüne uygular ve her iki görünümü güncel desen durumuna senkronize eder. |
|
|
Uygula |
Mekik değişikliklerini tasarım desenine alır. Diğer değişiklikler (örneğin renk parametreleri) hemen etkili olur. |
|
|
Uygula ve kapat |
Mekik değişikliklerini tasarım desenine alır ve görünümü kapatır. Diğer değişiklikler (örneğin renk parametreleri) hemen etkili olur. |
|
|
İptal |
Değişiklikleri siler ve mekik görünümünü kapatır. Close with İptal if you only opened the Yarn Carrier view for control. |


Adjust the display of the columns in the Renk parametreleri table:
- Move the cursor to the first row of the table header.
- Open the context menu with RMB.
|
| |
|
Sütun seç |
Adding or closing the desired columns in the selection list. |
|
Kullanılan sütunlarını göster |
Display of the columns used in the pattern |
|
Tüm sütunları göster |
Display all of the columns |
|
| |
|
Bu grubu gizle |
Hide all columns allocated to a group (color coded) |
|
Bu sütunu gizle |
Hide the individual column at cursor position |

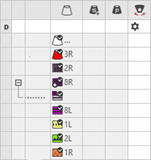
Structure and column headers of the Renk parametreleri table:
Group 1: General / Table header:
-
1st row:
All the symbols identifying the table columns -
2nd row D
Default settings for the respective column
Settings from the STOLL file - cannot be modified at the moment
Default settings are applied from a STOLL file and cannot be modified at the moment.
These are automatically applied to all colors without specifications.
|
| ||
|
Group 1: General | ||
|
| ||
|
1. Column |
Entry D for the definition of the 2nd row of the table | |
|
2. Column |
Display for available sub-colors | |
|
|
Renk |
Display of all the colors used in a project
|
|
|
Mekik çok sistem rengi örüyor. |
Specifications with multi-system knitting |
|
|
Mekik vanize rengi örüyor |
Specifications with plating |
|
|
Salınım |
Settings for the swivelling of intarsia yarn carriers or of autarkic yarn carriers |
|
|
Quantity of pattern rows for knitting-out, SEN edge and clamping
|
Specify the maximum distance between the color fields of the yarn carrier.
Clamp Yarn Carrier |


|
Group 2: Knitting-in | ||
|
| ||
|
|
Başlangıç yönü |
Specification of the knitting direction for the first row of a color (color area) |
|
|
Örgüye giriş olmadan sütun sayısı |
Quantity of columns (wales) without knitting-in module |
|
|
Örgüye giriş için modül |
Specification of the knitting mode for knitting-in
|
|
|
Örgüye giriş için tekrar genişliği |
Presetting of the module width in total for the knitting mode of feeding-in the yarn carrier
|
|
|
İlmek kapama için sıra kaydırma |
Column appears automatically if a module for knitting-in with casting-off is used |
|
|
Örgüye giriş için Sıra-Ofseti |
Knitting-in of the yarn carrier by x rows before the beginning of the color area
|
|
|
Başlangıçta düğüm / bağlama |
Presetting a module for knot / binding at start of a color area without knitting-in.
|
|
|
Örgüye düğümlü giriş için Sütun-Ofseti |
Move the position of a knot (module) by x columns to the left or right.
|


The direction of knitting-in of a yarn carrier is always carried out from last position.
|
Group 3: Knitting-out | ||
|
| ||
|
|
Örgüden çıkış yönü |
Preset of the direction for knitting-out of the yarn carrier at the end of a color area |
|
|
Örgüden çıkış için modül |
Preset of the knitting mode (module) for knitting-out
|
|
|
Örgüden çıkış için tekrar genişliği |
Presetting of the module width in total for the knitting mode of feeding-in the yarn carrier
|
|
|
İlmek kapama için sıra kaydırma |
Column appears automatically if a module for knitting-out with casting-off is used |
|
|
Örgüden çıkış için Sıra Ofseti |
Knitting-out of the yarn carrier by x rows after the end of the color area
|
|
|
Sonda düğüm / bağlama |
Presetting a module for knot / binding at end of a color area without knitting-out.
|
|
|
Düğümlü örgüden çıkış için Sütun-Ofseti |
Move the position of a knot (module) by x columns to the left or right.
|


|
Group 4 : Intarsia Binding | ||
|
| ||
|
|
Sol İntersiya Bağlantısı |
Presetting of a binding or no binding at the left border of the color area |
|
|
Sağ İntersiya Bağlantısı |
Presetting of a binding or no binding at the right border of the color area |
|
|
Sol intersiya bağlantısının yönü |
Specification for inserting the Binding module at the left border of the color area depending on the carriage direction
|
|
|
Sağ intersiya bağlantısının yönü |
Specification for inserting the module Binding at the right border of the color are depending on the carriage direction
|
|
|
Sol intersiya bağlantısı için modül |
Presetting of the knitting mode for binding at the left border of the color area |
|
|
Sağ intersiya bağlantısı için modül |
Presetting of the knitting mode for binding at the right border of the color area |


|
Group 5: Border Processing | ||
|
| ||
|
|
Kenar düzenlemesi olmadan izin verilen basamaklama, sol taraf |
Maximum number of needles when widening at the left border of the color area without automatic border processing.
|
|
|
Kenar düzenlemesi olmadan izin verilen basamaklama, sağ taraf |
Maximum number of needles when widening at the right border of the color area without automatic border processing.
|
|
|
Sol kenar düzenlemesi için modül |
Presetting of the knitting mode for the border processing (feeding) in case of large widenings (stepping) of the color area
|
|
|
Sağ kenar düzenlemesi için modül |
Presetting of the knitting mode for the border processing (feeding) in case of large widenings (stepping) of the color area
|


|
Group 6: Multi Gauge | ||
|
| ||
|
|
Kalın multi gauge sıralarının izin verilen basamaklaması |
Allowed number of needles when widening at the left and right border of the color area without automatic border processing.
|
|
|
Kenar düzenlemesi için modül, mg-kalından mg-inceye geçiş |
Presetting of the knitting mode for the border processing (feeding) in case of large widenings (stepping) of the color area and as transition
|


|
Group 7: Miscellaneous | ||
|
| ||
|
|
Tutma |
Presetting for the yarn carrier, when it is to be clamped after knitting its color area. |
|
|
Gecikmeli tutma |
|
|
|
Tutucuyu aç |
|
|
|
SEN kenarı |
Specifications for positioning the yarn carrier during the knitting
|
|
|
Sistem (yönden bağımsız) |
Selection of a knitting system for the selected color area
|
|
Group 8 | ||
|
Açıklama |
Girdinin kullanımı ile ilgili bilgi.
Buraya bir metin girebilirsiniz. | |


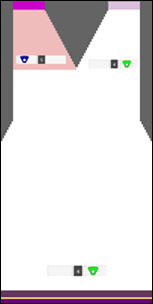
Standard behavior by the yarn carrier allocation
|
|
On the left side (shoulder) an additional yarn carrier is required for the yarn color #1 in shapes with neckline (shape element outside shape). It will be knitted-in from left by default at the start of the shoulder.
|
|
| |
|
| |
:
If there is the necessity to allocate other attributes to the yarn carrier of the left shoulder, there has to be another yarn color or a sub-color of the main color available in the table Renk parametreleri.
Creating Sub-colors within the Different Tables of Pattern Colors
Possible in the following tables:
- İplik renkleri
- Depo renkleri
- Teknik renkleri
- Mekik renkleri
: You can create sub-colors in each of these tables in the same way.
Creating Sub-colors:
: Be sure to create the sub-color for a main color used in the pattern only, as no additional yarn carrier should be added to the pattern.
With the help of the sub-color, you can allocate others attributes to a yarn carrier.
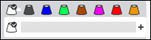
- Position the cursor to the
 main color in use (e.g. yarn color #1) in the tool window Desen renkleri / İplik renkleri.
 - The
 icon appears beside the symbol.
 - Click the icon.
- The input panel for the sub-color appears.
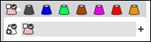
- Click on the
 icon.
icon. - A new empty sub-color will be created and selected.
- If required:
Call up the Renk değerini değiştir... context menu in order to change the color.
- or -
Delete the sub-color by Alt rengi sil. - If required, create additional sub-colors for the same main color.
- or –
Switch to another main color in order to add sub-colors. - Select sub-color und draw it into the area of Tasarım deseni for which different specifications are necessary.
- The sub-color will be marked by the
 icon and appears in the color parameter table.
 - Allocate the Atla, kilitle, kumaş kenarı module to the sub-color 1/1.
|
Modified Design Pattern |
Yarn Carrier View |
|
|
|
|
| |
|
| |
- 11
-
 Start Technical Processing:
-
 Show symbol view after technical processing.
- 12
- Generate
 Sintral.
 - 13
-
 Start Sintral Check
 - 14
-
 Extract knitting program.
 - A program for the knitting machine will be created: CMS530.Pattern-2.zip.
- 15
- Load knitting program into the machine.
: The extracted file CMS530W.Pattern-2.zip can be loaded onto the machine with an USB stick or via Ethernet.