What was new in CREATE PLUS V2.3
Expiration of License
An expiring license is clearly indicated before reaching the critical time.
- Display on Giriş Ekranı
-
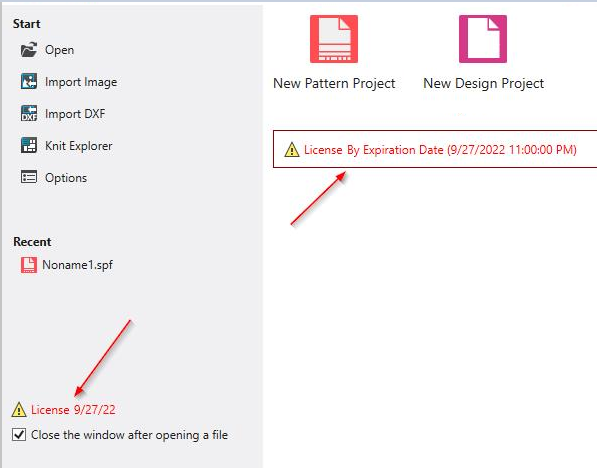
- Display in the Başlat and Görünüm ribbon tabs
- The different displays (starting from the bottom) correspond to a period of > 30 days, 30 - 7 days and < 7 days.
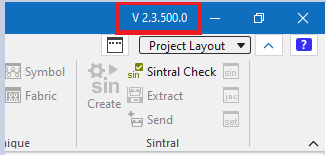
Display of Version Number
- The version number is also displayed in the title bar of the main window.
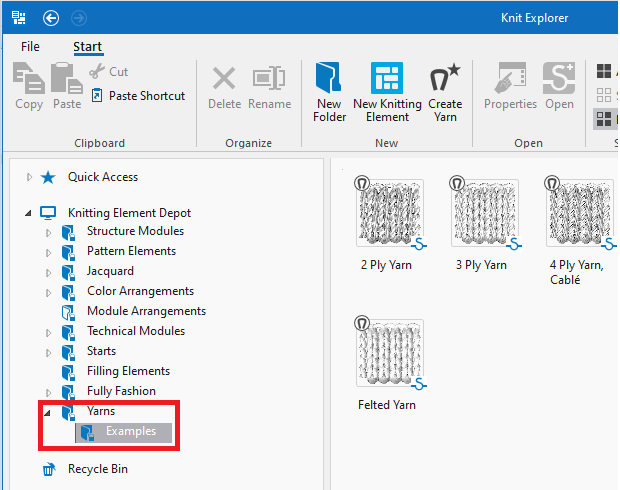
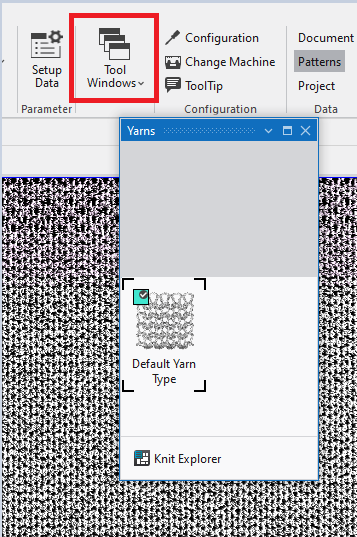
Yarn Management
İplik Tarayıcısı of version 2.2 is eliminated.
The yarns are included in the Knit Explorer.
With the installation, existing yarns are automatically applied to the Knit Explorer.
- Display in the Knit Explorer
- Display in the project
- Open the new İplikler tool window in the ribbon.
- By the default window layout, the İplikler tool window appears at the right of the Kesimler tool window within a Design Project.
Color Arrangements in the Knit Explorer
STOLL Color Arrangements for binding-off present in the M1plus are as well available in Knit Explorer.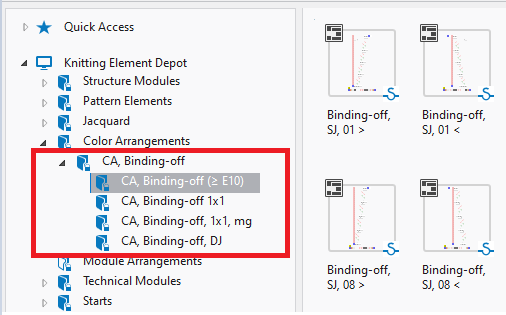
Ignore Messages
A prompt appears at several actions within the program. This prompt can now be switched off permanently. The following example concerns the positioning of a lined shape on a pattern that is too small.
- Call-up of the Kesimi konumlandır function in the context menu of the shape
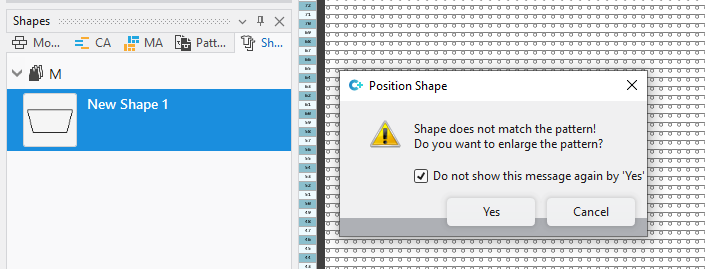
- If you confirm the message with Evet and if the 'Evet' olduğunda bu mesajı gösterme check box is activated, then a pattern that is too small will be automatically enlarged by the next positioning.
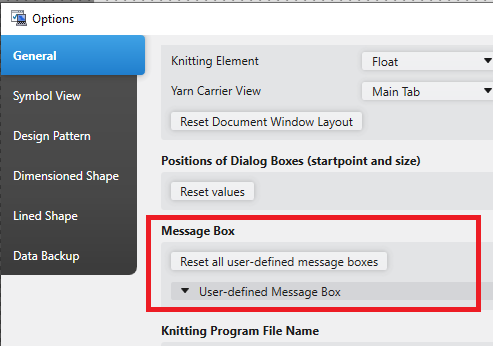
- Disabled messages are displayed in the Mesaj penceresi list box of the Seçenekler dialog box and can be re-enabled there.
MC Jakarı Editor
Up to now, an MC Jacquard could be opened and edited in a tool window within the pattern project only.
Now you have a separate editor running in its own instance.
You can open new MC Jacquards or edit existing ones.
The editor uses the drawing tools known from drawing the pattern.
- Create New MC Jacquard
- New button of the Start Window
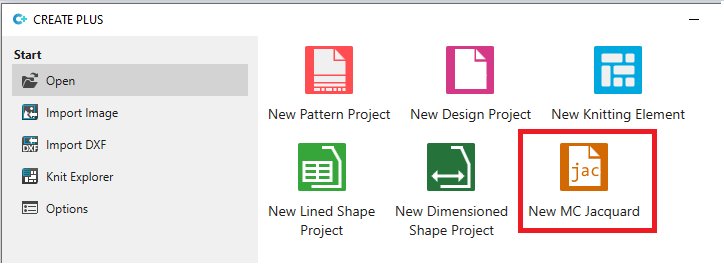
- Within an active pattern project, you will find the button via Dosya -> Yeni.
- Open an existing MC Jacquard
- The selection of the MC Jakarı (*.jac) file type is added to the Open dialog box.
Import from M1plus
Starting with M1plus V 7.6, you can export all M1plus (*.mdf) patterns of a common source directory to an empty target directory for CREATE PLUS.
- The function is available if no pattern or module is active.
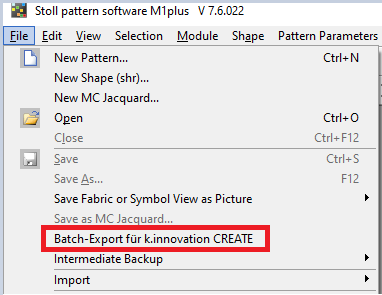
- All pattern files will be saved to the target directory in the *.spfm1 format.
Docking by Mistake
- CTRL pressed when moving or changing the size prevents the tool window from docking.
Drawing
- If
 1 tık is active then this mode will be retained when exiting the application.
 - Display of Coordinates
- The display has been moved from the status bar to the lower left corner of the pattern.
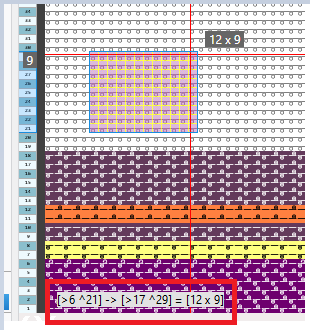
- The coordinates remain visible even after drawing.
- You can toggle off the display via CTRL + D (cancel selection) up to drawing the next time.
- You can switch off the display permanently via Seçenekler ->
 Çizim alanı bilgilerini göster.
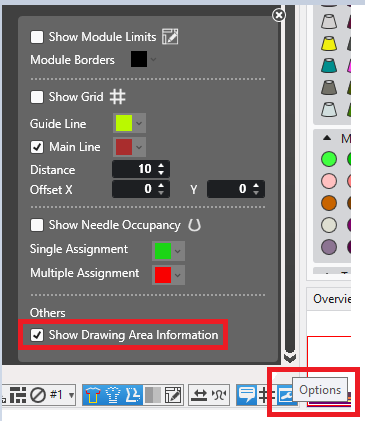
-
 : Hoover over display shows a X. You can toggle off the display with it.
However, you can enable it via Seçenekler only. - The O key within the needle area takes the display setting into account
- Up to now, all objects under the cursor were opened with O. Under certain circumstances, this could be modules, CAs and MAs at the same time.
- Now the current display is taken into account.
Meaning that only shape attributes (shape edge or shape mark) are opened in the Raster Shape view. If foreground and background are shown in pattern color, then only an existing CA will be opened. - Deleting needle actions selectively
- In version 2.2 each type of symbol in the needle area had its own deleting.
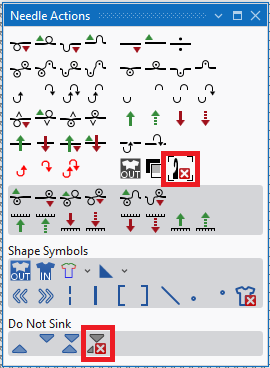
- With version 2.3, there is only one delete icon in the İğne hareketleri tool window available.
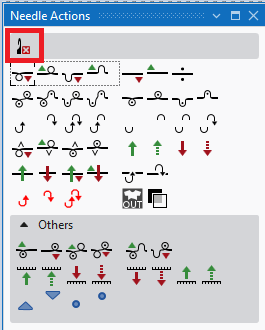
-
: Deleting selectively
You can select the Delete button together with a needle action (e.g. Önde aşırtma yok) via the CTRL button. -
: Joint picking-up of the two symbols for Önde aşırtma yok and Arkada aşırtma yok replaces the previous symbol.
- Drawing in tables
- Working in tables used to be time-consuming because, in addition to selecting from a list box, you could only copy and paste.
A drawing mode has now been developed for some tables.
In the tool window Vanize renkleri e.g: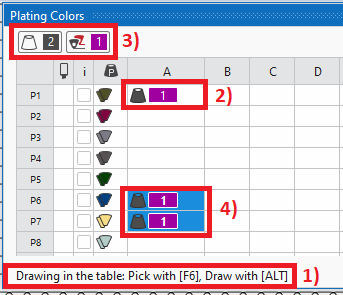
- 1) Tables supporting this mode contain this help text.
- 2) You pick up by F6 an existing entry which will appear in the control (3) then.
- 4) You can draw into the table by the ALT key pressed.
- Hit the Esc key to cancel the selection.
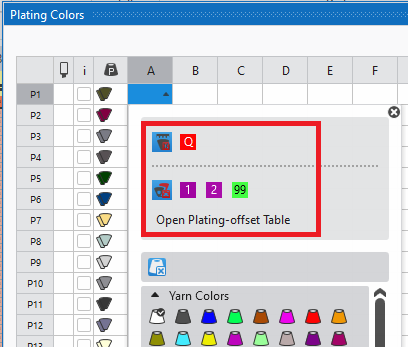
- Plating Color with Plating-offset
- Tool Window Vanize renkleri
- The selection Vanize ofseti (YPI) and Atkı ipliği has moved from the context menu into the visible area of the color selection.
-
Bul ve değiştir
The Bul ve değiştir dialog box has been optimized. Buttons with long text has been removed.
You will find now Ara at the left of the dialog box, Değiştir / Karşılıklı Değiştir at the right.
- Add the selection of the user control to the dialog box (+) or remove it from the dialog box (-).
- Add a line for search criterion (+) or on the other hand remove the line (-).
- Apply search criterion.
Kumanda sütunları
The behavior of Kullanıcı tanımlı kumanda sütunları is changed.
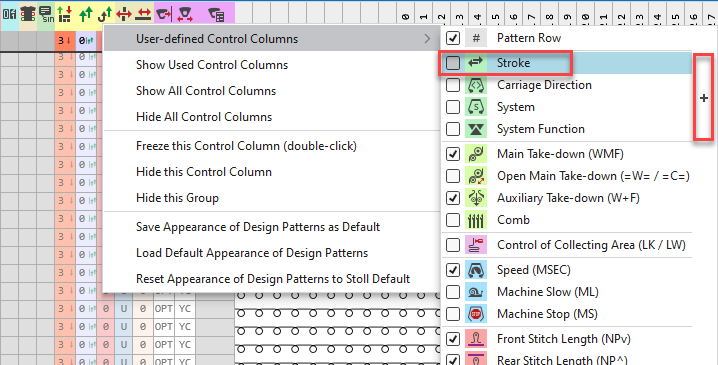
- The context menu will no longer be closed after the selection of a single control column.
- You can toggle the selected control column via the check box.
- You can toggle the entire group by the plus sign.
- You close the context menu via the Esc key.
Pattern Parameters
A newly generate table row will appear at the bottom of the table.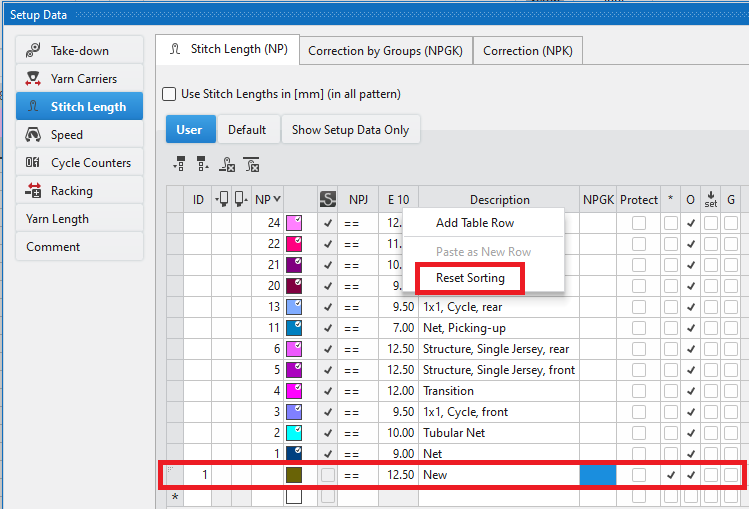
- If the new row appears at a different position, call up the Sıralamayı sıfırla function of the context menu of the table header.
Yapılandırma
If the value differs between project and pattern, than this state will get marked by the little button of orange color.
The following extension is available to this marking by color.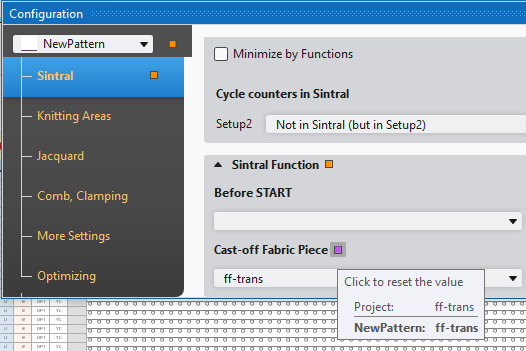
- The button will appear purple if the value between project and pattern is the same but not inherited from the project.
- If project and pattern have different settings (button in orange) and you make the same selection for the pattern as for the project, then the button will change to purple.
Color Arrangement – Placeholder Colors
The transparent search colors in a CA known from M1plus are now available as placeholder colors.
- You will find the placeholder colors in the CA tab of the CA Editor.
- Placeholder colors may not be used with other colors in the search row.
- Placeholder colors of the search row also allow the use of placeholder colors in the processing area.
Advantage of the placeholder colors in an example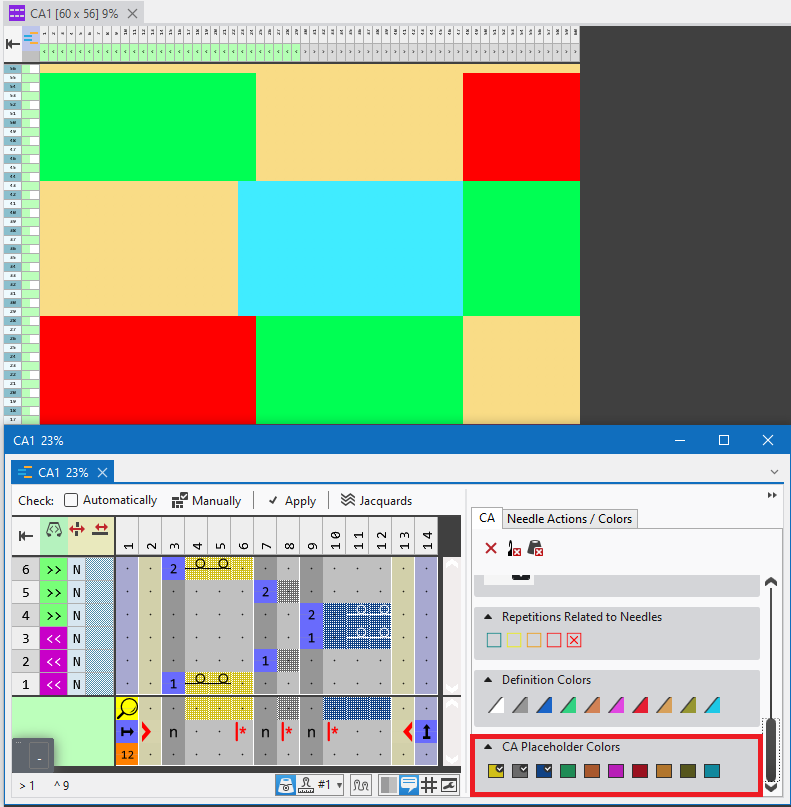
- The pattern has 3 colors in each row across the width, but they are different.
- Due to a CA, you want to knit reverse stitches by two needles on the fabric selvedge (column 4;5 and 11;12 of CA).
- Without placeholder colors, three different CAs would be necessary.
- By using the placeholder colors in the search row and in the processing area, the pattern is implemented in its original colors with 2 reverse stitches on the selvedge.
Color Arrangements – Working with Sub-colors
Sometimes it is necessary to work with sub-colors in the pattern.
For example, if different parameters are to be assigned to a yarn carrier. When creating a color arrangement with an sub-color in the pattern, manual reworking was always necessary.
Working with sub-colors has now been optimized.
- Create CA from Selection
- Result in version 2.2
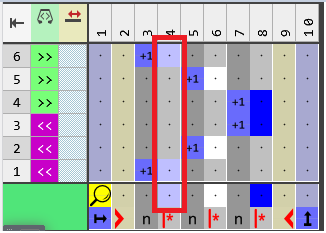
- The sub-color is on its own knitting row in relation to the main color (blue). You had to move the cells manually.
- Result in version 2.3

- The sub-color is on the right of and level with the main color (blue).
- Check the CA for new sub-colors
- You will find the new function to check for sub-colors in the context menu of the CA control column.
CA'daki alt renkleri güncelle - With calling up the context menu, it is checked whether the CA exists in multiple patterns.
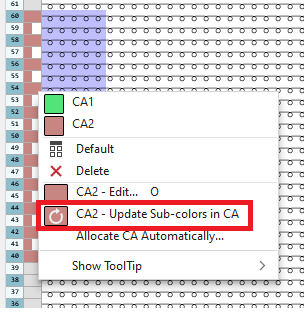
- Example: CA is only used in the current pattern
- By calling up the function, sub-colors in the pattern that are not yet contained in the CA are added to the right of the main color in the CA.
- The newly inserted color segment for the sub-color has the same number of columns and the same content in the processing area as the color segment for the main color.
- Note: If there are fewer sub-colors in the pattern than in the CA, then no sub-colors will be removed from the CA.
-
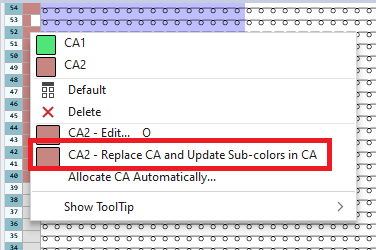
- Example: CA exists in multiple patterns
- The CA of the current pattern is replaced by a copy.
Sub-colors that are not present in the copy are automatically added. -
Note:
The copy is always created, even if there is no new sub-color in the pattern!
Fully Fashion – Specification of Sizes in Dimensioned Shapes
In the Seçenekler dialog box, you can switch between to two specifications of sizes for Dimensioned Shapes.
Sayılar (36, 38, 40, ...)
Büyük harfler (S, M, L, ...)
Fully Fashion – Mirroring a Lined Shape
A function that was previously only available in the Dimensioned Shape is now also available in the Lined Shape. The vertical mirroring.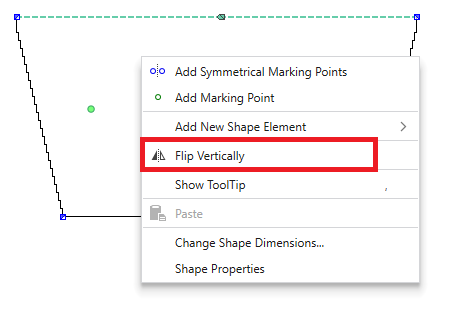
- Dikey döndür function in the context menu of a shape.
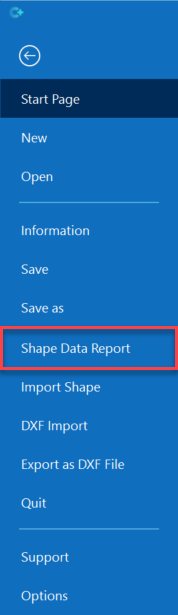
Fully Fashion – Shape Data Print
You will find a new print function for Lined Shapes and Dimensioned Shapes in the Dosya ribbon.
-
- After calling up the Şekil verileri raporu function and opening a report template, the shape data are displayed based on this template.
- You can create and use templates of your own if this feature is purchased and activated.
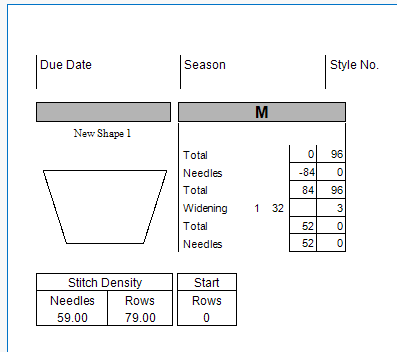
- Starting from the zero point of symmetrical shapes, the left column of the table grid shows the stepping width and the right column the stepping height.
At the left of the table grid you will find the factors of repetition (e.g. 32 for the Artırma). - For Dimensioned Shapes, the data contained under Dosya -> Bilgi are transferred to the printout.
- If the project contains several shapes, one page is created for each shape.
-

This function is not directly available for shapes of pattern or design projects.
Save the shapes as shape files at first and open them in a separate instance. - Shape Data Report
Fully Fashion – Deseni kesim ile çoğalt...
- This function is integrated in the Deseni çoğalt item of the context menu.
- Context menu on the pattern name
Fully Fashion – Raster-shape
- Şekil sembolleri
- The shape symbols for editing the raster-shape, previously located within the İğne hareketleri tool window, are now in the separate tool window Kalıb sembolleri.
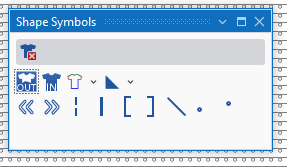
- The Şekil sembolleri tool window is listed in the Araç penceresi ribbon group and arranged below the needle actions by the default window layout.
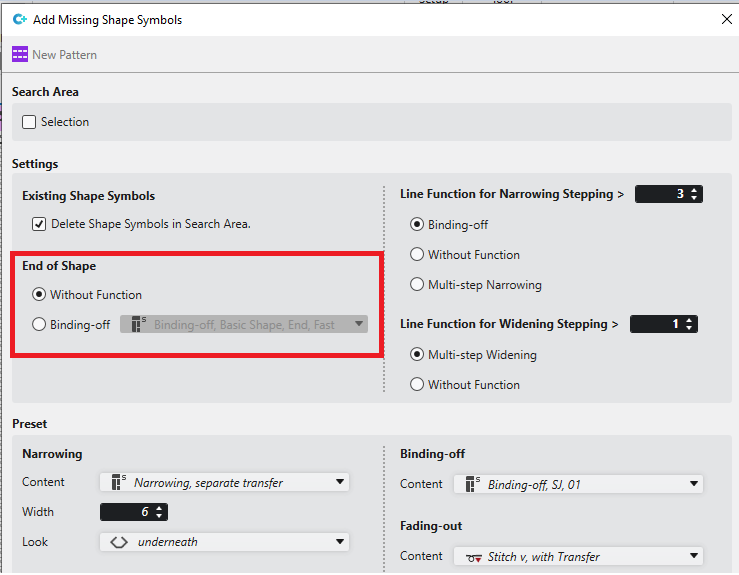
- Add Missing Shape Symbols
- The function has been extended so that binding-off can be created for the end of the shape.
-
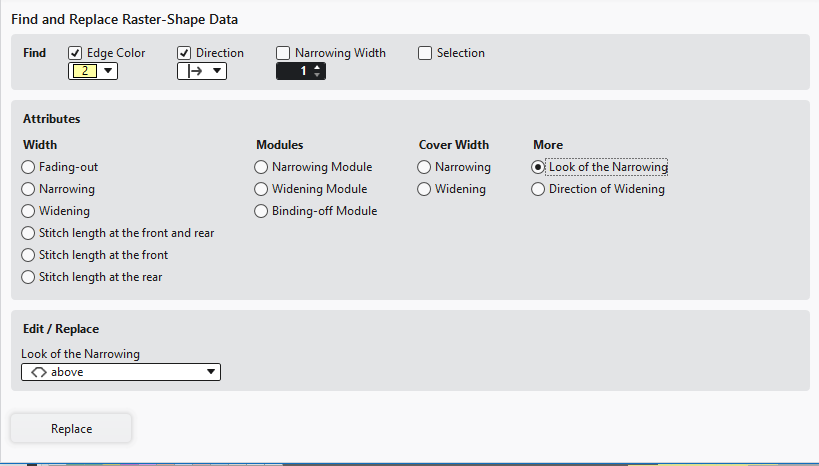
Find and Replace in the Şekil kenarları
tool window
The Kılavuz şekli verilerini bul ve değiştir rubric of the Şekil kenarları tool window is structured more clearly by the following areas: - Ara
- Özellikler
- Düzenle / Değiştir
-
- Binding-off by CA
- You can now assign Color Arrangements for binding-off from the STOLL database via the CA control column.
- For that, see also the What was new in CREATE PLUS V2.3 section.
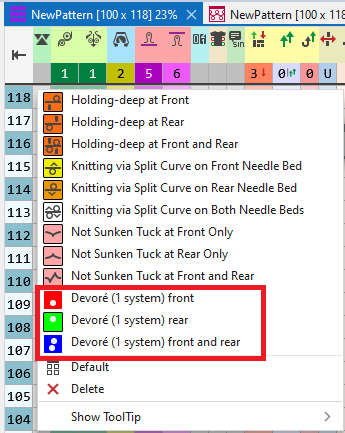
Devoré (1 system) for ADF
The corresponding places in the software:
- Makine öznitelikleri
- Knitting Devoré requires a system conversion which is currently only available for knitting systems at the rear.
- Activate the conversion in Yapılandırma / Makine öznitelikleri / Sistem fonksiyonları section.
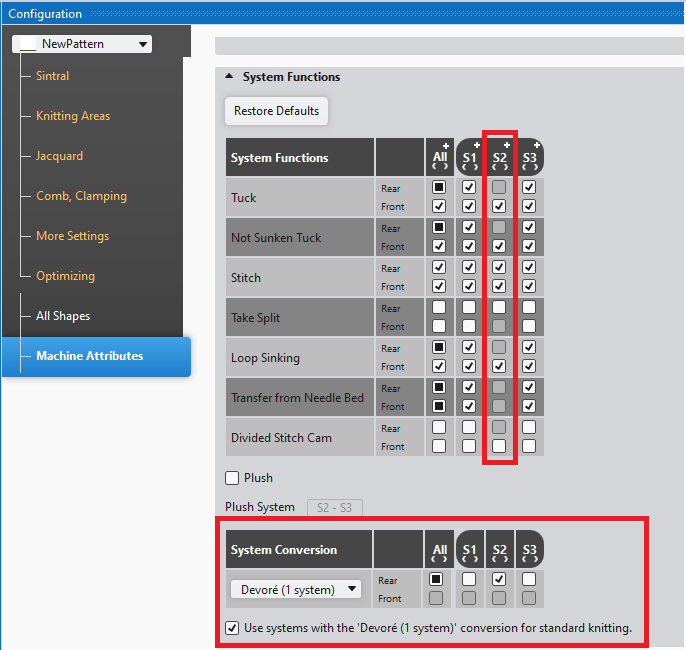
- By selecting Devoré (1 sistem) for a system, the system functions that are not allowed (e.g. tuck) are automatically disabled.
- You can specify by the 'Devoré (1 sistem)' tadilatına sahip sistemler normal örme için kullanılır. check box whether the converted system can be used for regular knitting (e.g. of the start).
- Tool Window İğne hareketleri
- Two new needle actions:
-
 Motif ipliği ön
-
 Motif ipliği arka
-
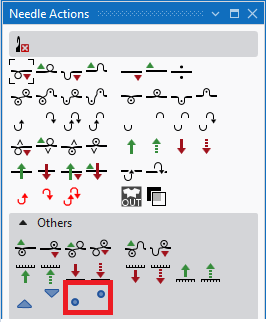
-
You can select the needle actions in addition by the CTRL key pressed.
In order to delete: Motif ipliği arka
+ CTRL +  İğne hareketini sil
.
İğne hareketini sil
. - Control column Sistem işlevi
-
- Warnings during Teknik İşlem
- Devoré without plating color (for motif thread and binding thread)
- Devoré in the needle area without entry in the control column
- If no system is configured for Devoré in machine configuration.
- If Devoré is combined with tuck.
Optimizing BMS
- Yarn carriers could be moved by one system only into and from the clamping position.
This resulted in a longer run time. - Both systems are supported now by the Teknik İşlem.
- The CKC 1.4 operating system must be used by the knitting machine.
Control of Collecting Area of BMS
Condition: CKC V1.4 and BMS Component Type 001
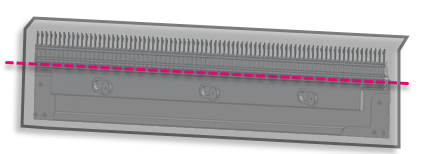
The monitoring of fabric collection chamber prevents the comb from taking casted-off fabrics upwards.
- With BMS, the commands LW1 and LW0 replace the commands LK1 and LK0.
- The commands LW1 and LW0 are available with Bul ve değiştir.
- The command LK1 of the comb thread modules for BMS is replaced.
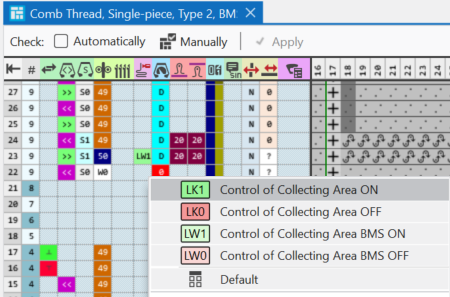
-
LW1 additionally in the new Emniyet sırası modülü Koruma sıraları, Bc, düşürmeli
With it, the monitoring is done before the start of the following fabric piece. -
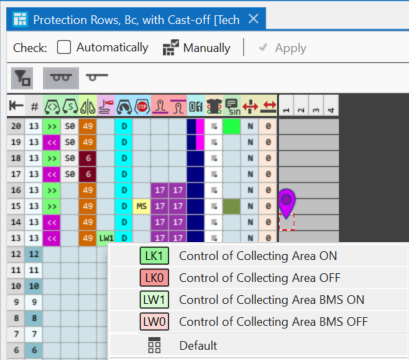
- The Emniyet sırası modülü will automatically be replaced with changing to a BMS.
A message will appear with the change.
Machine Data Check Warns of Modified Protection Row Module MDD_106 - Control column
 Toplama alanı kontrolü (LK / LW)
You can find the news of the previous releases in the CREATE Yardım (F1) help.