Step by Step to 'Pattern-14A'
Features of the pattern:
- Double jersey structure
- Shape adopted to DJ:
- Step width for narrowing by 1 needle
- Narrowing width 1 needle (no fully fashion marking)
- fading-out 1 needle at the right shape edge and at the left edge of the V-neck with Aktarmalı ön ilmek needle action.
Step by Step to 'Pattern-14A'
- A pattern project with one pattern and the desired settings is created.
- 1
- To create a project-related lined shape, select the
 Kesimler tab in the tool window.
 - 2
- Open the context menu with RMB and select M boyutunda yeni kesim oluştur....
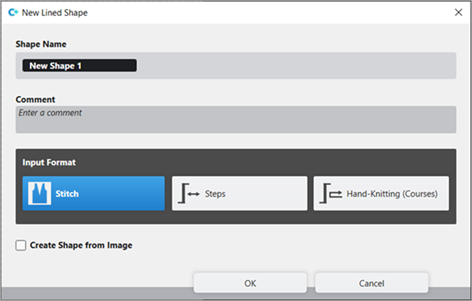
- The Yeni çizgi kesimi tool window is opened.
|
| |||
|
Kesim adı |
Name for the shape element | ||
|
Yorum |
Information about the shape | ||
|
| |||
|
Input Format | |||
|
İlmek |
Entry in the table of the lined shape
| ||
|
Aşamalar |
Entry in the table of the lined shape
| ||
|
El örgüsü (turlar) |
Entry in the table of the lined shape
| ||
|
Rules for widening with hand knitting | |||
|
|
Knitting before widening following the start | ||
|
|
Widening before knitting following the start (default setting) | ||
|
Resimden kesim oluştur |
|
No images will be used | |
|
|
Use image as template | ||


- 3
- Make the desired entries:
- Kesim adı: Any
- Giriş formatı: Stitch
- 4
- Confirm with the OK key.
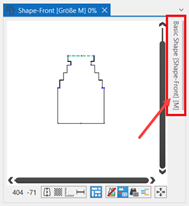
- The new lined shape (basic shape) is graphically displayed in the Kesimler tab and in a new document window
 as rectangle.
 : The default attributes will be used for the shape edges of the lined shape.
Menu Dosya -> Seçenekler -> Çizgi kesimi -> Yeni çizgi kesimi seçenekleri
- 5
- Open the docked line table by LMB in the document window.
- or -
Use the graphic displayed in the document window. - The table Çizgi kesimi with the values of the rectangular shape appears.
: The method (table or graphic) to create a project-related lined shape is freely eligible, since the views are always updated simultaneously.
- 6
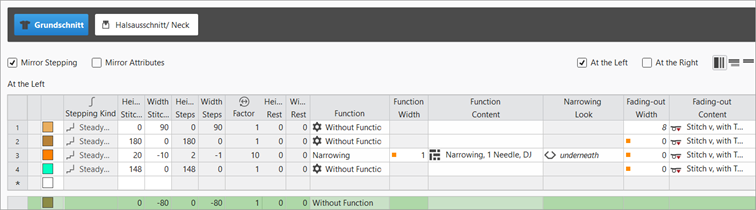
- Insert new shape lines in the table and enter the desired values for the basic shape with
 Basamaklamayı yansıt.
Rules for a shape stitch-stitch knitting mode (DJ):
|
Shape Attributes |
Rules |
|---|---|
|
Knitting Mode |
Önde ilmek - Arkada ilmek |
|
Step width of widening |
1 Stitch |
|
Step height of widening |
As desired |
|
Quantity of rows without shape modification |
As desired |
|
Step width when narrowing |
1 needle |
|
Step height when narrowing |
As desired |
|
Quantity of needles when narrowing |
1 needle |
|
Knitting mode for fading-out |
Modules of the |
|
Fading-out Width |
Depending on the selected module |
|
Binding-off |
Stepping > 1 needle |
|
Binding-off methods |
Remayözleme, dolu iğne, 01 Remayözleme, dolu iğne, 02 Remayözleme, temel kalıp, kenar, dolu iğne, tutturmalı, 01 Remayözleme, temel kalıp, kenar, dolu iğne, tutturmalı, 02 |

- 7
- Allocate the desired attributes to the new shape lines:
- Function:
- Function content: Eksiltme, 1 iğne, dolu iğne
- Function width: Value 1
- Fade-out:
- Fade-out content: Aktarmalı ön ilmek
- Fade-out width: Value 1
- 8
- Disable the Öznitelikleri yansıt check box.
- 9
- Adopt the attributes allocated to the new shape lines (no. 2 - 4):
- Basic shape at the left (line 2-4):
- Function width: Value 1
- Function content: Eksiltme, 1 iğne, dolu iğne
- Fade-out width: Value 0
- Basic shape at the right (line 2-4):
- Function width: Value 1
- Function content: Eksiltme, 1 iğne, dolu iğne
- Fade-out width: Value 0
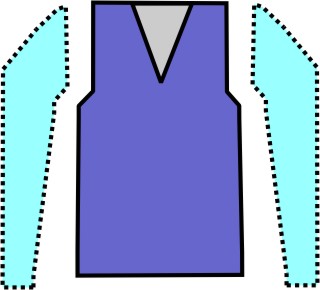
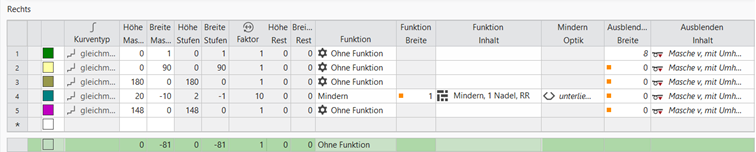
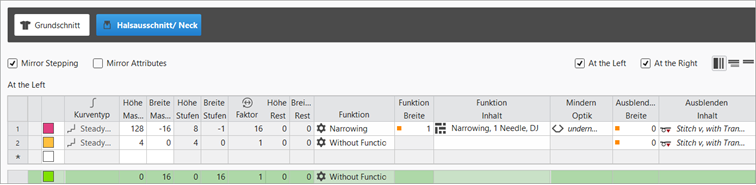
Example: Lined shape for Pattern-14A
|
Basic Shape: Left Front |
|
|
|
Basic Shape: Right Front |
|
|
|
|
- 10
-
Kesim özellikleri menu:
Position the cursor in the opened document window xx -> context menu with RMB -> select Kesim özellikleri
- or -
select the shape in the Kesimler tool window -> context menu with RMB -> select Kesim özellikleri - 11
- Click on the
 Tek sayılı genişlik selection.
 - The right side of the basic shape is widened by 1 needle.: This setting also has an effect on the neckline shape element, i.e. the V-neck shape element starts with 1 needle.
- 12
- In the line table, position the cursor in the area next to the
 Ana Kesim button -> open the context menu by RMB -> select Yeni kesim elemanı ekle....
 - 13
- In the selection menu select the desired shape element Yaka açıklığı -> symmetrically.
- 14
- Allocate the desired attributes to the new shape lines:
- Function:
- Function content: Eksiltme, 1 iğne, dolu iğne
- Function width: Value 1
- Fade-out:
- Fade-out content: Aktarmalı ön ilmek
- Fade-out width: Value 1
- 15
- Disable the Öznitelikleri yansıt check box.
- 16
- Adopt the attributes allocated to the new shape lines (no. 2 - 4):
- Basic shape at the left (line 2-4):
- Function content: Eksiltme, 1 iğne, dolu iğne
- Function width: Value 1
- Fade-out content: Aktarmalı ön ilmek
- Fade-out width: Value 0
- Basic shape at the right (line 1-2(3)):
- Function content: Eksiltme, 1 iğne, dolu iğne
- Function width: Value 1
- Fade-out content: Aktarmalı ön ilmek
- Fade-out width: Value 1
|
Left Neckline Shape Element (V-neck) |
|
|
|
Right Neckline Shape Element (V-neck) |
|
|
|
|

- 17
- In the Kesimler tool window select the created shape with LMB.
- 18
- Open the context menu -> Kesimi konumlandır -> select Pattern name.
- The shape is floating in the selected basic pattern.
- 19
- Start the
 Teknik
işlem:
Teknik
işlem: Show symbol view after technical processing.
 - 20
- Generate
 Sintral.
 - 21
- Start the
 Sintral Kontrolü.
 - 22
-
 Genişlet the knitting program.
 - A program for the knitting machine will be created: CMS530.Pattern-14A.zip.
- Load knitting program into the machine.
 : The extracted file CMS530.Pattern-14A.zip can be loaded onto the machine with an USB stick or via Ethernet.