What was new in CREATE PLUS V2.9
Release V2.9 04/2025
Dosya sürümü: 17 (V2.9)
Compatible with:
- EKC 3.1
- CKC 2.1
- OKC 6.6
Redesigned Yapılandırma Dialog Box
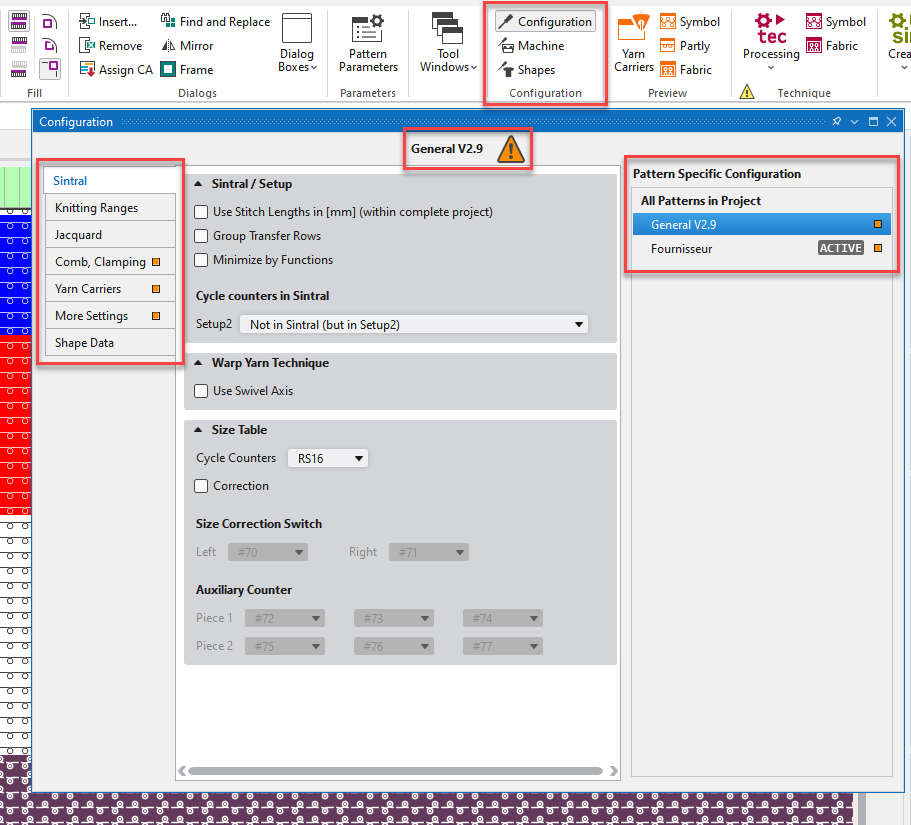
The Yapılandırma dialog box is redesigned.
- The tabs of Tüm kesimler and Makine öznitelikleri have settings specific to the project.
These tabs are therefore different from the other tabs of the Yapılandırma.
Therefore, they has been removed from the Yapılandırma dialog box.
You will find them in the Makine yapılandırması and Kesim yapılandırması dialog box. - You call-up all three dialog boxes in the Yapılandırma ribbon group of the Başlat ribbon.
- The presentation of these dialog boxes has been adapted to the Pattern Parameters dialog box and thereby standardized.
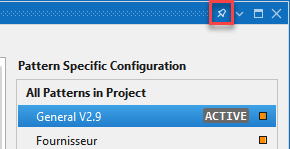
- The pattern filter is no longer collapsed.
- The pattern filter is always visible on the right edge.
- The selected pattern is highlighted by a blue background.
- The pattern active in the design view is marked as ACTIVE in the list.
- If the selected pattern is not the active pattern, a warning symbol appears after the pattern name.
The warning symbol indicates that changes made do not apply to the active pattern.
 - The contents of the tabs are arranged more clearly.
- The Optimizasyon tab has been removed and its contents have been reassigned.
- The new Yarn Carriers tab collects the yarn carrier related settings.
- The different functions and settings of all tabs have been arranged more clearly.
Makine yapılandırması as a Standalone Dialog Box
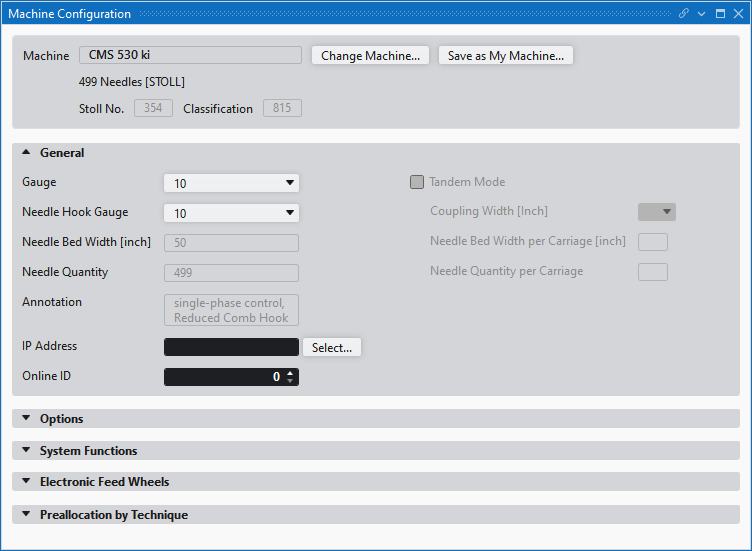
Call up the Makine yapılandırması dialog box in the Yapılandırma ribbon group of the Başlat ribbon.
Select a machine in the Makine yapılandırması dialog box and make settings specific to the machine.
Kesim yapılandırması as a Standalone Dialog Box
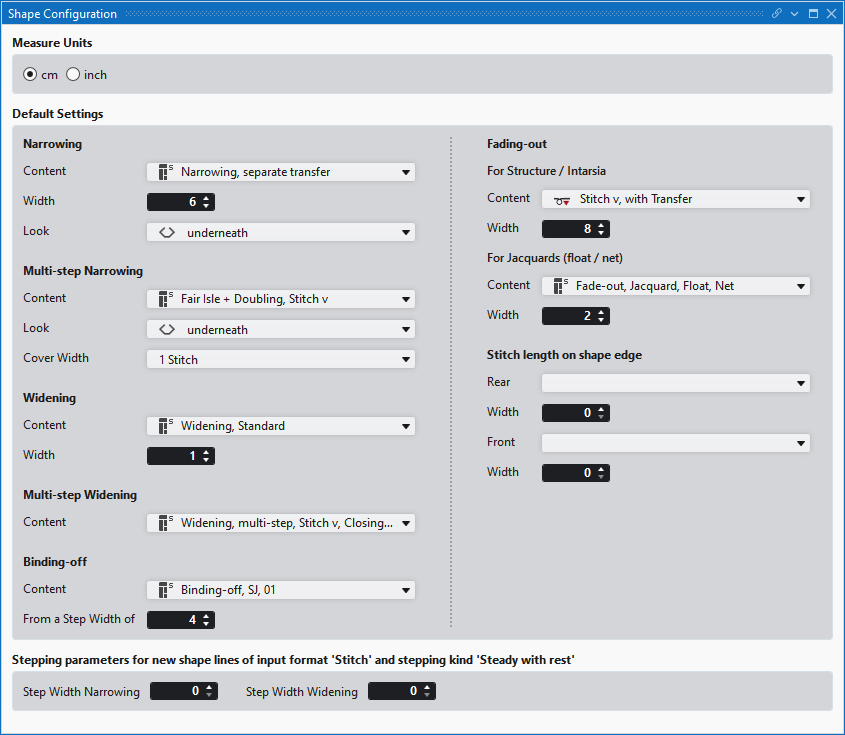
Call up the Kesim yapılandırması dialog box in the Yapılandırma ribbon group of the Başlat ribbon.
You make the settings for new shapes in the Kesim yapılandırması dialog box.
Filtering in Pattern Parameters dialog box has been optimized.
- The presentation of the Pattern Parameters dialog box has been improved.
- You can filter the entries according to the project or the active pattern.
 Project
The entries are filtered according to the whole project.
The following entries are displayed:- All entries that are present in the patterns, in the knitting elements or in other settings of the project.
- All Sintral entries that are present in this project.
- All entries that belong to the favorites.
- All entries created by the user, even if they are not among the favorites.
 Project
The entries are filtered according to the active pattern.
The following entries are displayed:- All entries used in this pattern.
- All Sintral entries used in this pattern
- All pattern-related entries of this pattern, regardless of whether they are used in the pattern or not.
- All entries that belong to the favorites.
Directory for Your Own Machines in Knit Explorer
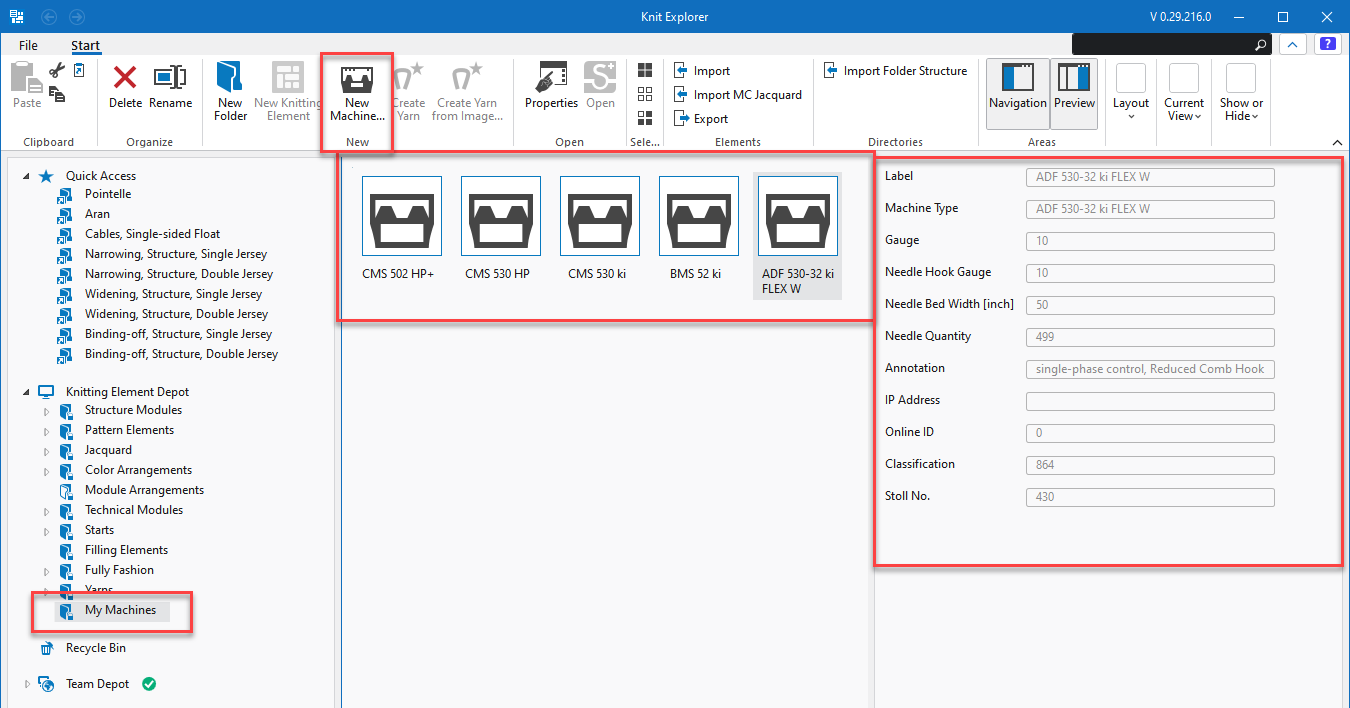
- Create your own machines in the Makine seç dialog box under Özel.
- You can find all your machines in the new directory My Machines of the Knit Explorer.
- Your own machines of the Makine seç dialog box and of the Knit Explorer are synchronized in real time.
- You can create and configure your own machines directly in the Knit Explorer.
- In the preview, you can see the main features of the selected machine.
- In the context menu of a machine, you can open and configure the Makine özellikleri.
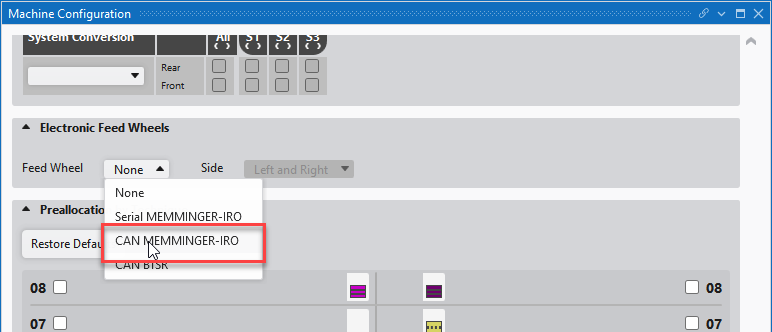
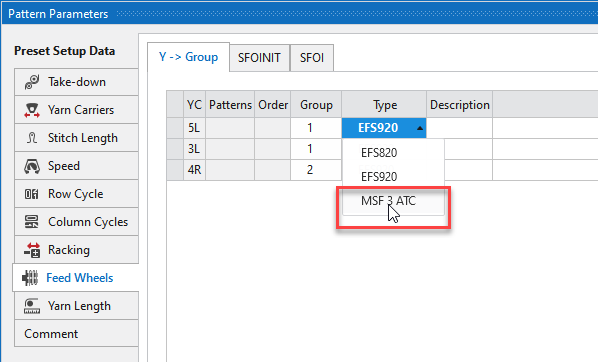
Feed wheels of the type MSF 3 ATC from MEMMINGER-IRO are supported.
- Select the feed wheel type CAN MEMMINGER-IRO in Makine yapılandırması
- Create the feed wheel group and select the MSF 3 ATC type in the yarn carriers dialog box.
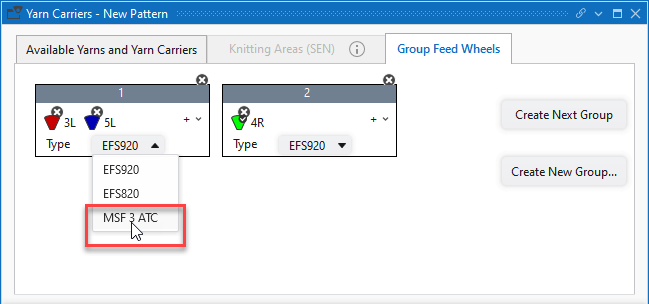
- or -
- After the groups have been created, the MSF 3 ATC type can be entered in the pattern parameters even afterwards.
Plugins for CLO and browzwear are available at installation
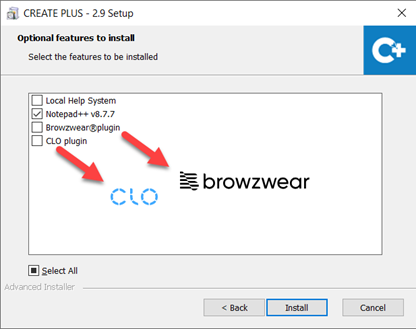
- 183
- Specify the save location according to the 3D software.
- 184
- Enable the plugin correspondingly to the 3D software.
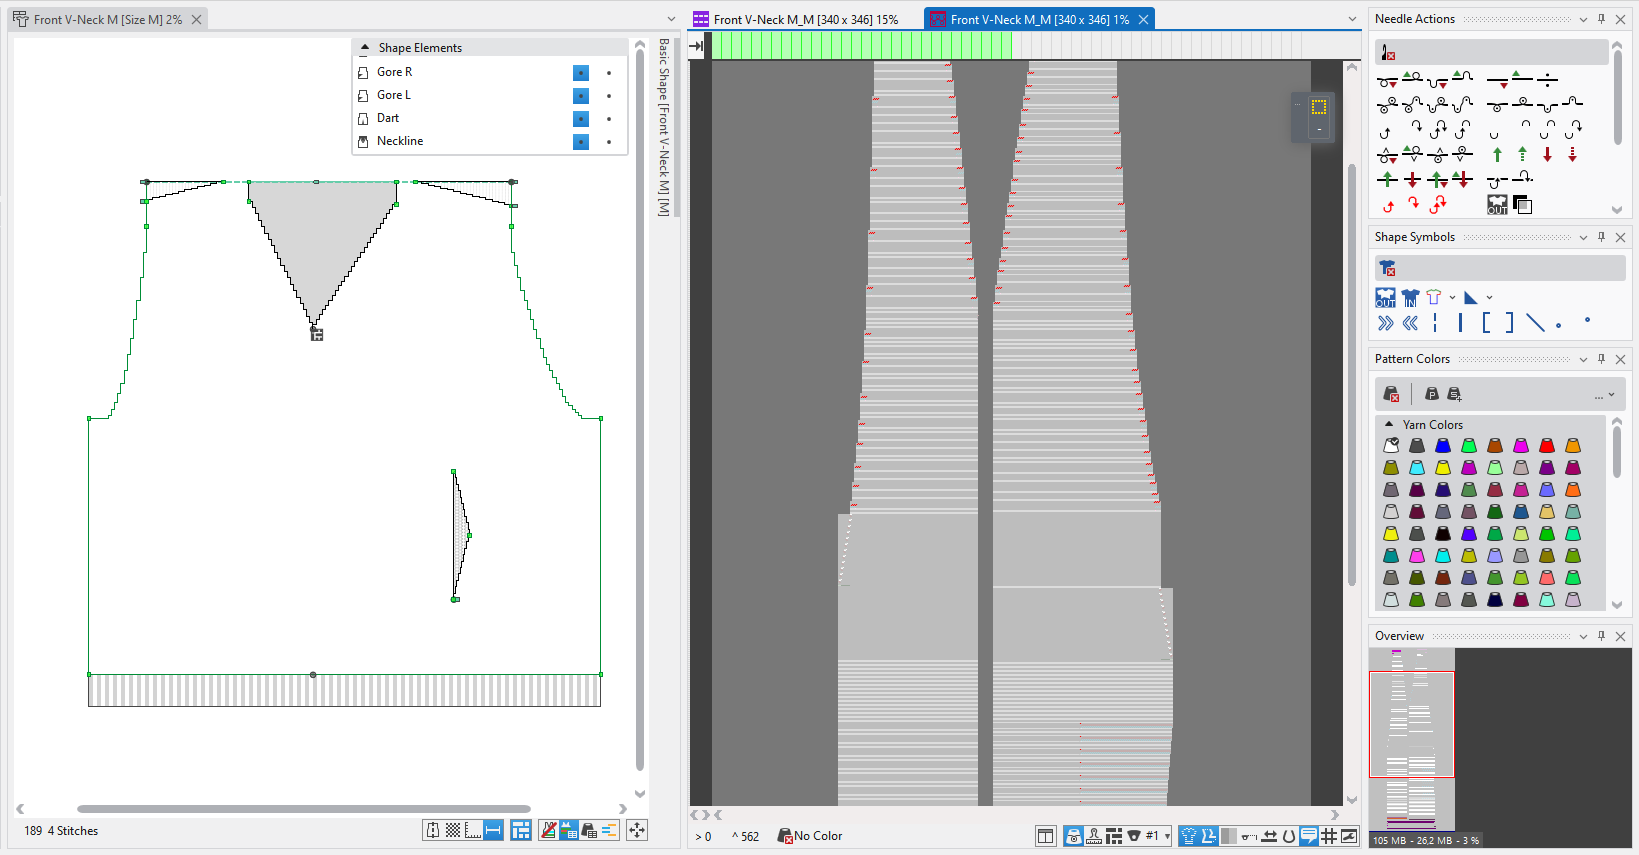
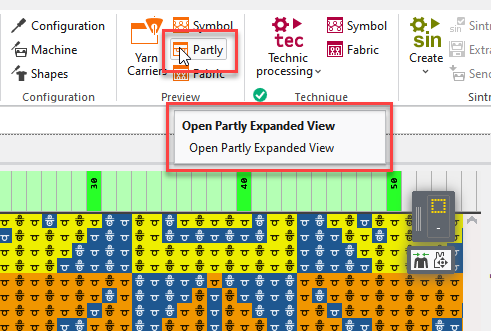
New function Open Partly Expanded View
Represent an area of the pattern expanded without expanding the entire pattern.
- 185
- Create a row selection in the Design View.
- 186
- Click the Open Partly Expanded View function in the Başlat ribbon.
- The selected area is displayed expanded in a new document window.
 If there is no row selected, the visible area of the design view is displayed partially expanded.
Column Cycles for Different Widths (Sizes)
You enter Column Cycles in the needle bar and they are displayed there.
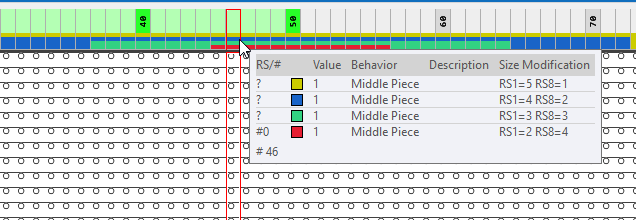
- The tooltip on the needle bar shows the Column Cycles of the cursor position.
- In the context menu on the needle bar, you can select a column cycle to draw or open the Column Cycles table.
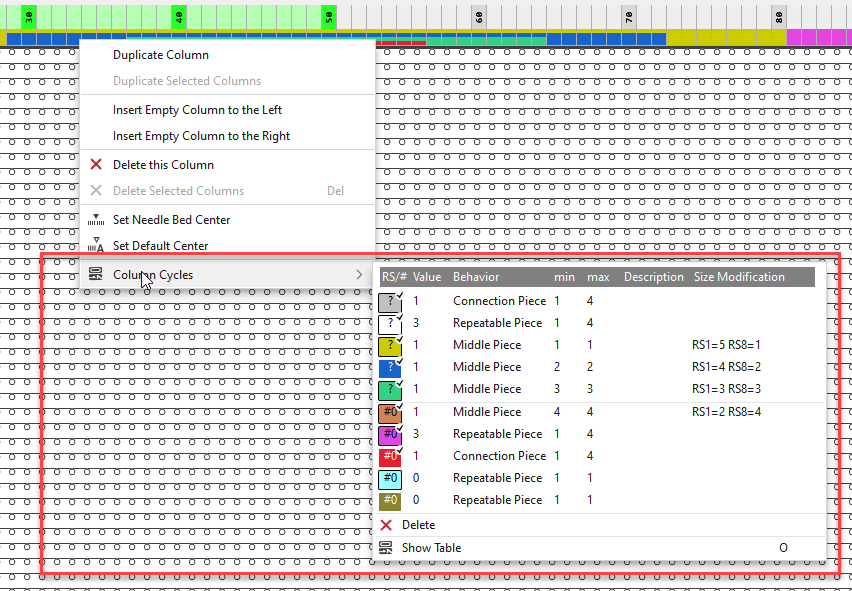
The Column Cycles table is located in the Pattern Parameters tool window.
Make all the necessary settings there.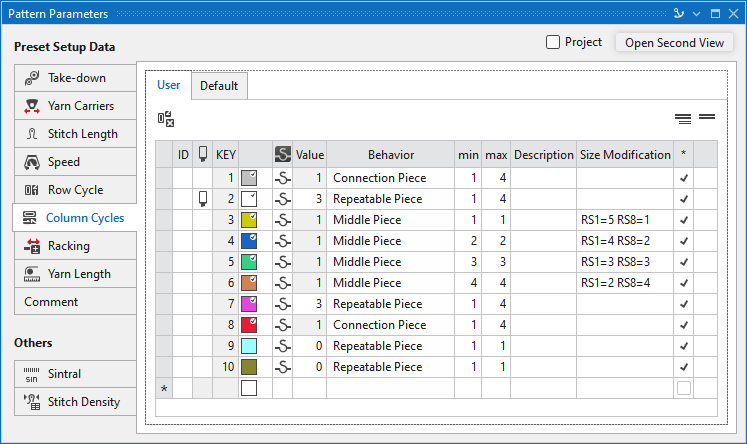
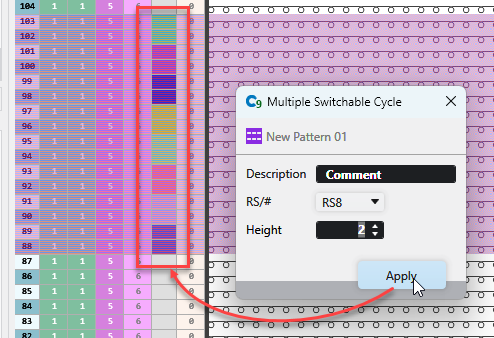
Multiple Switchable Cycle
You call up the Multiple Switchable Cycle dialog box for selected rows in the context menu of the Raport (RS) control column.
Entry in the context menu:
Create a Multiple Switchable Cycle from Selected Rows...
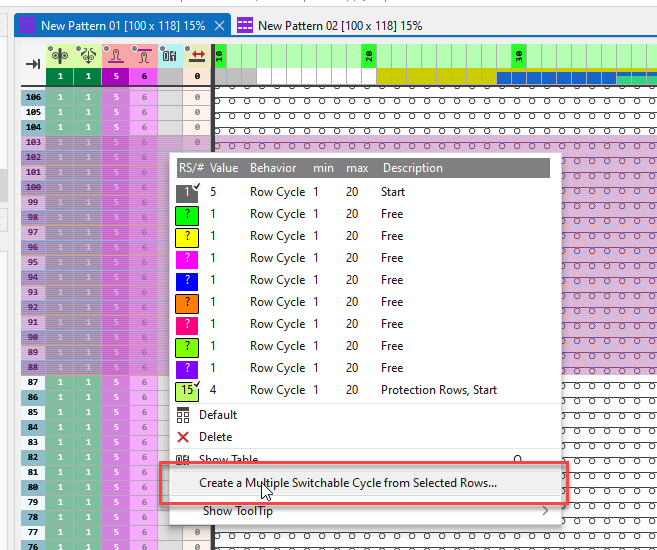
Make the following settings in this dialog box:
- Enter the description.
- Select the desired cycle counter.
- Set the height of the switchable cycle.
Insert Carriage Direction Repeatedly Function
In the context menu of the Semer yönü control column, call up the Insert Carriage Direction Repeatedly dialog box.

- 187
- Select complete rows of the pattern.
- 188
- Enter the Starting Direction.
- 189
- Enter the Quantity of Repetitions.
- 190
- Confirm with Uygula.
- he carriage direction is drawn in the control column according to the input.
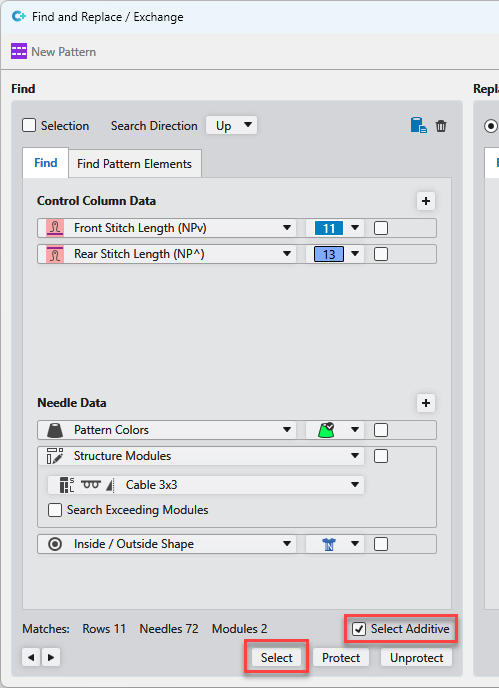
Bul ve değiştir Dialog Box
- Function Select Additively
- 191
- Activate the Select Additively option.
- 192
- Select attributes in the search area.
- 193
- Click on Seç.
- The matches are selected in the pattern and added to the existing selection.
- Better presentation of the functions İmleç öznitelikleri ekle , Arama kriterleri ekle and delete criteria.
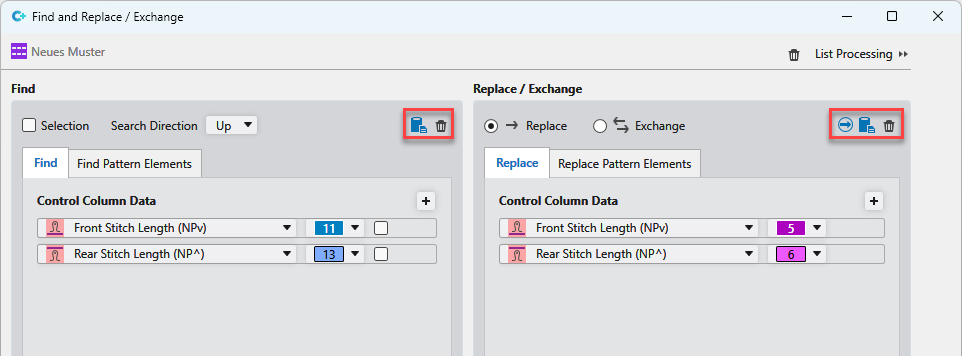
| Adds the current cursor attributes to the already defined search or deployment criteria. |
| Deletes all criteria for search or insert. |
| Adds the current search criteria to the already defined criteria for insert. |


- Detailed list display
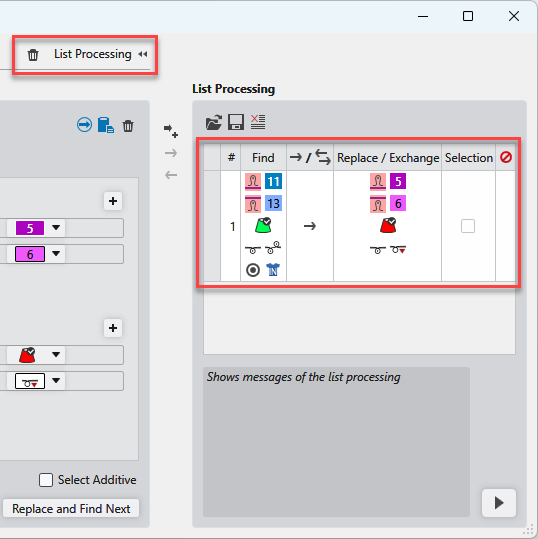
- The buttons for Delete Search Criteria and Liste prosesini etkinleştirir/devre dışı bırakır are always visible.
- Improved order of columns at Liste prosesi.
Jacquard Knitting Sequences
To use 2 or 3 yarn carriers per Jacquard color may improve the knitting time.
Various knitting sequences are available in the Jakar oluştur dialog box.
In it, you assign the desired knitting sequences to the corresponding Jacquards.
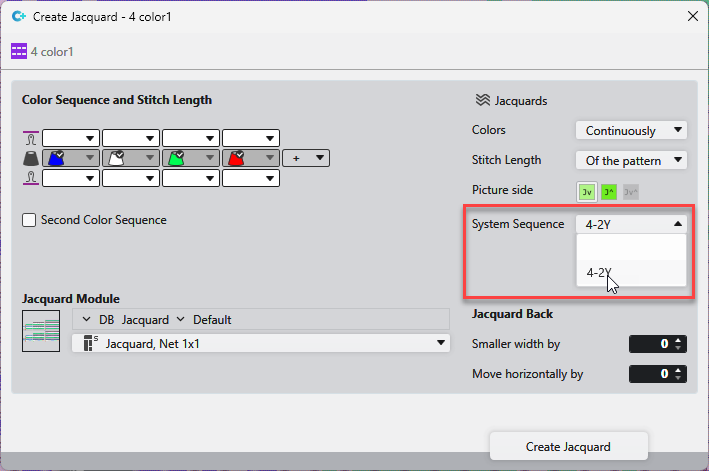
Knitting sequences are available for the following situations:
Systems -> | 2 | 3 | 4 | 6 |
v Colors | ||||
2 |
| 2-2Y |
|
|
3 | 3-2Y |
| 3-2Y | 3-2Y |
4 |
| 4-2Y |
| 4-2Y |
5 |
|
| 5-2Y |
|
6 |
|
| 6-2Y |
|
- There are two variants available for the knitting sequence of 2 colors + 4 systems:
- Yarn carriers starting on the right side (R)
- Yarn carriers starting on the left side (L)
- There are two variants available for the knitting sequence of 2 colors + 6 systems:
- 2 yarn carriers for each color (2Y)
- 3 yarn carriers for each color (3Y)
- Note on 4 colors + 2 systems without empty rows:
- In CREATE, this situation does not require a knitting sequence.
- Activate İkinci renk takip sırası and change the order of the colors manually.
Argyle Dialog Box
In the Argyle dialog box, you can create Argyle patterns quickly and easily.
Başlat -> İletişim kutuları ->  Argyle
You make the following settings in the Argyle dialog box:
Colors | Make general settings for the colors of the diamonds. | |
Dimension of Diamonds | Define the size of the diamonds. | |
Repetitions | Set the quantity of diamonds in width and height. | |
Stepping | Define step width and height. | |
Diamond |
| |
Fancy Stitch | Specify the color, needle action and knitting sequence for each area of the fancy stitch. | |
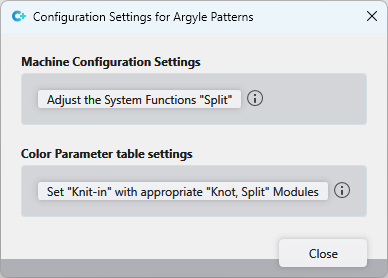
Configuration... | Opens the Configuration Settings for Argyle Patterns dialog box.
| |
Set the 'Split' System Functions | The 'Split' system function is enabled in the machine configuration for all systems at the rear. | |
Set 'Knit-in' with appropriate 'Knot, Split' Modules | Modules with knitting technic 'Knot, Split' are set in the color parameter table for knitting-in. | |
Create Pattern Element | After you have made all the settings, get the pattern element created from the diamonds and draw it into the pattern. | |
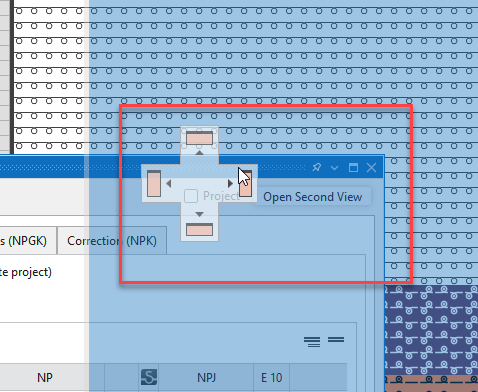
Docking of tool windows and document windows can be switched
For each tool window or document window, the snap feature can be enabled or disabled.
- The function is enabled.
- The window can be docked to allowed positions.
- The corresponding buttons for positioning will appear.
- The feature is disabled:
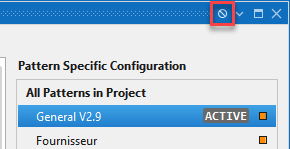
- The window can be positioned anywhere without the buttons appearing.
- The window is not docked.
Save Position and Size of Inner Document Window
Affects the following inner document windows:
- Şekil kenarları
- Kalıp İşaretleri
- Çizgi tablosu
- Mekikler
You will find the Save Position and Size as Default function in the context menu on the header of these windows.
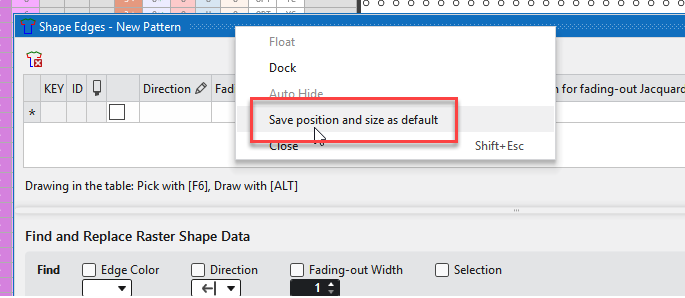
This function saves the current position and size of the window.
The layout is saved across projects.
The Twill Jacquard module has been extended to up to 8 colors
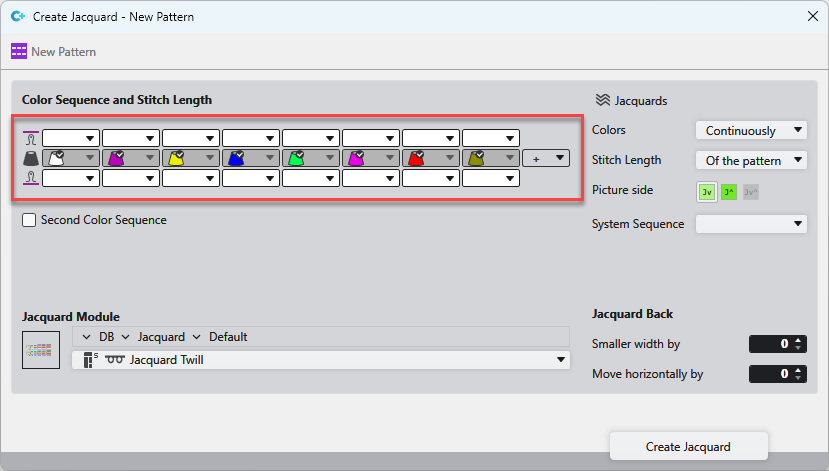
The Twill Jacquard module has been extended to up to 8 colors for Tüm iğneler, Resim tarafı at front and back.
Design rows or technical rows can be defined in structure modules.
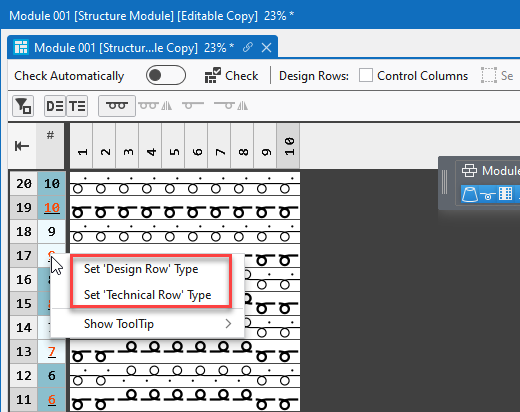
You can find the following functions in the context menu of the Desen sırası control column:
- 'Tasarım sırası' tipini ayarla
Defines these rows as a design row. - 'Teknik sırası' tipini ayarla
Defines these rows as a technical row.
Please note the following:
- Design rows can only contain design symbols.
- Technical rows may only contain tech icons.
- Each design row must have at least one technical row assigned to it.
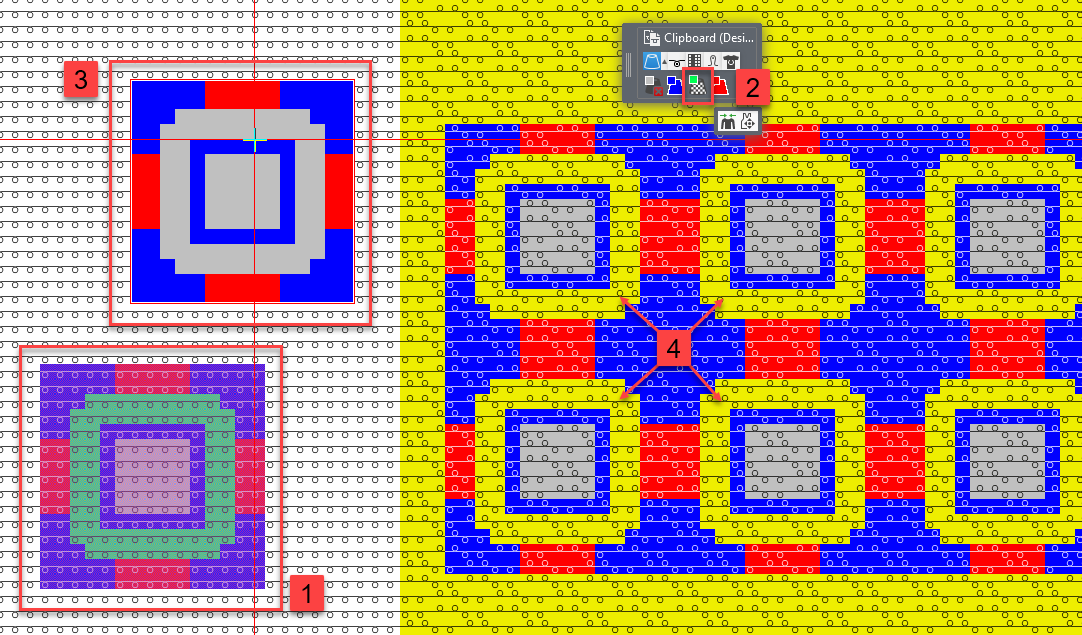
Drawing With Pattern Element as Copy and Transparent Color
- 194
- Select the area in the pattern (1) and copy it.
In the example image, this area contains the colors blue, green, red, and Renk yok. - 195
- In the cursor attributes, replace a color with Renk yok.
In the example image, the green color (2). - 196
- In the cursor echo (3), the green color can be seen as transparent.

- When drawing into the pattern (4), the green area is drawn transparently.
All other colors, even Renk yok, overwrite the existing colors.
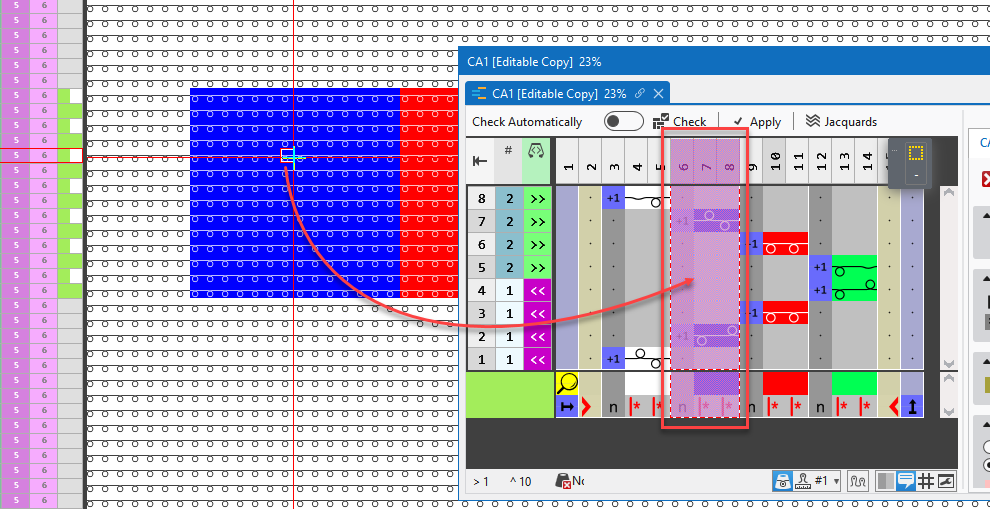
Open CA at Cursor Position Selects Color Segment
- 197
- Open a CA with the O key at the cursor position.
- The CA is opened and the color segment of the pattern color at the cursor position is selected.
Advanced Mirror and Replace CA Feature:
The reflection variants Dikey eksen üzerinde yansıt and İğne yataklarını değiştir can be created and replaced for an entire pattern and for several CA.
For this, proceed as follows:
- 198
- Open the HızlıBilgi'yi yapılandır dialog box in the Desen tool window.
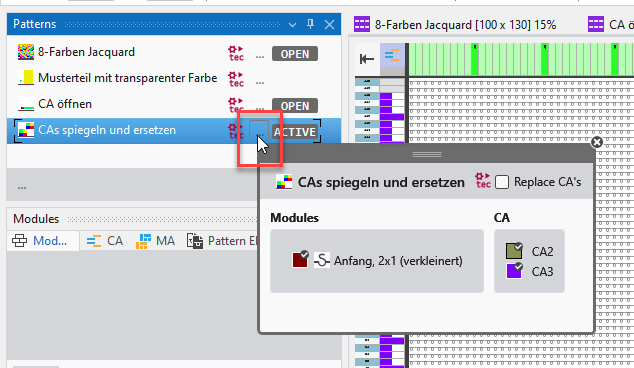
- 199
- Click on in the dialog box.
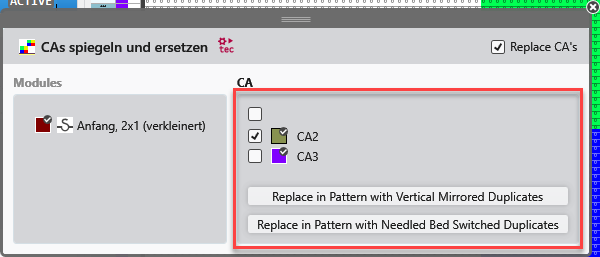
- 200
- Select if the CA to be replaced or exchanged.
- 201
- Click on the desired option of mirroring.
- A mirrored copy of the respective CA is created.
- The selected CA is replaced in the pattern by the mirrored copy.
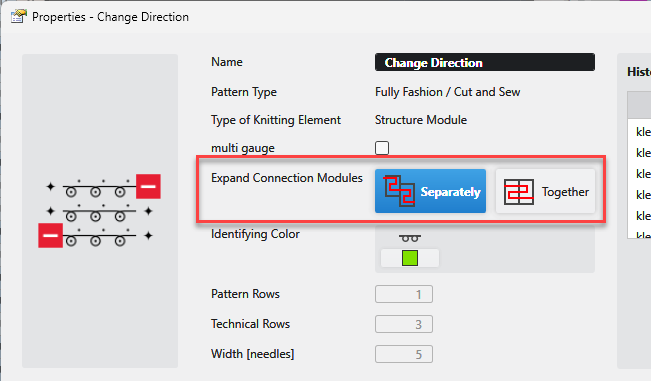
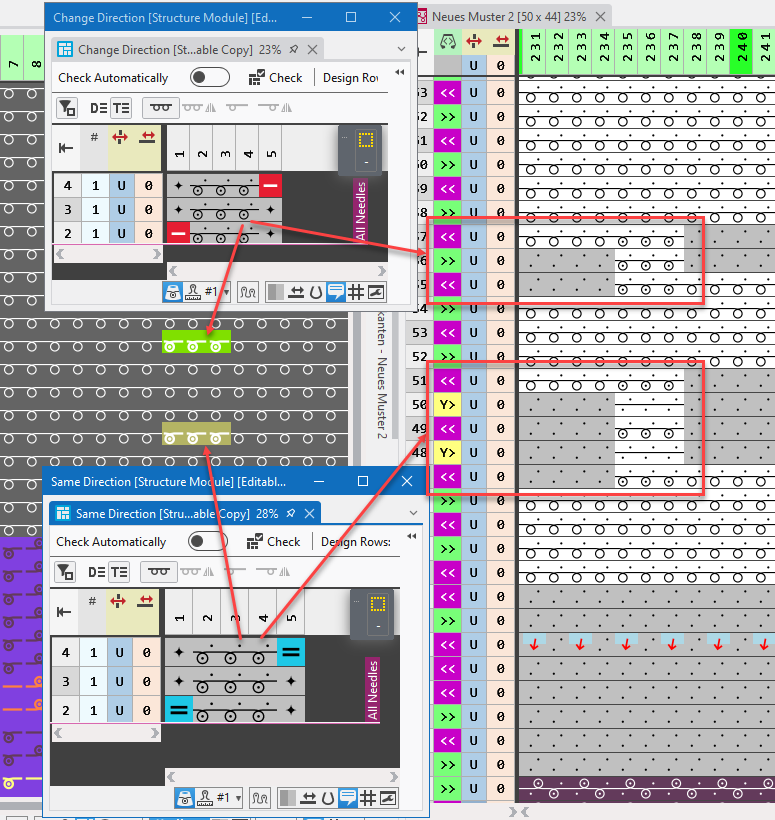
New Features of Connecting Modules
- Combined Expanding
You can specify the expanding via the properties of the connecting module.  Separately
  Together
- Alternating and constant carriage direction
- You can specify an alternating or constant carriage direction for the connecting module.
The connecting icon in the module defines the sequence of carriage directions. - Bağlantı

- Connection, Same Carriage Direction
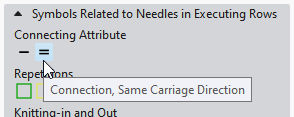
With constant carriage direction, the yarn carrier is kicked back between the knitting rows.
With ADF machines, the yarn carrier is kicked back autarkically between the knitting systems. This results in increased productivity.
Editable Properties of Opened Knitting Elements
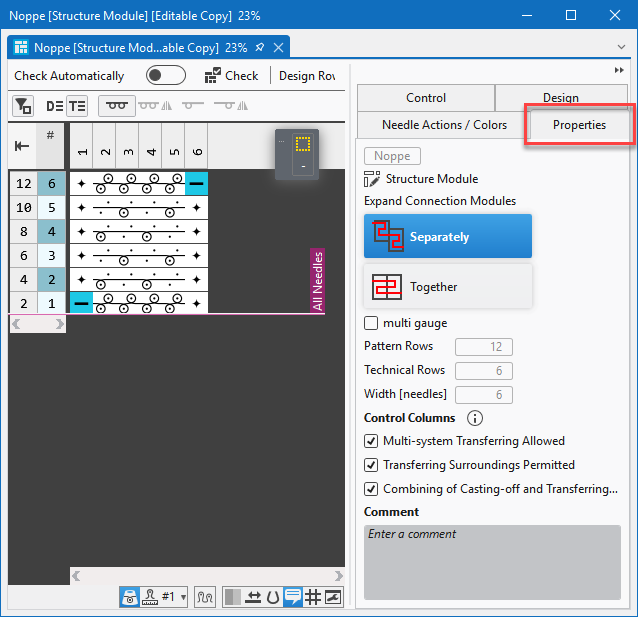
The properties of the knitting element are available as a tab of the task pane at the right.
You can edit the properties of the knitting element quickly and easily without closing the knitting element.
Importing Knitting Elements of M1plus into CREATE PLUS
You can export from M1plus:
- Structure Modules
- Pattern Elements
- Starts
- Color Arrangements
- Run the function in the context menu of the module in M1plus.
- Enter name, save location and export file type.
- Import the module into the Knit Explorer of CREATE PLUS by double-click on the exported Import.bat file.
Further Information:
Select the Çok basamaklı artırma mode
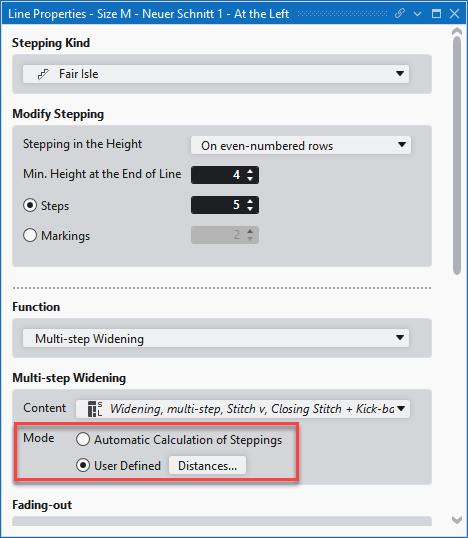
You can select the mode for the Fonksiyon Çok basamaklı artırma with the Çizgi özellikleri dialog box as well.
The following options are available:
- Otomatik basamak hesaplaması
- Kullanıcı tanımlı
Make the corresponding settings for Kullanıcı tanımlı option in the Mesafeler... dialog box.
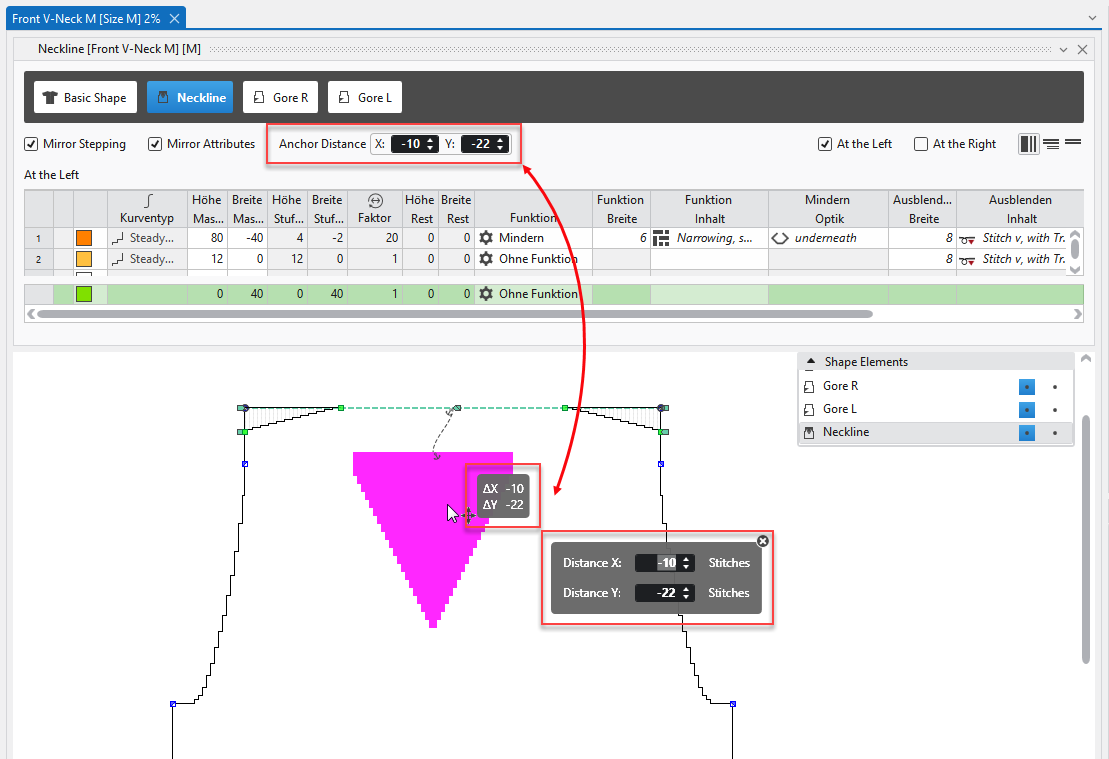
Anchor Distance in the Line Table
The Anchor Distance of a shape element is visible and editable in the line table.
Unstitch Asymmetric Shapes
Until now, you could separate only symmetrical shapes.
If you enter a distance in the properties of an asymmetrical shape, then this shape will be unstitched at the central axis by the technical processing.