Step by Step to 'Pattern-17'
- A pattern project with one pattern and the desired settings is created.
- 1
- To draw select any desired drawing tool under the 绘图 group.
- 2
- In the 花型颜色 tool window, select the desired pattern colors from the 纱线颜色 color palette (e.g. yarn colors # 3 and # 6) to create the pattern element.
- 3
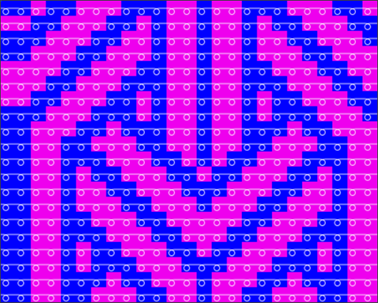
- Draw the desired pattern element in the
 设计花型.
设计花型.
|
Example of Pattern Element |
|
|
|
Width: 25 stitches Height: 20 rows |
- 4
- Select the height and width of the pattern element.
- 5
- Open the context menu and select 选择 -> 创建花型元素....
- Pattern element will be saved locally as
 花型元素.
花型元素. - 6
- Select the pattern element for drawing.
- 7
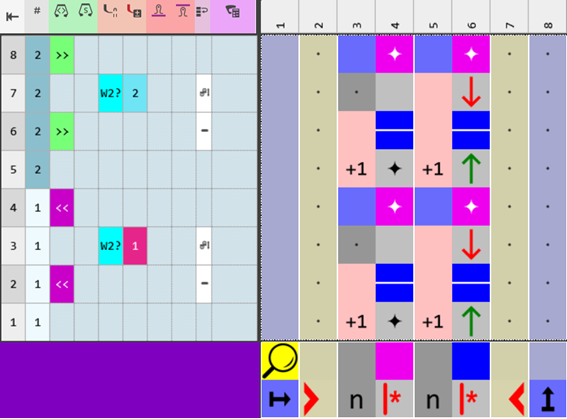
- Draw in the pattern element starting from the third pattern row of the 设计花型.
 : Keep a desired quantity of rows without pattern element (e.g. SJ with yarn color #6) at the end of the basic pattern.
 - 8
- Select the desired total height of pattern rows for CA#1 (e.g. 114 row) in the 花型行 control column.
- 9
- Position the cursor in the pattern area.
- 10
- Call up the context menu and select 选择 /
 颜色排列.
颜色排列.
- or -
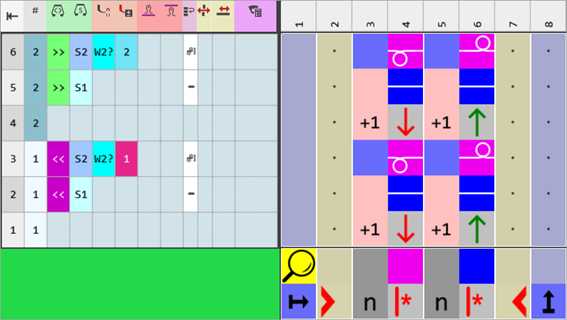
Click directly the button in the ribbon. - The Color Arrangement Editor appears with the original standard knitting process of the 2 pattern rows.
|
Original for 2 Color Arrangements |
|
|
- 11
- Insert the necessary quantity of rows into the executing area.
- 12
- Draw-in the needle actions for the structure and transferring into the color segments of the yarn colors #6 (pink) and #3 (blue).
- 13
- Make or correct entries in the 基准号码 column.
- 14
- Make entries to the following control columns:
-
 W 压脚 :
 - Activate weft yarn presser foot in the technical row 'enclose the weft yarn by knitting'
- Define the type of weft yarn presser foot.
: The  选择机器 dialog box graphically displays the position and the set type of weft yarn presser foot.
The following link opens the corresponding chapter of the online help:
: Use the Back button of the browser to go back chapter by chapter.
-
 压脚修正 :
 - If necessary, set a different ESCI index for each of both the carriage directions in those technical rows in which the weft yarn presser foot is active.: A placeholder entry in the pattern makes working on the machine easier
The following link opens the corresponding chapter of the online help:
: Use the Back button of the browser to go back chapter by chapter.
-
 工艺行排序 :
 - Into the technical row with the weft yarn:
 纬纱衬入行
纬纱衬入行 - Into the technical row to enclose the weft yarn by knitting
 纬纱封闭行
纬纱封闭行
The following link opens the corresponding chapter of the online help:
: Use the Back button of the browser to go back chapter by chapter.
-
 System
 -
: You can set a specific knitting system in the CA, but is not mandatory in this case.
|
Color Arrangement CA #1 |
|
|
- 15
- Check the generated Color Arrangement on correct entries with the
 检验 button.: The knitting procedure cannot be checked!
 - 16
- If necessary, in case of a Color Arrangement already used in the design pattern, apply the changes to the basic pattern with the
 应用 button.
- or -
Close the tool window with button.
 - 17
- Close the prompt with the desired button:
-
Save: Color Arrangement is saved locally in the
 颜色排列 tool window.
 - Reject: The changes will not be saved.
-
Copy: The changed Color Arrangement is saved as copy in the 颜色排列 tool window.
- 18
- If necessary, enter the CA#1 via the
 control column into the desired rows of the design pattern.
 - 19
- Select the desired height of pattern rows for allocating CA#2 in the 花型行 control column.
- 20
- Position the cursor in the pattern area.
- 21
- Call up the context menu and select 选择 / 颜色排列.
- or -
Click directly the button in the ribbon. - The Color Arrangement Editor appears with the original standard knitting process of the 2 pattern rows.
- 22
- Rename the Color Arrangement if necessary.
- 23
- Modify the original Color Arrangement CA#2 as follows:
|
Color Arrangement CA#2 (alternative) |
|
|
- 24
- Check the generated Color Arrangement on correct entries with the 检验 button.: The knitting procedure cannot be checked!
- 25
- If necessary, in case of a Color Arrangement already used in the design pattern, apply the changes to the basic pattern with the 应用 button.
- or -
Close the tool window with button. - 26
- Close the prompt with the desired button:
-
Save: Color Arrangement is saved locally in the 颜色排列 tool window.
- Reject: The changes will not be saved.
-
Copy: The changed Color Arrangement is saved as copy in the 颜色排列 tool window.
- 27
- If necessary, enter the CA#2 via the control column into the desired rows of the design pattern.: Only enter, if you want to use both CA's within one pattern.
- 28
- Click the
 导纱器 button under 预览 in the 起头 ribbon.
 - The document window is opened as view and the 导纱器 ribbon appears.
- 29
- Open the dialog box via
 显示导纱器.
 - 30
- If necessary, make the desired settings for allocating yarn carriers.
- 31
- Start the
 工艺
处理:
工艺
处理:
Show the 工艺花型织物视图.
|
Fabric View CA#1 + CA#2 |
|
|
- 32
- Generate
 Sintral.
 - 33
- Start the
 Sintral 检验.
 - 34
-
 提取 the knitting program.
 - A program for the knitting machine will be created: CMS530W.Pattern-17.zip.
- Load knitting program into the machine.
 : The extracted file CMS530W.Pattern-17.zip can be loaded onto the machine with an USB stick or via Ethernet.