Multi-Piece Knitting: Knitting two or more pieces side by side
Multi-piece knitting with tandem machine CMS 922 / 933
|
Without tandem mode, narrow coupled | |
|
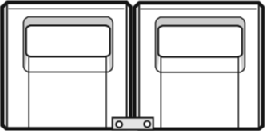
Single-piece knitting |
Multi-piece Knitting |
|
|
|
|
Tandem mode, wide coupled |
|
Knitting with Defined Coupling Width |
|
|
|
|
Examples for CMS 922 / 933 without tandem
|
机器 |
|
|
|
|
|
花型项目 | |
|
线模型项目 |
Without or with shape |
|
|
Working with several fabric pieces (Multi-piece Knitting)
|
|
|
|


Create New Pattern Project with One Pattern
- 1
- Enter any desired name.
名称 - 2
- Select a machine.
机器
Example for CMS 933 HP, E3,5.2 (classification 776)
|
| ||
|
1 |
Select the Machine Type | |
|
2 |
Define needle gauge and needle hook gauge | |
|
3 |
|
Tandem mode is disabled
|


- 3
- Define Knitting technique.
编织工艺
-
满针
Design Pattern is knitted with all needles.
- 4
- Select Filling Elements.
填充元素
- Any Yarn Color
- 带翻针前板线圈
- 5
- 尺寸
-
宽度
Input of the pattern width: 100 stitches -
高度
Input of the pattern height: 100 rows
- 6
- Select any knitting element for picking-up after pressing-off e.g. 脱布后起针,1x1,一编织系统.
刷布后起针 - 7
- Select the desired start with the desired settings:
- 起头,1x1
- 一个系统
- 不使用弹力纱
- 使安全行纱
- 放松行
Step by Step to the Pattern
- A pattern project with one pattern and the desired settings is created.
- 8
- Draw the desired structure with the desired yarn colors.
Example: Color stripes without and with structure - 9
- Open
 配置 dialog box in the ribbon at Configuration.
 - The dialog box appears.
- 10
- Select the 编织区域颜色 tab.
|
| |
|
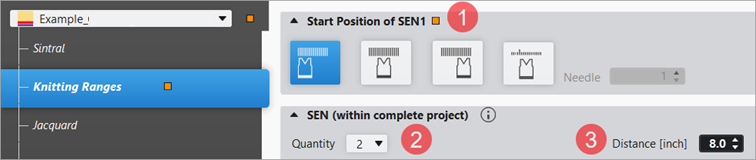
1 |
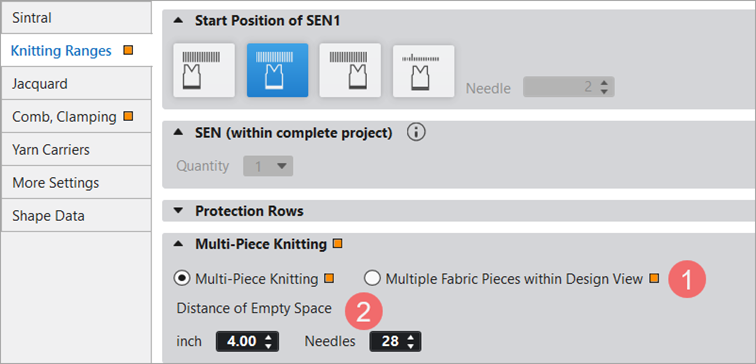
Positioning the fabric piece on the needle bed
Further information: Start Position of SEN1 |
|
2 |
Specifying the quantity of SEN areas Further information: SEN |
|
3 |
Distance between the SEN areas
Further information: SEN |
 : The pattern element is placed in the center of the needle bed.
- 11
- In the 编织区域颜色 section below 开始位置 SEN1, make the desired setting for positioning the fabric pieces in the needle bed.
- 12
- Make the following settings in the 编织区域颜色 section at SEN then:
- Desired quantity of fabric pieces on the needle bed:
- 1 to 4 fabric pieces are possible depending on the knitting width per fabric piece and the quantity of yarn carriers
- Distance between the fabric pieces – area outside the fabric pieces
- Depends upon the quantity of yarn carriers required per fabric piece.
- 13
- Click the
 导纱器 button under 预览 in the 起头 ribbon.
 - The document window is opened as view and the 导纱器 document window appears.
- 14
- Select the 编织区域 (SEN) section of the 导纱器 document window.
- The knitting areas (SEN) are displayed.
|
| |
|
1 |
Tab for multi-piece knitting on machines without comb |
|
2 |
Display and selection of all knitting areas with the default yarn carrier home positions
|
|
3 |
Change of the displayed yarn carrier home position |
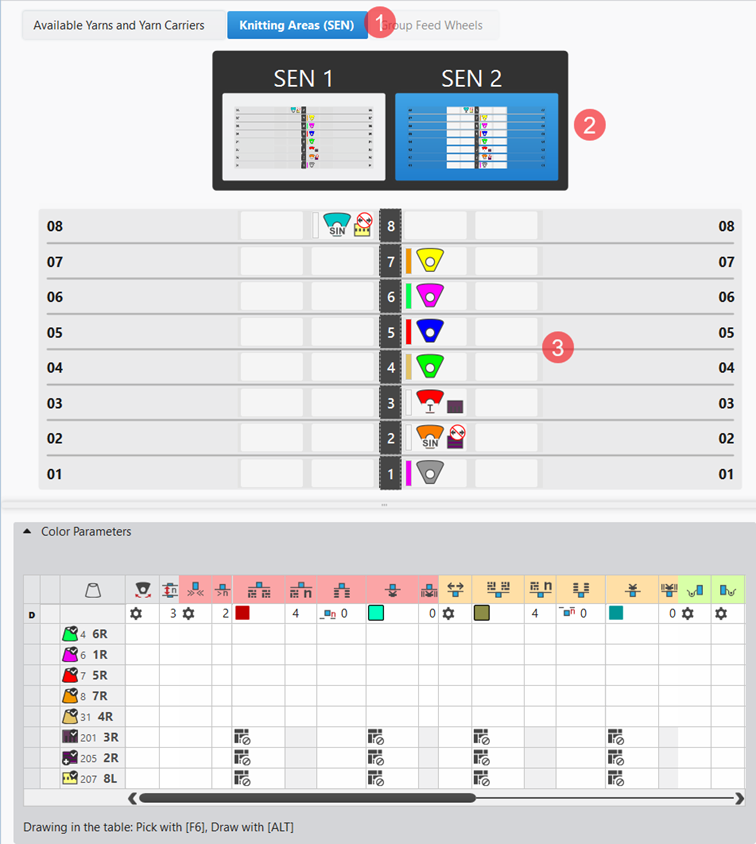
- 15
- Change the home positions of the yarn carriers if necessary.
- 16
- Start the
 工艺
处理:
工艺
处理: Show symbol view after technical processing.
 - 17
- Generate
 Sintral.
 - 18
- Start the
 Sintral 检验.
 - 19
-
 提取 the knitting program.
- A program for the knitting machine will be created: CMS933-6.Pattern_A.zip.
- Load knitting program into the machine.
 : The extracted file "CMS933-6.Pattern_A.zip" can be loaded onto the machine with an USB stick or via Ethernet.
Pattern_CMS933_oTandem
Examples for CMS 922 / 933 machines with tandem
|
机器 |
|
|
|
|
|
花型项目 | |
|
线模型项目 |
Without or with shape |
|
|
Working with several fabric pieces (Multi-piece Knitting)
|
|
|
|
Create a New Pattern Project:
- 20
- Enter any desired name.
名称 - 21
- Select a machine.
机器
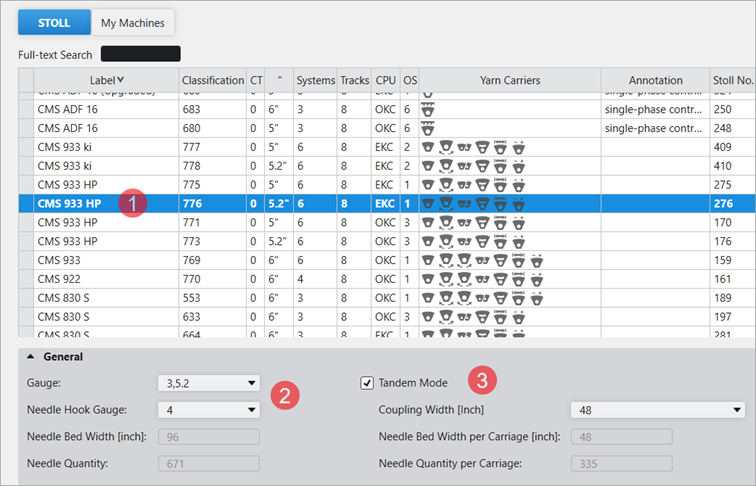
Example for CMS 933 HP, E3,5.2 (classification 776)
|
| |||
|
1 |
Select the Machine Type | ||
|
2 |
Define needle gauge and needle hook gauge | ||
|
3 |
|
Tandem Mode is enabled
| |
|
1 |
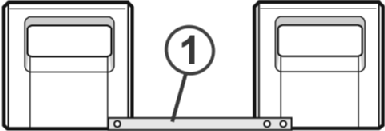
Coupling rod with different coupling widths | ||
- 22
- Enable
 分机头模式.
 - 23
- Select the desired coupling width in the 连接宽度 [英寸] selection list.
- 24
- Define Knitting technique.
编织工艺
-
满针
Design Pattern is knitted with all needles.
- 25
- Select Filling Elements.
填充元素
- Any Yarn Color
- 带翻针前板线圈
- 26
- 尺寸
-
宽度
Input of the pattern width: 100 stitches -
高度
Input of the pattern height: 100 rows
- 27
- Select any knitting element for picking-up after pressing-off e.g. 脱布后起针,1x1,一编织系统.
刷布后起针 - 28
- Select the desired start with the desired settings:
- 起头,1x1
- 一个系统
- 不使用弹力纱
- 使安全行纱
- 放松行
Step by Step to the Pattern
- A pattern project with one pattern and the desired settings is created.
- 29
- Draw the desired structure with the desired yarn colors.
Example: Color stripes without and with structure
- or -
Open the existing 花型项目 and save it with a new name. - 30
- Open 配置 dialog box in the ribbon at Configuration.
- The dialog box appears.
- 31
- Select the 编织区域颜色 tab.
|
| |
|
1 |
Positioning the fabric piece on the needle bed : Further information: Start Position of SEN1 |
|
2 |
Specifying the quantity of SEN areas per carriage
Further information: SEN |
|
3 |
Distance between the SEN areas per carriage
Further information: SEN |
- 32
- In the 编织区域颜色 section below 开始位置 SEN1, make the desired setting for positioning the fabric pieces in the needle bed.
- 33
- Make the following settings in the 编织区域颜色 section at SEN then:
- Desired quantity of fabric pieces on the needle bed:
- 1 fabric piece per carriage
- Distance between the fabric pieces per carriage – area outside the fabric pieces
- Depends upon the quantity of yarn carriers required per fabric piece.
- 34
- Click the 起头 button under 预览 in the 导纱器 ribbon.
- The document window is opened as view and the 导纱器 document window appears.
- 35
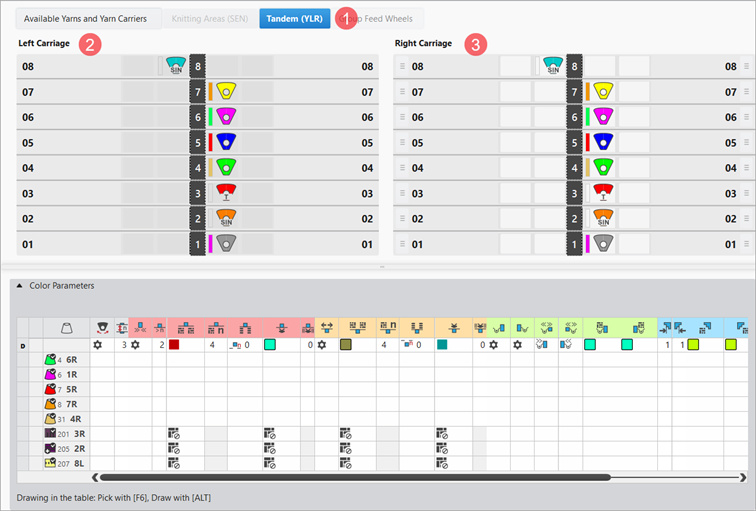
- Select the 导纱器 section of the 分机头 (YLR) document window.
- The yarn carrier home positions of the left and right carriage are displayed.
|
| |
|
1 |
Tap for tandem machines enabling the exchange of yarn carriers of left and right carriage
|
|
2 |
Display of the default yarn carrier home positions of the left carriage
|
|
3 |
Display of the default yarn carrier home positions of the right carriage
|
- 36
- Change the home positions of the yarn carriers if necessary.
- 37
- Start the 工艺
处理: Show symbol view after technical processing.
- 38
- Generate Sintral.
- 39
- Start the Sintral 检验.
- 40
-
提取 the knitting program.
- A program for the knitting machine will be created: CMS933-3.Pattern_A.zip.
- Load knitting program into the machine.
: The extracted file "CMS933-3.Pattern_A.zip" can be loaded onto the machine with an USB stick or via Ethernet.
Pattern_933_wTandem
Multi-piece knitting is available on all types of machines with comb take-down
Disabling the comb take-down
- Comb: Disabled
- Clamping & Cutting: Disabled
|
Single-piece knitting without comb (standard) |
Multi-piece Knitting without Comb |
|
|
|
|
| |
Enabling the comb take-down
- Comb: Enabled
- Clamping & Cutting: Enabled
|
Single-piece knitting with comb (standard) |
Multi-piece Knitting with Comb |
|
|
|


Examples for all machines with comb take-down: Comb Disabling
机器 |
|
|
|
花型项目 | |
线模型项目 | Without or with shape |
| Working with several fabric pieces (Multi-piece Knitting)
|
|
|
Create New Pattern Project with One Pattern
- 41
- Enter any desired name.
名称 - 42
- Select a machine.
机器
Example for CMS 530 HP, E3,5.2 (classification 656) - 43
- Define Knitting technique.
编织工艺
- 满针
Design Pattern is knitted with all needles.
- 44
- Select Filling Elements.
填充元素
- Any Yarn Color
- 带翻针前板线圈
- 45
- 尺寸
- 宽度
Input of the pattern width: 100 stitches - 高度
Input of the pattern height: 100 rows - 牵拉梳
Cancel selection
- 46
- Select any knitting element for picking-up after pressing-off e.g. 脱布后起针,1x1,一编织系统.
刷布后起针 - 47
- Select the desired start with the desired settings:
- 起头,1x1
- 一个系统
- 不使用弹力纱
- 使安全行纱
- 放松行
Step by Step to the Pattern
- A pattern project with one pattern and the desired settings is created.
- Comb is disabled for the entire pattern project.
- 48
- Draw the desired structure with the desired yarn colors.
Example: Color stripes without and with structure
- or -
Open the existing 花型项目, save it with a new name and change the machine type if desired. - 49
- Open 配置 dialog box in the ribbon at Configuration.
- The dialog box appears.
- 50
- Select the 编织区域颜色 tab.
| |
1 | Positioning the fabric piece on the needle bed
Further information: Start Position of SEN1 |
2 | Specifying the quantity of SEN areas Further information: SEN |
3 | Distance between the SEN areas
Further information: SEN |
- 51
- In the 编织区域颜色 section below 开始位置 SEN1, make the desired setting for positioning the fabric pieces in the needle bed.
- 52
- Make the following settings in the 编织区域颜色 section at SEN then:
- Desired quantity of fabric pieces on the needle bed:
- 1 to 4 fabric pieces are possible depending on the knitting width per fabric piece and the quantity of yarn carriers
- Distance between the fabric pieces – area outside the fabric pieces
- Depends upon the quantity of yarn carriers required per fabric piece.
 : Watch out the quantity of yarn carriers at the machine!
- 53
- Click the 起头 button under 预览 in the 导纱器 ribbon.
- The document window is opened as view and the 导纱器 document window appears.
- 54
- Select the 导纱器 section of the 编织区域 (SEN) document window.
- The selected quantity of knitting areas (SEN) is displayed.
| |
1 | Tab for multi-piece knitting on machines without comb |
2 | Display and selection of all knitting areas with the default yarn carrier home positions
|
3 | Change of the displayed yarn carrier home position |
- 55
- Change the home positions of the yarn carriers if necessary.
- 56
- Start the 工艺
处理: Show symbol view after technical processing.
- 57
- Generate Sintral.
- 58
- Start the Sintral 检验.
- 59
- 提取 the knitting program.
- A program for the knitting machine will be created: CMS530.Pattern_A.zip.
- Load knitting program into the machine.
: The extracted file "CMS530.Pattern_A.zip" can be loaded onto the machine with an USB stick or via Ethernet.
Pattern_530_withoutComb
Examples for all machines with comb take-down Enabling the Comb
机器 |
|
|
|
花型项目 | |
线模型项目 | Without or with shape |
| Working with several fabric pieces (Multi-piece Knitting)
|
|
|
Create New Pattern Project with One Pattern
- 60
- Enter any desired name.
名称 - 61
- Select a machine.
机器
Example for CMS 530 HP, E3,5.2 (classification 656) - 62
- Define Knitting technique.
编织工艺
- 满针
Design Pattern is knitted with all needles.
- 63
- Select Filling Elements.
填充元素
- Any Yarn Color
- 带翻针前板线圈
- 64
- 尺寸
- 宽度
Input of the pattern width: 100 stitches - 高度
Input of the pattern height: 100 rows - 牵拉梳
Activate Selection
- 65
- Select the desired start with the desired settings:
- 起头,1x1
- 一个系统
- 不使用弹力纱
- 使安全行纱
- 放松行
Step by Step to the Pattern with Comb
- A pattern project with one pattern and the desired settings is created.
- Comb is enabled for the entire pattern project.
- 66
- Draw the desired structure with the desired yarn colors.
Example: Color stripes without and with structure
- or -
Open the existing 花型项目, save it with a new name and change the machine type if desired. - 67
- Open 配置 dialog box in the ribbon at Configuration.
- The dialog box appears.
- 68
- Select the 编织区域颜色 tab.
|
| ||
|
1 |
|
Multi-piece knitting is not available on machines with comb . |
|
|
Multi-piece knitting is available on machines with comb, whereby two identical fabric pieces are knitted next to each other.
| |
|
2 |
Distance from the left fabric piece center to the right fabric piece center
| |
|
3 |
Distance between left and right fabric piece
| |
- 69
- In the 编织区域颜色 section below 开始位置 SEN1, make the desired setting for positioning the fabric pieces in the needle bed.
- 70
- Enable the checkbox at 多片编织 of the 多片编织 section.
- 71
- Activate the desired selection e.g.
 中间间距.
中间间距. - 72
- Click the 起头 button under 预览 in the 导纱器 ribbon.
- The document window is opened as view and the 导纱器 document window appears.
: All yarn carrier of the pattern get doubled!
Exception: Not the yarn carrier for the comb thread!
- 73
- Change the home positions of the yarn carriers if necessary.
- 74
-
Start the 工艺
处理: Show symbol view after technical processing.
- 75
-
Generate Sintral.
- 76
-
Start the Sintral 检验.
- 77
-
提取 the knitting program.
- A program for the knitting machine will be created: CMS530.Pattern_A.zip.
- Load knitting program into the machine.
: The extracted file "CMS530.Pattern_A.zip" can be loaded onto the machine with an USB stick or via Ethernet.
Pattern_530_withComb
Multi-piece knitting with CMS 822
|
Working modes of CMS 822 | |||
|
Without Tandem
|
With Tandem
| ||
|
|
|
|
|
|
Without Comb |
With Comb |
Without Comb |
With Comb
|


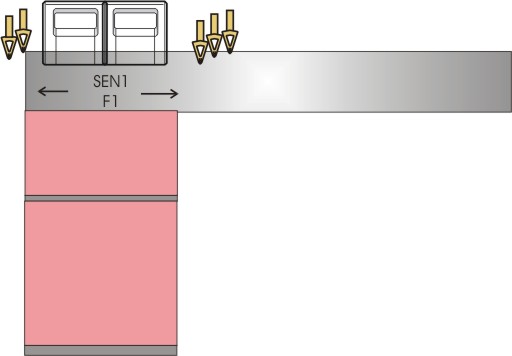
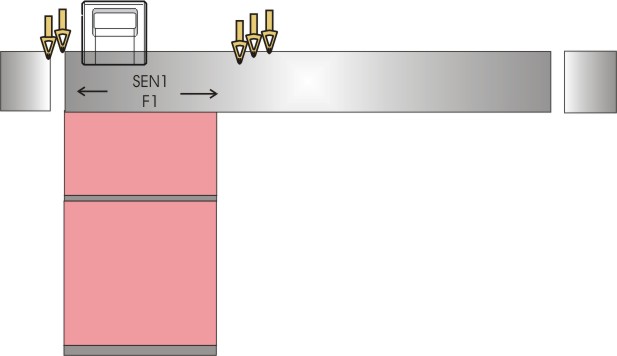
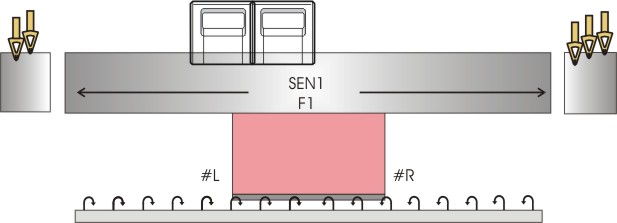
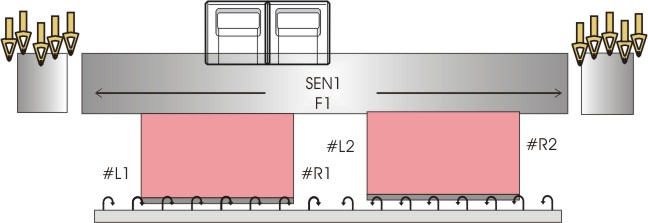
Machine CMS 822 without Tandem but without Comb Take-down
- Without tandem mode
- Narrow coupled:
- Comb take-down Disabling
- Comb: Disabled
- Clamping & Cutting: Disabled
|
Single-piece knitting without comb (standard) |
Multi-piece Knitting without Comb |
|
|
|
|
: | |
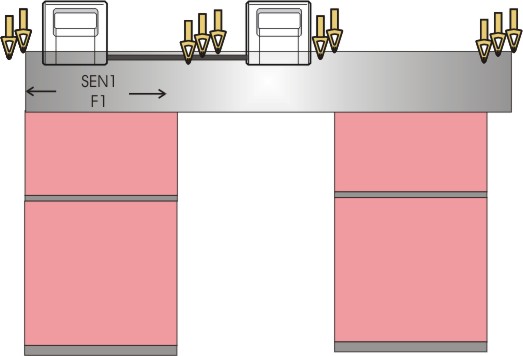
Machine CMS 822 without tandem and with comb take-down
- Without tandem mode
- Narrow coupled:
- Enabling comb take-down
- Comb: Enabled
- Clamping & Cutting: Enabled
|
Knitting without tandem mode with comb (standard) |
Knitting without tandem mode with comb (2 fabric pieces) |
|
|
|
|
| |
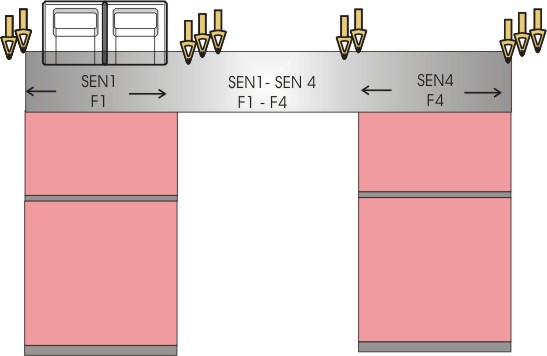
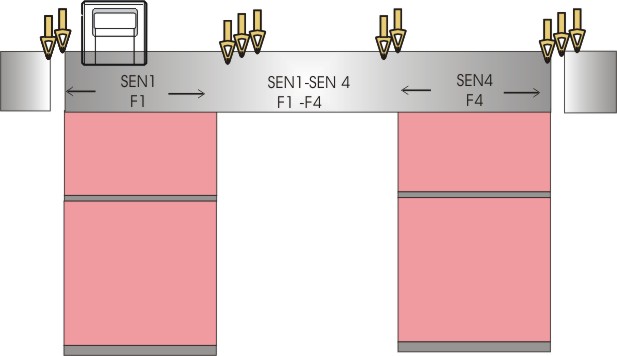
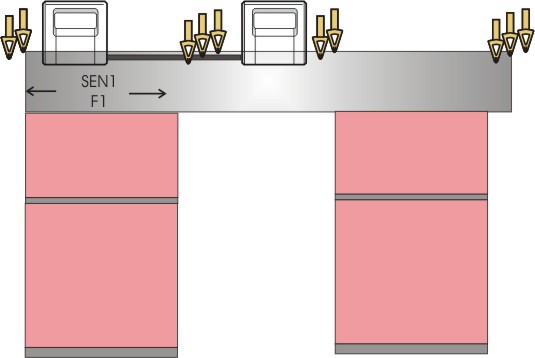
Machine CMS 822 without tandem and without comb take-down
- With Tandem Mode
- Wide coupled
- Comb take-down Disabling
- Comb: Disabled
- Clamping & Cutting: Disabled
|
Knitting in tandem mode without comb |
|
|
|
|
|
|
Machine CMS 822 with tandem and with comb take-down
- With Tandem Mode
- Wide coupled
- Comb Enabling
- Comb: Enabled
- Clamping & Cutting: Enabled
|
Knitting in tandem mode with comb |
|
|
Example for CMS 822 Tandem with Comb: Narrow Coupled + Comb Disabling
机器 |
|
|
|
花型项目 | |
线模型项目 | Without or with shape |
| Working with several fabric pieces (Multi-piece Knitting)
|
|
|
Create New Pattern Project with One Pattern
- 78
- Enter any desired name.
名称 - 79
- Select a machine.
机器
Example for CMS 822 ki, E3,5.2 (classification 827)
| ||
1 | Select the Machine Type | |
2 | Define needle gauge and needle hook gauge | |
3 |
| Tandem mode is disabled
|
- 80
- Define Knitting technique.
编织工艺
- 满针
Design Pattern is knitted with all needles.
- 81
- Select Filling Elements.
填充元素
- Any Yarn Color
- 带翻针前板线圈
- 82
- 尺寸
- 宽度
Input of the pattern width: 100 stitches - 高度
Input of the pattern height: 100 rows - 牵拉梳
Cancel selection
- 83
- Select any knitting element for picking-up after pressing-off e.g. 脱布后起针,1x1,一编织系统.
刷布后起针 - 84
- Select the desired start with the desired settings:
- 起头,1x1
- 一个系统
- 不使用弹力纱
- 使安全行纱
- 放松行
Step by Step to the Pattern
- A pattern project with one pattern and the desired settings is created.
- Comb is disabled for the entire pattern project.
- 85
- Draw the desired structure with the desired yarn colors.
Example: Color stripes without and with structure
- or -
Open the existing 花型项目, save it with a new name and change the machine type if desired. - 86
- Open 配置 dialog box in the ribbon at Configuration.
- The dialog box appears.
- 87
- Select the 编织区域颜色 tab.
| |
1 | Positioning the fabric piece on the needle bed
Further information: Start Position of SEN1 |
2 | Specifying the quantity of SEN areas Further information: SEN |
3 | Distance between the SEN areas
Further information: SEN |
- 88
- In the 编织区域颜色 section below 开始位置 SEN1, make the desired setting for positioning the fabric pieces in the needle bed.
- 89
- Make the following settings in the 编织区域颜色 section at SEN then:
- Desired quantity of fabric pieces on the needle bed:
- 1 to 4 fabric pieces are possible depending on the knitting width per fabric piece and the quantity of yarn carriers
- Distance between the fabric pieces – area outside the fabric pieces
- Depends upon the quantity of yarn carriers required per fabric piece.
: Watch out the quantity of yarn carriers at the machine!
- 90
- Click the 导纱器 button under 预览 in the 起头 ribbon.
- The document window is opened as view and the 导纱器 document window appears.
- 91
- Select the 编织区域 (SEN) section of the 导纱器 document window.
- The selected quantity of knitting areas (SEN) is displayed.
| |
1 | Tab for multi-piece knitting on machines without comb |
2 | Display and selection of all knitting areas with the default yarn carrier home positions
|
3 | Change of the displayed yarn carrier home position |
- 92
- Change the home positions of the yarn carriers if necessary.
- 93
- Start the 工艺
处理: Show symbol view after technical processing.
- 94
- Generate Sintral.
- 95
- Start the Sintral 检验.
- 96
- 提取 the knitting program.
- A program for the knitting machine will be created: CMS822.Pattern_A.zip.
- Load knitting program into the machine.
: The extracted file "CMS822.Pattern_A.zip" can be loaded onto the machine with an USB stick or via Ethernet.
CMS822_oT+oC
Example for CMS 822 Tandem with Comb: Narrow Coupled + Enabling the Comb
机器 |
|
|
|
花型项目 | |
线模型项目 | Without or with shape |
| Working with several fabric pieces (Multi-piece Knitting)
|
|
|
Create New Pattern Project with One Pattern
- 97
- Enter any desired name.
名称 - 98
- Select a machine.
机器
Example for CMS 822 ki, E3,5.2 (classification 827) - 99
- Define Knitting technique.
编织工艺
- 满针
Design Pattern is knitted with all needles.
- 100
- Select Filling Elements.
填充元素
- Any Yarn Color
- 带翻针前板线圈
- 101
- 尺寸
- 宽度
Input of the pattern width: 100 stitches - 高度
Input of the pattern height: 100 rows - 牵拉梳
Activate Selection
- 102
- Select the desired start with the desired settings:
- 起头,1x1
- 一个系统
- 不使用弹力纱
- 使安全行纱
- 放松行
CMS822_oT+mC
Example for CMS 822 Tandem with Comb: Wide Coupled + Comb Disabling
机器 |
|
|
|
花型项目 | |
线模型项目 | Without or with shape |
| Working with several fabric pieces (Multi-piece Knitting)
|
|
|
Create a New Pattern Project:
- 103
- Enter any desired name.
名称 - 104
- Select a machine.
机器
Example for CMS 822 ki, E3,5.2 (classification 827)
| |||
1 | Select the Machine Type | ||
2 | Define needle gauge and needle hook gauge | ||
3 |
| Tandem Mode is enabled
| |
1 | Coupling rod with different coupling widths | ||
- 105
- Enable 分机头模式.
- 106
- Select the desired coupling width in the 连接宽度 [英寸] selection list.
- 107
- Define Knitting technique.
编织工艺
- 满针
Design Pattern is knitted with all needles.
- 108
- Select Filling Elements.
填充元素
- Any Yarn Color
- 带翻针前板线圈
- 109
- 尺寸
- 宽度
Input of the pattern width: 100 stitches - 高度
Input of the pattern height: 100 rows - 牵拉梳
Cancel selection
- 110
- Select any knitting element for picking-up after pressing-off e.g. 脱布后起针,1x1,一编织系统.
刷布后起针 - 111
- Select the desired start with the desired settings:
- 起头,1x1
- 一个系统
- 不使用弹力纱
- 使安全行纱
- 放松行
Step by Step to the Pattern
- A pattern project with one pattern and the desired settings is created.
- Comb is disabled for the entire pattern project.
- 112
- Draw the desired structure with the desired yarn colors.
Example: Color stripes without and with structure
- or -
Open the existing 花型项目 and save it with a new name. - 113
- Open 配置 dialog box in the ribbon at Configuration.
- The dialog box appears.
- 114
- Select the 编织区域颜色 tab.
| |
1 | Positioning the fabric piece on the needle bed
Further information: Start Position of SEN1 |
2 | Specifying the quantity of SEN areas per carriage
Further information: SEN |
3 | Distance between the SEN areas per carriage
Further information: SEN |
- 115
- In the 编织区域颜色 section below 开始位置 SEN1, make the desired setting for positioning the fabric pieces in the needle bed.
- 116
- Make the following settings in the 编织区域颜色 section at SEN then:
- Desired quantity of fabric pieces on the needle bed:
- 1 fabric piece per carriage
- Distance between the fabric pieces per carriage – area outside the fabric pieces
- Depends upon the quantity of yarn carriers required per fabric piece.
- 117
- Click the 导纱器 button under 预览 in the 起头 ribbon.
- The document window is opened as view and the 导纱器 document window appears.
- 118
- Select the 分机头 (YLR) section of the 导纱器 document window.
- The yarn carrier home positions of the left and right carriage are displayed.
| |
1 | Tap for tandem machines enabling the exchange of yarn carriers of left and right carriage
|
2 | Display of the default yarn carrier home positions of the left carriage
|
3 | Display of the default yarn carrier home positions of the right carriage
|
- 119
- Change the home positions of the yarn carriers if necessary.
- 120
- Start the 工艺
处理: Show symbol view after technical processing.
- 121
- Generate Sintral.
- 122
- Start the Sintral 检验.
- 123
- 提取 the knitting program.
- A program for the knitting machine will be created: CMS822-2.Pattern_A.zip.
- Load knitting program into the machine.
: The extracted file "CMS822-2.Pattern_A.zip" can be loaded onto the machine with an USB stick or via Ethernet.
CMS822_mT+oC
Example for CMS 822 Tandem with Comb: Narrow Coupled + Enabling the Comb
机器 |
|
|
|
花型项目 | |
线模型项目 | Without or with shape |
| Working with several fabric pieces (Multi-piece Knitting)
|
|
|
Create a New Pattern Project:
- 124
- Enter any desired name.
名称 - 125
- Select a machine.
机器
Example for CMS 822 ki, E3,5.2 (classification 827)
| |||
1 | Select the Machine Type | ||
2 | Define needle gauge and needle hook gauge | ||
3 |
| Tandem Mode is enabled
| |
1 | Coupling rod with different coupling widths | ||
- 126
- Enable 分机头模式.
- 127
- Select the desired coupling width in the 连接宽度 [英寸] selection list.
- 128
- Define Knitting technique.
编织工艺
- 满针
Design Pattern is knitted with all needles.
- 129
- Select Filling Elements.
填充元素
- Any Yarn Color
- 带翻针前板线圈
- 130
- 尺寸
- 宽度
Input of the pattern width: 100 stitches - 高度
Input of the pattern height: 100 rows - 牵拉梳
Activate Selection
- 131
- Select the desired start with the desired settings:
- 起头,1x1
- 一个系统
- 不使用弹力纱
- 使安全行纱
- 放松行
Step by Step to the Pattern
- A pattern project with one pattern and the desired settings is created.
- Comb is enabled for the entire pattern project.
- 132
- Draw the desired structure with the desired yarn colors.
Example: Color stripes without and with structure
- or -
Open the existing 花型项目 and save it with a new name. - 133
- Open 配置 dialog box in the ribbon at Configuration.
- The dialog box appears.
| ||
1 |
| Multi-piece knitting is not available on machines with comb |
| Multi-piece knitting is available on machines with comb, whereby two identical fabric pieces are knitted next to each other.
| |
2 | Distance from the left fabric piece center to the right fabric piece center
| |
3 | Distance between left and right fabric piece
| |
- 134
- In the 编织区域颜色 section below 开始位置 SEN1, make the desired setting for positioning the fabric pieces in the needle bed.
- 135
- Enable the checkbox at 多片编织 of the 多片编织 section.
- 136
- Activate the desired selection e.g. 中间间距.
- 137
- Click the 导纱器 button under 预览 in the 起头 ribbon.
- The document window is opened as view and the 导纱器 document window appears.
: All yarn carrier of the pattern get doubled!
Exception: Not the yarn carrier for the comb thread!
- 138
- Change the home positions of the yarn carriers if necessary.
- 139
- Start the 工艺
处理: Show symbol view after technical processing.
- 140
- Generate Sintral.
- 141
- Start the Sintral 检验.
- 142
- 提取 the knitting program.
- A program for the knitting machine will be created: CMS822-2.Pattern_A.zip.
- Load knitting program into the machine.
: The extracted file "CMS822-2.Pattern_A.zip" can be loaded onto the machine with an USB stick or via Ethernet.
CMS822_mT+mC