Step by Step to 'Pattern-3B'
 : Using a Color Arrangement
- A pattern project with one pattern and the desired setting WITHOUT start is created.
- 1
- Draw the desired motif of SJ combined with DJ areas in the
 设计花型 without start.
 - 2
- Therefore, use the desired pattern colors and the corresponding sub-colors of the 库颜色 color palette in the 花型颜色 tool window for drawing.
: The yarn carriers are not automatically placed on the yarn carrier rails.
The yarn carrier home position is determined in the 工艺处理.
: When drawing pay attention to the distances between the color fields.
|
Basic pattern with 19 magazine colors and the corresponding sub-colors | ||
|
| ||
|
| ||
|
Neckline of the basic pattern | ||
|
| ||
|
1 |
SJ structure
| |
|
2 |
SJ combined with DJ structure | |
|
A |
| |
|
B |
| |
|
3 |
SJ structure
| |
|
4 |
SJ combined with DJ structure | |
|
A |
| |
|
B |
| |


- 3
- In the 花型行 control column, select the first 2 pattern rows.
- or -
Select the total height of the pattern area for the CA. - 4
- Position the cursor in the pattern area.
- 5
- Select 选择 /
 颜色排列 in the context menu.
- or -
Click directly the button in the ribbon. - The Color Arrangement Editor appears with the original 'Default knitting process' of the 2 selected pattern rows.
- 6
- Make the desired changes in the Color Arrangement:
- Combining the yarn carriers on 2 systems: Watch the distances between the color sections.
- Allocate new indices of stitch lengths for the DJ structure to the control column.
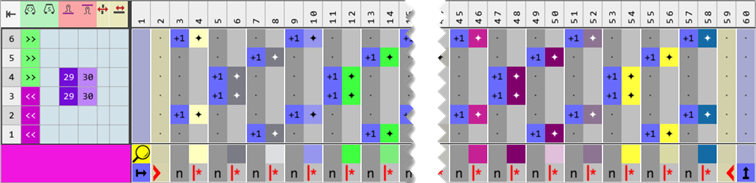
|
Part of Color Arrangement CA1 |
|
|
- 7
- Check the generated Color Arrangement on correct entries with the
 检验 button.: The knitting procedure cannot be checked!
 - 8
- If necessary, in case of a Color Arrangement already used in the design pattern, apply the changes to the basic pattern with the
 应用 button.
- or -
Close the tool window with .
. - 9
- Close the prompt with the desired button:
- 10
- Enter the generated Color Arrangement via the
 control column into the desired rows of the design pattern.
 - 11
- If necessary, create another Color Arrangement for the last 2 pattern rows to assign new stitch length indices to the last pattern row.
|
Part of Color Arrangement CA2 (End) |
|
|

- 12
- Make the desired settings in the
 导纱器 tool window.
- 编织带入
- 编织带出
- 边界处理 etc.
- 13
- Make the desired presets in the following control columns:
- 线圈长度 (NP)
- 主牵拉(WMF)
- 速度 (MSEC)
- 14
- Enable the 'split' system function in the machine attributes if desired.
- 15
- Make all steps to create the pattern.
 : The extracted file ADF530-32W.Pattern-3B.zip can be loaded onto the machine with an USB stick or via Ethernet.