Step by Step to 'Pattern-5'
- A pattern project with one pattern and the desired settings is created.
- 1
- To draw select any desired drawing tool under the 绘图 group.
- 2
- In the 花型颜色 tool window, select the desired pattern colors from the 纱线颜色 color palette to draw the motif:
- 3
- Draw the desired motif in the
 设计花型.
设计花型.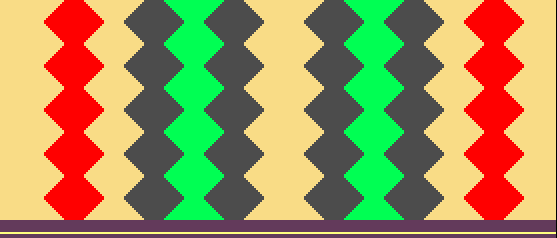
- 4
- Draw additional yarn colors for the inverse plating area in the design pattern.
 : The corresponding yarn colors for creating the plating colors must be available for each inverse plating area.
- Area 1 (left): Yarn color #2 and yarn color #4
- Area 2 (right): Yarn color #3 and yarn color #10

- 5
- Open the 添纱颜色 dialog box with
 in the 花型颜色 tool window.
 - 6
- In the tool window, enter the yarn colors used for area 1 in row P1 under columns A and B.
- 7
- Paste the used yarn colors in exchanged order under P2.
: The exchange of yarn colors in the 添纱颜色 tab determines the change (inverse plating) of the yarn carriers.
- 8
- Use the same procedure with the corresponding yarn colors to create the plating colors P3 and P4 for area 2.
- 9
- Open the Plating Offset (YPI) table.
- The 添纱偏移 (YPI) tab of the Pattern Parameters dialog box appears.
- 10
- Select YPI index (1) and assign it to both yarn colors in column A for P1 and P2.
- 11
- Select YPI index (2) and assign it to both yarn colors in column B for P1 and P2.
- 12
- Enter the settings for the selected YPI indices in the table.
- 13
- Create two new entries for the use with the plating colors P3 and P4 in the 用户 table of the 添纱偏移 (YPI) tab.
- 14
- Use the same procedure to allocate the new YPI indices to the plating colors P3 and P4.
|
|
|
|
|
Inverse plating (with system change) For the so called Inverse Plating (with system change), a different plating color is required for each color change. |

- 15
- Draw the plating colors P1 + P2 into area 1 (left) of the design pattern.
- 16
- Draw the plating colors P3 + P4 into area 2 (right) of the design pattern.
- 17
- If desired, define a cycle for length control in the
 control column.
 - 18
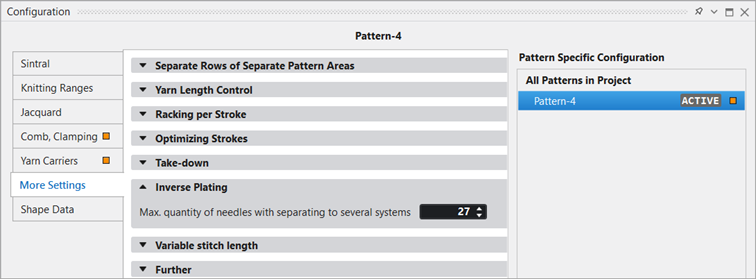
- If desired, modify the value under 反向添纱 in the 更多设置 tab of Configuration:
|
| |
|
|
Maximum quantity of needles with separating knitting rows to several systems.
|

- 19
- Make the desired settings in the
 导纱器 tool window.
- 编织带入
- 编织带出
- 边界处理 etc.
- 20
- Make the desired setting at 合并导纱器 in the 更多设置 tab of the 配置 dialog box.
- Do not combine: Long run time
- Combining with high productivity (default): Short run time due to optimized knitting sequence
- Same Knitting Rhythm : Average run time due to constant knitting sequence
- 在颜色加宽部分固定纱线垫入: Short run time in compliance with the rules for safe yarn insertion (tuck binding at the yarn field border).
- Same Knitting Rhythm and Secure Yarn Insertion : Average run time in compliance with the rules for safe yarn insertion.
- 21
- Enable the 'split' system function in the machine attributes if desired.
- 22
- Carry out all the steps of processing.
 : The extracted file ADF530-32W.Pattern-5.zip can be loaded onto the machine with an USB stick or via Ethernet.