Create a new pattern project with one pattern
Dialog Box: New Pattern Project
- 1
-
Name
Enter the desired name for the pattern project. : The first design pattern automatically receives the same name.
 - 2
- Machine
- Display of the selected machine type.
- Press the Change Machine button, to change the machine type:
-
STOLL :
Selection of a STOLL standard machine -
My Machines
:
Selection of a machine created by yourself
: With private machines it is possible to allocate machine-specific Options and System Functions.
- Open the STOLL tab.
- Select the desired machine in the selection list.

- Example: CMS 530HP, E 3,5.2, Classification 656
- Select the context menu Create My Machine.
- Enter the machine name / specifications and confirm with OK.
- Select the created machine -> Open the context menu Properties.
- Make the desired entries.: IP address for the Ethernet connection to the machine.
- 3
- Knitting Technique
-
All Needles:
Design pattern is knitted with all needles (example). -
1x1 Technique :
Design Pattern is knit in 1x1 Technique.
- 4
- Filling Elements :
- Select the yarn color for the design pattern.
- Select the structure element for the design pattern.
- 5
- Dimension
- 6
-
Width
Input of the pattern width: 200 stitches. - 7
-
Height
Input of the pattern height: 300 rows. - 8
-
 Comb:
Comb:
-
Comb Thread
 Module :
Usage of the Comb Thread technical module.: Clamping at Fabric End in the Cast-off Function (RS17=0) : Is automatically enabled, when Comb is selected.
- 9
- Start:
- Selection of the module for the Start
Example: Start, 1x1 . -
Quantity of Systems:
Selection of the quantity of working Systems for the Start
Example: 1 system -
1 system:
The Start is knitted with one system / 1 yarn carrier.
- or -
2 systems :
The Start is knitted with 2 systems / 2 yarn carriers. -
: The knitted structure becomes more even due to knitting the start with 1 system.
-
Elastic Thread:
Selection of the technical module for without / with elastic thread -
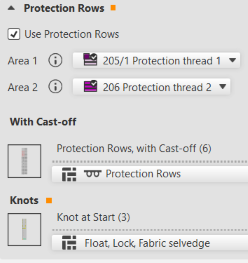
Protection Yarn :
Selection of a technical module for without / with protection thread.
-
With Protection Thread
:
Preparation rows are knitted with a separate yarn carrier (Technical Color #205). (recommended).
- or -
Without Protection Thread : Preparation rows are knitted with the same yarn carrier as the Start (Technical Color #201) (not recommendable).
: Working with protection thread saves thread because of the usage of cheaper thread as protection thread.
- The yarn carrier with the protection thread for the protection rows will be clamped after the start and knitted-in again at the fabric end.
-
Recommendation:
Use the knot module Float, Lock, Fabric selvedge for the knitting-in of the protection thread in the protection rows at the fabric end.
Result: This way it is avoided that the thread at the fabric selvedge does not lay-in. - Setting in Configuration -> Knitting Ranges -> Protection Rows
-
Transition:
Selection of the kind of transition from the start to the basic pattern -
: An extra NP (NP4) index is assigned to this last row in the start, so that the stitch tension can be changed for a safe transfer.
- 10
- Confirm entries with the OK button.
- The pattern project appears.